From falls & poppers to plaiting & cracking technique, this section is dedicated in memory of Sergei, IndyGear Staff Member and Whip Guru. Always remember to keep "Celebratin' Life!"
First off, let me thank the moderators and the administration for allowing me the opportunity to make a fool of myself and leave photographic evidence while doing so. In all seriousness though, thanks to all the staff for letting me put this up with more than the usual six photos per thread. I hope that I can gain more insight from doing so, and hope that those who follow can learn from my mistakes as well.
I've seen a few build logs for leather whips, but haven't seen any for nylon whips. Perhaps I didn't dig deep enough with the search feature, but I hope that this thread will prove to be a good resource for members in the future who decide to make their own nylon whip.
My aim is to make an eight foot Raiders style paracord whip. I plan on having two braided bellies, possibly bolsters depending on how the thickness and taper of the whip develops, and the overlay.
Feedback is extremely welcome, especially if it is constructive in nature.
One last thing, I have no idea what on earth I am doing. Let's get to it. First photos will be up tonight or tomorrow.
I've successfully made several nylon (and many more UN-successful ! ) whips over the past few years. While I have no illusions of going on to be the next Joe Strain, whip-making as a hobby really helped me understand the whip and how it works much better than cracking alone.
Here's some general things that will help;
Keep patient.
Keep a journal of all your measurements, strand counts, drops, etc...
It's easy to get in the groove while plaiting. Make sure to stop and look at your work every so often. Don't be afraid to back up and re-do something if(when) you find a mistake.
Cut your strands longer than you think you will need. (Para-cord is cheap and finding out you have a strand that is too short really *****.)
kwad wrote:SJ,
Cut your strands longer than you think you will need. (Para-cord is cheap and finding out you have a strand that is too short really *****.)
And double, triple, quadruple, quintuple check measurements! Ok, maybe not that extreme, but seriously, double check the numbers. Even when you KNOW you've got them right.
One mistake I made on, I think, my second whip was embarrassingly stupid. For my 8 and 12 plait bellies, I don't cut each strand to length. I double them up. So if I'm doing, say, a 12 plait, I use 6 strands. If I need 12 feet for a strand, I'll really need to DOUBLE that to a 24 foot length of cord, and so on. And guess what I did? Yeah. Not so much with the doubling. And to add to the stupid, it took me awhile to figure out why I was running out of cord too soon because I KNEW that I had measured out the lengths correctly (and I did -- just didn't double them).
I'm afraid pics are going to be delayed until tomorrow. I had already started plaiting on the first belly and had gotten a couple of inches past the handle but decided to undo it and start over. This is the third time I've started over actually.
The good news is that this will give me a chance to take and record the measurements of the individual strands that make the core, which I forgot to do .
With any luck I should have enough done to post some pics tomorrow.
I initially was going to use a nail for the handle foundation but decided that it was too thick. I was hand filing a rebate in it and it was taking forever so I looked around the garage and I found a scrap piece of metal with a large flat head on the end of it that was 8.5" long and 2 cm in diameter and seemed strong enough, I couldn't get it to flex at all even when I put it in a vise and put my full weight on it. I figure it will work at least for this first whip.
I decided to do a 4 plait over three gutted paracord strands. The longest is 62", the next longest is 40" and is filled with copper coated bbs, the shortest is 18.5". The strands I used for the 4 plait were 91" long. I thought plaiting the core would help to build the whip up in diameter without having to resort to taping it. I'm not sure though if it made much of a difference.
I want to build it up a bit more before I start plaiting the first belly should I bind it with artificial sinew or use tape?
EDIT: I put the photo of the first attempt up twice. The second photo is now correct.
Indeed there are. I got so busy plaiting that I couldn't find the time to upload the pics. Anyways here they are.
This was my first attempt at a plaited core, but I didn't like the way it turned out so I started over.
Here is the second attempt. Much better in my opinion. The binding is over the transition, and don't mind the duck tape at the end I just used it to hold the plaiting together while I taped the whip. I removed it before taping that section.
Another shot of the plaited belly, thanks Canuck Digger .
A shot of the first belly taped. I'm not really happy with the taper, or lack of taper really. I think I'm going to add some more tape to the first third of the whip to build it up a bit more.
And another shot of the taped belly.
Last edited by ShanghaiJack on Fri Nov 09, 2012 8:43 am, edited 2 times in total.
I'd not tape it like that, because it will stiffen the part of whip, that shouldn't be as stiff as transition zone. I'd make a kind of duct tape bolster, like in leather whips. You'll see that it will make the transition a lot stiffer.
The gaps between the strands indicate you are using too large a core for the number of strands. To fix this you can, either make your core smaller, or use more strands in your belly. While this may not be critical on the first belly, if the cause is not understood, you run the risk of having this happen on the overlay, which is visible...
Also, when an inside layer is plaited it is called a belly, not a plaited core. Though the word "core" is sometimes used to refer to the center of the whip at any given point along its length, it is usual to use "core" to mean an un-plaited section, either the very first layer of the whip, over which the first belly is plaited or the area made-up of leftover (un-plaited) strands. It is easier to understand one-another if we all use the same terminology, and seeing as this is the terminology used by other whipmakers, I thought I'd share it
Regards.
That's a 4 strand plait, is it not? That seems like too few strands to me.
For my paracord whips, I do an 8 strand belly, 12 strand belly and then a 16 plait overlay. This works well for me, but obviously it's pretty dependent upon how thick my starting material is. Still, from the spike/nail or whatever it was you used for the handle, I'm thinking you could have easily gotten away with 8 strands.
(Incidentally, this would also allow you to drop strands as you progress down the belly, which would help with your taper issue, too. With 4 strands, you're pretty much stuck with what you've got because you can't really drop anything.)
Like Canuk said, you can get away with more on the first belly. But I'd be careful of gaps from here on out. I don't know how many strands you were planning for your second belly, but if it were me, I'd look at jumping up to a 12 plait based on what I can see of the thickness you've got going on right now.
tomek9210 wrote:I'd not tape it like that, because it will stiffen the part of whip, that shouldn't be as stiff as transition zone. I'd make a kind of duct tape bolster, like in leather whips. You'll see that it will make the transition a lot stiffer.
I didn't really want to tape it, but the tutorial I am loosely following did tape it, although with electrical tape not duck tape. Would that make a difference, or is it just a bad idea to tape it at all in the above manner?
Canuck Digger, Thanks for clearing up the terminology for me.
I had a feeling that the four plait was not enough whenI started, I guess I should have listened to it. I know I should probably start over, but I really don't want to. I was planning on using a 12 plait on the next belly so I think I might just go ahead and do that. If it turns out poorly, well at least I know what not to do next time.
Zuiun, do you use any kind of bolsters when you are working with paracord?
Thanks guys for the feedback. I really do not know what I am doing so it' very much swim or sink here. Thanks for helping me keep my head above the water!
ShanghaiJack wrote:Zuiun, do you use any kind of bolsters when you are working with paracord?
No, I don't.
Keep in mind that I don't work with leather, so what I'm about to say could be completely wrong:
My understanding is that the bolster serves the purpose of helping to create the proper taper and to also add some density for thinner, lighter weight leathers.
Paracord is plenty dense, and I've been able to create a good taper by dropping strands. My first couple of whips I created bolsters of sorts for them and the whips wound up being thicker than I wanted (and I had troubles with gaps in the braiding, suggesting that even 16 plait wasn't enough).
So I don't think bolsters are necessary with paracord.
A couple of questions:
When you guys are doing a 12 plait belly do you use a whipmaker's plait under three over three , or do you use the under two over two? Edwards says that the under two looks nicer, but that the under three is faster. Are there any other reasons to use one instead of the other?
I'm having a hard time getting the plaiting to start high enough on the whip. How do you guys attach the strands to the handle for plaiting? I wish I had doubled the strands and then folded them and tied them off on the other end of the handle, but I cut twelve individual strands, so I'm not sure what to do now.
The area where the heel knot will be doesn't matter, just be sure that you bind tightly over it.
Regularly I do the under 3 over 3, the only time I'll do differently is for decoration. There's no reason to doing anything other than an under 3 over 3 unless it's for decoration. If it's on a belly especially, just do the quicker and easier under 3 over 3.
Thanks, Jeremy. It's definitely a learning experience, and one of the things I've learned so far is that the fastest way to learn to make a whip –for me anyway– is by actually making it, as counterintuitive as that may seem.
I think that I might even skip right to leather for the next one, since that is ultimately what I would like to be working with. On the other hand, not having to cut the strands was one of the things that helped me to start this project.
If you're wanting leather my aduvce would be to jump right into it like you mentioned. It would be ok to practice plaiting with paracord, but so many of the things you do with leather is so different than the same thing with paracord, that it could be somewhat overwhelming going from paracord to leather.
Cutting strands... I'm just glad I'm past that initial learning curve. It will definitely be hard your few couple whips, just fight through it and stay patient and you'll be looking back on it soon enough. The best advice I can give you is to start on kangaroo. It's more expensive but it is so much easier to cut and pare kangaroo strands properly than any cowhide.
I think that's just what I'll do. This whip will at least give me a feel for plaiting before I try it out with the roo. Course I need to finish this one first
When working with leather, the sets (be they for the bellies of the overlay) are usually cut from a keeper, that is to say a single piece of leather from which all the strands are cut. The keeper is either tied like a bolster would be over the handle, or over the butt foundation in the case of the overlay. So all one needs to do is to start crossing the strands in the proper sequence to get the plait going. With paracord you do have this possibility, but you can always replicate the IDEA of is by duct (not DUCK) taping the strands one next to the other and starting your set this way. In the case of a belly, you could have the taped part hanging over the end of the handle and once the sequence is started, simply bind the base and cut off the rest. In the case of the overlay, you could do the same as well, or you could bind the taped portion over the butt knot foundation, much like one would start work with a leather overlay.
Keep in mind I am not a nylon expert here, I am only suggesting options of how you might start your work, and this is deduced from my experience with leather. So take it for what it's worth...
As for bolsters, in a leather whip the bolster does play a big role in shaping the thong, but as mentioned in another post, it also contributes to the density of the thong. What is density and how does it achieve this one might ask... Well in this context, it means to have the most leather in the least amount of space-or in other words, to have the least amount of air pockets in between not only layers, but also between strands. This happens when a bolster fills in the small dips and cracks in between strands and fills all those little air pickets. as a matter of fact, if you were to undo a leather whip made with bolsters, you would see in the bolster, the imprint of the layer underneath it and over is, and you would see how the bolster acts as a sort of filler. Now this is important for a few reasons, but the most important one is because the denser a thong is, the more easily it will transmit the kinetic energy from the handle down to the cracker-or in other words, a dense whip with the exact same taper as one which isn't as dense, will crack more easily. So shape and transmission of energy are the two main reasons for bolsters in leather whips, and I don't see why it would be any different with a synthetic whip. The biggest problem isn't using a bolster on a nylon whip, the trouble is finding a suitable material, that will conform to the shape of the whip, bend with the thong, and not dry out and crack like tape does. I'm still working on it- I have a few ideas, but nothing worth sharing at this point.
I knew that when cutting strands for leather whips that a keeper was included. I don't know why I didn't think of using duck/duct tape –see here for the origins of both words https://en.wikipedia.org/wiki/Duct_tape –to recreate the keeper with a nylon whip . That is a good idea that I will definitely incorporate when I get to the overlay.
Which is going to take forever. This 12 plait is slow going for me, even doing the faster whipmaker's plait. It also seems a lot harder to keep all of my strands nice and tight once I've plaited them. I find that after plaiting one strand I have to go back and tighten the previous three strands on both sides to get them nice and tight. Am I doing something wrong? Can any of you guys with more experience give me any tips that might alleviate this and speed things up?
Don't worry about the strands in front. When you are plaiting , you pull the strands tightly as you're laying it in place. That tightens one, two, or more sets up ( with nylon no more than two sets ). You don't have to worry about the strands in front because they shouldn't be tight yet, they'll be tightened next time they are plaited.
Pandering to the lowest common denominator doesn't make it a goal to reach... Anyway. Enough of my silliness, back to whips...
As Riku said, even though the immediate strands may appear loose, when you pull it is a few stitches up that it tightens, so it's all good and this will allow you to plait faster. Grab strand, pull tight, bring around and lay in place, hold with other hand's thumb. Repeat until the fall hitch.
Thanks guys, this is most excellent news. At the rate I was plaiting it was going to take me a month or so to finish! What can I do to keep my seams straighter? Is it mostly down to pulling equally hard on both sides, or is there another trick to getting nice straight seams as well?
Back when I had trouble keeping seams straight it wasn't my tension on each strand ( that is the most common problem but wasn't mine ). For me it was how the whip is secured. Its good to plait from a hook because if done properly, if you seams are straight you know you did it right, if they twist you know you need to fix something ,whereas with a vice if you're plaitin uneven they won't show up until the whip has been used a lot and the strands are allowed to settle into their "natural" position.
My problem was that, for instance, I had a strand yoke attached to a hook, and instead of the plaiting seam being lined up to where its attached, the plaiting seam was somewhat offline with where it was attached. To fix this I often clamp the yoke exactly where it needs to be instead of punching holes in the yoke and putting the hook through these.
Ever since I started to doing I've had straight seams with little effort.
ShanghaiJack wrote:What can I do to keep my seams straighter? Is it mostly down to pulling equally hard on both sides, or is there another trick to getting nice straight seams as well?
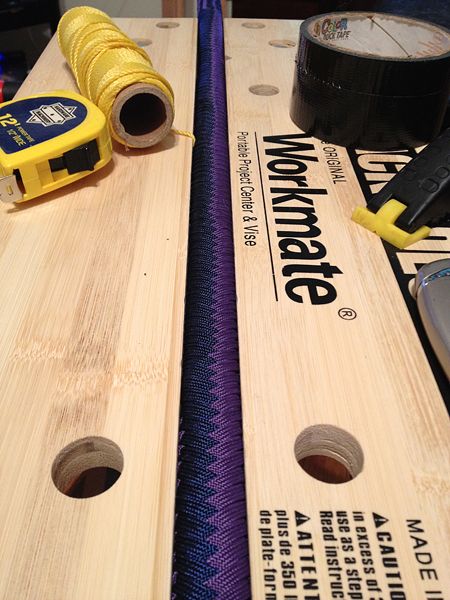
I use this guy:
It's a Black and Decker Workbench (you can find them for around $30-40 at hardware stores). The entire middle of the table opens up and works as a vise. and it has helped me tremendously with keeping my plaiting straight. You can even open or close each side independently, so it allows me to account for the taper of the whip.
HOWEVER, if you go a route like this, you will have to take a lot of care to make sure your tension is even on both sides. Even though the Workbench will keep things looking straight, Like riku said, if the tension isn't even, the whip can still twist on you as it's used. So you can't let yourself get lazy just because it looks straight. But the reason I like this is because I don't have room to plait from a hook for anything longer than maybe a 5 foot whip, so this lets me keep things pretty compact and portable.
Thanks guys for the tips. I will keep the workbench in mind Zuiun, but think I will stick for the hook for now.
I am getting ready to drop my first strands, going from 12 to 10 plait. I would like to drop them one at a time to try and minimize bumps. Does it matter which position I drop the first strand from?
Here's the thing about dropping strands, and it's the same idea about any other part of whipmaking or cracking; you have to understand what is going on and the effect one action has on the rest.
There are many ways of dropping strands, each have have positive and (to me) negative points. Understand which does what and then you can decide what works best for you.
You can drop two strands at a time; this minimizes the derangement tot he plait pattern, but tends to make one side of the plait shorter than the opposite side, which make a more "triangular" cross-section. Some feel this creates an imbalance in the tension on the strands while others swear it makes no difference.
You can drop one at a time; this is easy because you are only dealing with one strand at a time, and so it is an easy thing to concentrate of that one drop. It does destabilize the pattern of the plait a bit, but if you drop a second strand shortly thereafter, it if almost like dropping two strands at once.
You can drop one from the front and the other from the back, on opposite sides, which really balances the plait out.
Basically the most important question I feel needs to be answered is are you going to alternate the sequence of plaiting or make it the same on the left and right side? For example, it you are going from 12 to 10 (assuming in this example you are dropping 2 at a time), the pattern could go either under 3 over two on both sides, or, alternately, it could go under 3/over 2 on one side and under 2/over 3 on the other. If you have the same U3/O2 on both sides, then the back of the plait will not show as many strands as the front will, but they will be the same on the right as on the left side. This style allows for a much more seamless drop, but again, the down side to this is that the plait is not balanced front-to-back. With the second method, you will have visible strand drops, but the plait will be perfectly balanced in an alternating sequence O3/U2-O3/U2.
So you see there are no perfect solutions, just choices to make and becoming more adept in achieving a nice drop in whichever technique you like best. To wit I would go with David Morgan's philosophy of "it's more important that the whip work well than it look good"...
Hope this wasn't too confusing; it can daunting to explaining this with text alone... and remember, everything must taper...
Cheers!
I think I will need to digest that over a few more whips before it makes complete sense. I have a feeling that for me dropping strands, and cutting leather strands, are going to be the kind of things that I can read about until the cows come home, but only by actually doing it will I really figure out how to do it.
Well, I dropped from 12 to 10 dropping two at once. Did it once and was not happy with it due to pulling a bit to hard on one of the dropped strands and messing up the plaiting. I did it over and it turned out okay, but I definitely don't have the hang of it yet as it seemed to leave a small bump in the whip. The next strand drop from 10 to 8 I did dropping one strand at a time went a little better and seemed to create less of a difference in the whip's shape.
Do most nylon whipmakers leave the dropped strand running down the length of the whip until the next strand is dropped, or do you cut it off after a few more passes?
Thanks Riku. I guess that might be what's causing the bumps when I dropped the strands then. I will try not to do it from now on if it's possible. Does that go for leather as well, or is only when working with nylon?
I should have the second belly finished tonight, and will post some photos of it when I can.
Leather has many many more variables than nylon. I like to have my strand drops plaited over 9 inches or more, but often keep them in much longer. It all depends on how you taper your bolster, your core strands , your dropped strands, and your overlay strands.
Here's the finished second belly, started with a 12 plait and ended in a 4 plait.
I think that there is obviously a lot of room for improvement. I need to work on keeping my seams straight for more than four inches at a time. I really need to work on the overall tapering of the whip. I also need to slow down at times and take a look at all sides of the whip. If I had done that I would have caught a few places where the strands got twisted early enough that I could have easily replaited it. Finally, I need to work on dropping strands, although I am beginning to feel more comfortable dropping them I think I tend to drop them a bit too soon which then leads to gaps in the plaiting. I also need to come up with a different method for pulling on the strands to tighten them because I have some painful rope burns on my index fingers and thumbs .
Before I gave it a good roll I was afraid that it might be pointless to plait an overlay on it. Tomek was definitely right about not taping it the way I did. It is very stiff well below the transition. After I gave it a roll though it loosened up enough that I think it will be okay.
Overall, I am not that pleased with the way this turned out, but I am glad it's finished. I'd like to get started on the overlay right away, but it'sgoing to have to wait as my hands hurt too much to think about plaiting. I might have to put it off until after Thanksgiving as things are starting to get busy. We will see.
Enough of my criticism. How about yours? What do you think needs improving, did I leave anything out? Is there anything that looks good? Let me know.
I recently made myself a pair of nylon stock whips so I can give you a little advice. First, because you can't taper nylon you obviously have to drop them as wide strands. Because of this, when you drops strands you are giving up a good fraction of your plaiting. After I dropped I always had to pack the strands for the first few pulls in order not to get gaps ( because the angle does change ).
That said, you may very well be right about dropping too soon, I'm just giving another possibility.
Also, the tape will break in, so don't worry about that.
Overall it looks good. Don't expect it to be much, it's your first whip! I'd says its going very well for yor first whip!
About your fingers, don't change how you're doing it as long as its working. They will get sore , that's good. Just fight through it and they will toughen up. That's especially the case with leather since you must plait it much tighter than nylon. When I plait my fingers don't get sore anymore unless I plait for more than 4 hours straight ( for context, it takes me about 2 hours to plait an 8 ft. 12 plait overlay from start to finish ).
At the end of the handle there is a sudden change in diameter. Be sure to bind in that area, then in would give it a layer of tape then bind again to fix that bump.
What comes out of the end of your plaiting? Just the core strand, if so next time, have your plaited strands come out straight and cut them off at even increments for a nice even taper.
I will keep that in mind about dropping strands when I do the overlay.
It's not the soreness I mind as much as the actual rope burns on my fingers. I think when I was pulling the strands tight the paracord was sliding just enough to cause enough friction to rub my fingers raw. I imagine that after a few more whips, even that won't be a problem after I develop some calluses in those spots.
I was already thinking of binding that area, so it's nice to know that I was on the right track there.
Yup, it's just the core strand that comes out of the end of the plaiting. I was planning on doing what you recommended but I guess I underestimated the length needed. I planned for enough to plait over the first belly but didn't leave any extra length to taper off. Is there anything that I could do now to try and fix that, or is it just a mistake that I will need to learn from?
Thanks again for all the advice. It is much appreciated!
Just put in new strands where they would come out at the end of the belly and tie them down. Not too tight, just enough so that they will stay on, the overlay plaiting will hold them down. It shouldn't cause any problems with the whip as long as they are put on tightly at the end of the belly ( no major gaps ).
ShanghaiJack wrote:It's not the soreness I mind as much as the actual rope burns on my fingers. I think when I was pulling the strands tight the paracord was sliding just enough to cause enough friction to rub my fingers raw. I imagine that after a few more whips, even that won't be a problem after I develop some calluses in those spots.
I would think that if you're getting actual rope burns from the paracord, then you're either plaiting too tight, or you're holding your strands too loose.
Remember that with paracord you actually *don't* want to pull super tight. The whip will either take forever to break in, or it just won't ever break in if your plaiting is too tight. The reason leather needs to be pulled tight is because over time it stretches and loosens -- paracord won't do that. All it should require is firm pull.
Having said that, I think your whip is looking pretty good so far for your first one. Sure, the taper could be better. Sure, there are some bumps. But I don't see anything in it so far that would prevent it from giving you a nice, solid crack when it's done. And you're learning a lot in the process.
Zuiun wrote:Remember that with paracord you actually *don't* want to pull super tight. The whip will either take forever to break in, or it just won't ever break in if your plaiting is too tight. The reason leather needs to be pulled tight is because over time it stretches and loosens -- paracord won't do that. All it should require is firm pull.
Thanks for the encouragment Zuiun, I just wish you had told me about plaiting paracord a couple of days ago . I think that I have definitely been pulling it too tight. I didn't give much thought to it, which I have discovered is not a good habit to get into when whipmaking, and just figured that tighter was better. It's good to know that I won't have to suffer when I get to the overlay so I, my thumbs, and index fingers thank you .
Being new to plaiting, what is tight for you would be like barely pulling the strand for more experience people. Pull it tight enough so that you see the last set tighten up, and the set above that just barely tighten up. With leather I get sometimes get 3 sets to tighten up, but usually just the second set tightening a lot.
As you plait more and more, you subconsciously learn to use leverage and te angle of the pull to get a tighter plait with less or equal effort , along with building the muscles used over time.
Yeah, to be clear, you do still want a good, tight pull. I guess what I'm saying, though, is that if you're giving yourself rope burns, it's probably a little *too* tight.
Gotp it guysa, tight, but Iu don't ghave to inflict bodily harmm upon mmyselfg in ordert to make the whipm. Boy typing eith abndages on your handss is hard!
It's normal for your hands to be hurt or have calluses if they are not used to hard physical labor. It will heal and you will get stronger and one day it won't hurt anymore. Then you'll wake up one morning, realize you're much older than you feel in your head and your hands wil hurt once more. That's when you get Bengay...


