


Hi
I'm making myself a S&W holster. I'm wondering if there is any special technique used in the stitching? Should I use a back-stitch method? Any guidance gratefully received.
Thanks,
Ian
Stitching a holster - guidance sought
Moderator: Cajunkraut
-
Abner's diarist
- Dig Worker

- Posts: 11
- Joined: Fri Mar 20, 2009 2:29 pm
- Location: Peterborough, UK
-
Mountaineer

- Dig Leader

- Posts: 584
- Joined: Sat Apr 18, 2009 7:52 pm
- Location: Once the mountains; now the seaside.
Re: Stitching a holster - guidance sought
Ian, I'm no expert but I have recently started out in leather crafting and I'll tell you what I found successful and easy, the saddle stitch. It uses a long strand of thread and two needles, one on each end.
Basically, after punching holes in your leather with a punch, you pick an end to start on and push one needle through and center the thread in that starter hole.
Then push either needle (left or right one, your choice) for clarity, let's say the right one, through the next hole in line, hold it and then push the needle that started on your left through that same hole. This manner the right one becomes the left and the left becomes the right. Continue this pattern until the end.
When you get to the end, backstitch about 3-4 holes in the same manner. Done.
Wade, if you happen across this, please don't crucify me for the copy of your work. I was telling a coworker about yours and needed some practice before I did my DL-44 holster. He was cutting me a buckle, so I made him a phone holster.
Great tutorial video: http://www.tandyleatherfactory.com/en-u ... Video.aspx
My results:

Album: https://flic.kr/s/aHskoNSoLB
Basically, after punching holes in your leather with a punch, you pick an end to start on and push one needle through and center the thread in that starter hole.
Then push either needle (left or right one, your choice) for clarity, let's say the right one, through the next hole in line, hold it and then push the needle that started on your left through that same hole. This manner the right one becomes the left and the left becomes the right. Continue this pattern until the end.
When you get to the end, backstitch about 3-4 holes in the same manner. Done.
Wade, if you happen across this, please don't crucify me for the copy of your work. I was telling a coworker about yours and needed some practice before I did my DL-44 holster. He was cutting me a buckle, so I made him a phone holster.
Great tutorial video: http://www.tandyleatherfactory.com/en-u ... Video.aspx
My results:
Album: https://flic.kr/s/aHskoNSoLB
Last edited by Mountaineer on Sun Aug 20, 2017 6:45 pm, edited 1 time in total.
-
Abner's diarist
- Dig Worker
- Posts: 11
- Joined: Fri Mar 20, 2009 2:29 pm
- Location: Peterborough, UK
Re: Stitching a holster - guidance sought
Mountaineer,
Thanks so much for prompt posting. The stitching holes are all punched out ready to go. I'll look at the Tandy Leather tutorial and then practice following your advice on a pouch first. Then when confident will move on to the S&W holster.
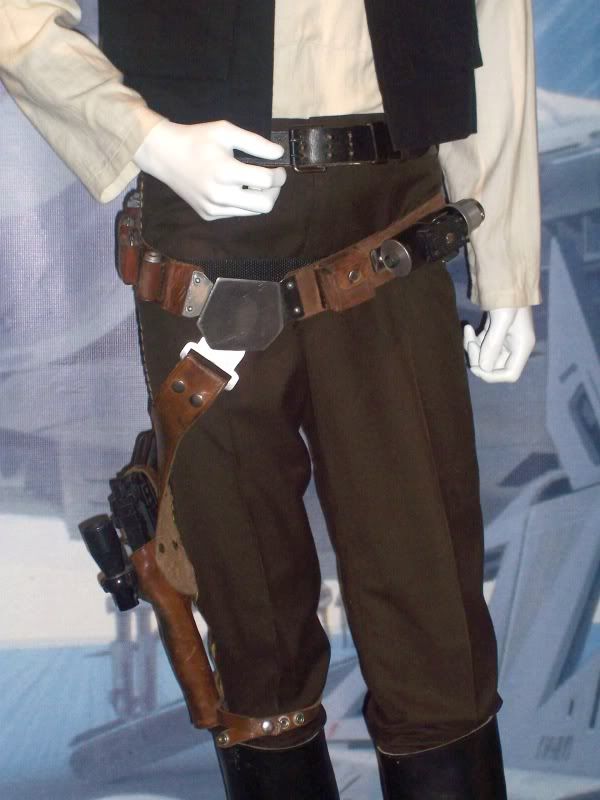
Nice looking 'A New Hope' DL-44 rig by the way. That may be my next project - following on from the Indy holster - replace my old Costume Base pleather one.
Thanks again,
Ian
Thanks so much for prompt posting. The stitching holes are all punched out ready to go. I'll look at the Tandy Leather tutorial and then practice following your advice on a pouch first. Then when confident will move on to the S&W holster.
Nice looking 'A New Hope' DL-44 rig by the way. That may be my next project - following on from the Indy holster - replace my old Costume Base pleather one.
Thanks again,
Ian
-
Mountaineer
- Dig Leader
- Posts: 584
- Joined: Sat Apr 18, 2009 7:52 pm
- Location: Once the mountains; now the seaside.
Re: Stitching a holster - guidance sought
Ian,
No problem whatsoever and thanks for the compliments.
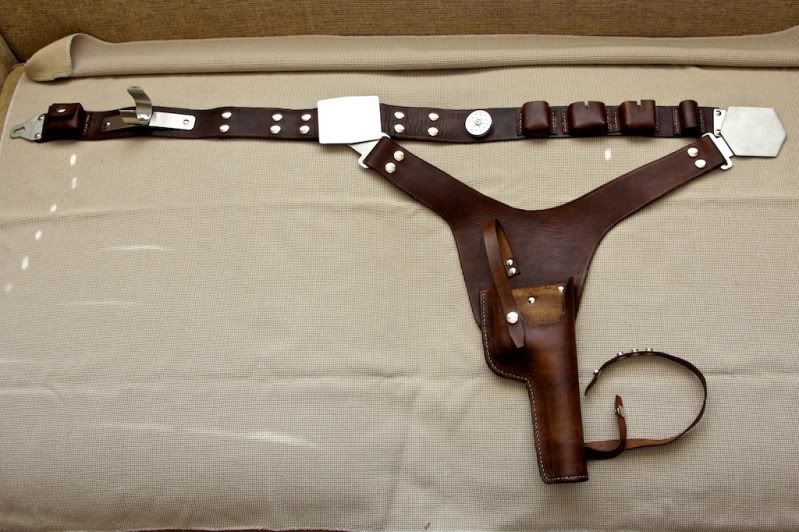
For what it's worth, I used a Costume Base belt and holster as my model for this belt/rig. I just took it apart carefully, flattened everything out on the new leather and traced the shapes.
Once I had all the components cut out, and wet-formed the necessary areas, I dyed the components and then assembled everything. Except for the holster. Due to the leg strap, it was assembled, stitching and all, when I dyed it. I used an airbrush and Fiebing's Tan.
I stitched the pouches down just as they had been on the purchased belt, using some wooden parts to keep the shape/sizing and then used the method I described above.
I found I didn't need big needles, if anything the smaller Glover's needle was the best thing, as larger needles would break at the eye if you had to pull too hard.
Good luck with your holster. I had a blast making all this stuff and hope you do with your project.
No problem whatsoever and thanks for the compliments.
For what it's worth, I used a Costume Base belt and holster as my model for this belt/rig. I just took it apart carefully, flattened everything out on the new leather and traced the shapes.
Once I had all the components cut out, and wet-formed the necessary areas, I dyed the components and then assembled everything. Except for the holster. Due to the leg strap, it was assembled, stitching and all, when I dyed it. I used an airbrush and Fiebing's Tan.
I stitched the pouches down just as they had been on the purchased belt, using some wooden parts to keep the shape/sizing and then used the method I described above.
I found I didn't need big needles, if anything the smaller Glover's needle was the best thing, as larger needles would break at the eye if you had to pull too hard.
Good luck with your holster. I had a blast making all this stuff and hope you do with your project.
Re: Stitching a holster - guidance sought
Ha, Mountaineer, I'm not cross don't worry! Nice job on both holsters. I agree with you, that for these types of items saddle stitching is the best and quickest way to do it. Your Solo Belt looks great. Your friend did a nice job on the buckles. I, too just finished having some sweet buckles made and here's my new version of the Solo Belt with saddle stitched pockets and holster bucket:
There are a lot of great tutorial for saddle stitching available online. Though, I haven't seen anyone show the best way to do the end plug. However, if you look up tutorial for making cup holders or dice rounds the technique for an end plug attachment is pretty much the same. I recommend making your plug out of at least three layers of 10 oz. leather and gluing them super securely. You'll thank yourself later.
W.E.
-
Mountaineer
- Dig Leader
- Posts: 584
- Joined: Sat Apr 18, 2009 7:52 pm
- Location: Once the mountains; now the seaside.
Re: Stitching a holster - guidance sought
Thanks Wade. The comments mean a great deal coming from you. That is a VERY nice rig there as well!
I already found out how tricky sewing in a holster plug can be. I didn't know the trick of triple-layering the thing and ended up with some puckering on the plug itself. Not a big deal to me because it sits at almost knee-level and it faces the ground. So if people can see it, one of us is passed out and on the ground, and a puckered holster plug is the least of our concerns.
Sorry, I wasn't clear enough in my original post on the buckle part. The buckles you see on the belt are the Costume Base buckles. My buddy just made a female end for the left side of the belt, so I could fasten the whole thing around my waist. The ends of my belt are folded back and fastened with Chicago screws, somewhat like a normal belt; I had no way known to me at the time of building where I could get really accurate buckles. Your buckles are pretty sweet. Did you or someone you know make those, if I may ask?
I keep all my costumes, because well, I spend money on them and I like having things for the pop-up party that may sometimes occur. (Same reason I own a tuxedo.) Usually that means I get something built to work for the first time, then tinker with it to make it more accurate as time goes by. Those buckles would do nicely if I ever revisit this belt.
Re: Stitching a holster - guidance sought
I've just had all the hardware and buckles specially made for me. I'm advertising them on the RPF.

W
W
-
Mountaineer
- Dig Leader
- Posts: 584
- Joined: Sat Apr 18, 2009 7:52 pm
- Location: Once the mountains; now the seaside.
Re: Stitching a holster - guidance sought
OK. Cool. Thanks for the follow up.
I'm not a member there, so I'll see what I can search and find.
I'm not a member there, so I'll see what I can search and find.
-
Abner's diarist
- Dig Worker
- Posts: 11
- Joined: Fri Mar 20, 2009 2:29 pm
- Location: Peterborough, UK
Re: Stitching a holster - guidance sought
Wade
thanks for the tip about the end plug. I'll triple-up as you've suggested. I'm also trawling the net to look at tutorials so thanks. I should bear in mind that this is a trial holster so I'm sure that I'll learn from the 'baptism of fire' of actually doing it. But it does mean a lot to get guidance from members of this board.
Mountaineer & Wade,
Off topic - re: the Solo holster rig - I'm curious how you both stitched the actual holster component of the rig. I've seen many replicas where the holster is stitched directly to the hanging part of the rig off the belt. But I've behind the scened pics/photos that show that the holster was actually 'wrapped around' and only stitched along the trigger-guard edge. I'm most likely not making myself clear and should dig out the pics that I've got. Just interested, but am sure that this has been discussed ad nauseum on the RPF. On that note I'll look there for the hardware that you've had made Wade.
Thanks again to both, just need to get stitching.
Best,
Ian
-
Mountaineer
- Dig Leader
- Posts: 584
- Joined: Sat Apr 18, 2009 7:52 pm
- Location: Once the mountains; now the seaside.
Re: Stitching a holster - guidance sought
I assembled the actual holster while it was off of the thigh piece/drop hanger.
To secure the holster to the piece that rests on the leg, I used 3 rivets on the upper inside edge of the holster's throat.
To secure the holster to the piece that rests on the leg, I used 3 rivets on the upper inside edge of the holster's throat.


Re: Stitching a holster - guidance sought
Not to steal this thread, but those Solo rigs are gorgeous!!! Do either of you make those? I've been looking to get one made in left hand.
R/S
Fritz
R/S
Fritz


Re: Stitching a holster - guidance sought
Since you are talking about the DL-44 holster...I figured I could ask this question.
I have one.....and apparently I purchased it more from a Porkins than from a Wedge because DANG this thing is large. Problem is, I'm not.
So I have two questions (and these could apply to general holsters as well).
1) Can someone tell me exactly HOW a rivet can be removed.
2) Where do you purchase the rivets for the DL-44 holster. Is there an exactly model number from Tandy that is recommended?
Re: Stitching a holster - guidance sought
I make them Fritz, and would be happy to make a lefty version for you. Email me direct about it: adventureleather@mac.comM1917 wrote:Not to steal this thread, but those Solo rigs are gorgeous!!! Do either of you make those? I've been looking to get one made in left hand.
R/S
Fritz
W.E.
Re: Stitching a holster - guidance sought
[quote="So I have two questions (and these could apply to general holsters as well).
1) Can someone tell me exactly HOW a rivet can be removed.
2) Where do you purchase the rivets for the DL-44 holster. Is there an exactly model number from Tandy that is recommended?[/quote]
You an cut a rivet with a pair of utility sheers or a nail head cutter. I use utility scissors and cut them in between the two pieces of leather so you don't make marks where they can be seen. Tandy has SM, Med, and Large standard rivets and a setter. I'd use a large rivet or medium depending on how thick your holster bucket and sling back are. If you're looking to exchange the holster or remove it you can use Chicago screws instead of rivets. They have those at Tandy as well.
W
-
Mountaineer
- Dig Leader
- Posts: 584
- Joined: Sat Apr 18, 2009 7:52 pm
- Location: Once the mountains; now the seaside.
Re: Stitching a holster - guidance sought
Thanks M1917, I only did the leatherwork for my rig.
My buckles are all Costume Base and the disk is from Elvis Trooper. Although it's not shown here, I used a wall mount for a D-cell Mag-light as my droid caller holder. I did a scratch-build of my droid caller. I've yet to get shots of everything completed, but I will.
If you got so inclined to try and do one yourself, it really was pretty easy, this was my first hard-core project in leather. To do a lefty rig, I'd imagine reversing the holster pattern on the leather when you trace it to would work. Just be sure your rough side ends up being the inside of the holster.
Maboot,
Now removing rivets? Get a Dremel or a drill press, a hand drill will be too hard to control and you'll want fine control for this. Use a really fine drill bit, and drill through the center of the solid, domed or flat, side of the rivet. Take your time, but don't heat the rivet so much that you burn the surrounding leather. Do it in phases if you must, but a Dremel on high speed and with a sharp bit should go through really quickly. Once your through, get rid of the drill.
Next step, needle-nose pliers. Try and push up the side you just drilled up from the leather by pushing on the other side of the rivet; this is probably not going to be easy. Bottom line, you want to use the pliers to pinch the sides of the piece you just drilled and collapse it in on itself. You may need to pinch it again, 90-degrees from your first crimp. Then pull or push the rivet out of the leather. Normally they will just come apart after one crimping. My mistakes did.
Which size did I use? I used Tandy's Easy-To-Do Rivets & Setter (Item #3635-00). It came with the setters and an assortment of rivets. I eyeballed the head sizes and shaft lengths on the rivets and then whacked away. I will say, the proper hammer/mallet makes a difference. I tried using a claw hammer. Don't. Then I got a non-marring, shot-loaded mallet. Blew through the rivet and punching work after that.
Hope all that true-amateur help, well, helps.
(Wade simul-posted, LOL.)