My First Kangaroo bullwhip -Build Log - Mod Approved - PICS

From falls & poppers to plaiting & cracking technique, this section is dedicated in memory of Sergei, IndyGear Staff Member and Whip Guru. Always remember to keep "Celebratin' Life!"

Moderator: BullWhipBorton

User avatar
riku1914
Vendor
Posts: 1246
Joined: Mon Feb 07, 2011 6:38 pm
Location: Texas, probably making whips :)
Contact:

My First Kangaroo bullwhip -Build Log - Mod Approved - PICS

Post by riku1914 »

Ok to start this, I'd like to thank BullWhipBorton for doing everything that was needed to allow me to do a build log, thus

exceeding the normal picture maximum, which is 6. That said This log is MOD-ADMIN approved

Also, I'd like to thank everyone that has helped me in the process of making, you guys have been awesome :D

Now, my whole idea for making this build log, is that you more experienced guys can critique my methods, and give any advice

on what I can do, be it in the future or on this particular whip, so don't hold anything back
:twisted:


Now, I'm going to be making an 8 ft. 12 plait, jacka style bullwhip ( Indy 4 ). It'll end in an 8 strand point, have the very stiff

transition, all that good stuff.

Before I start the actual whip, I'm going to buy a Dene Williams Strander, which I don't have yet, so all you're going to get for

now is my hides, so here they are :

Image

Uploaded with ImageShack.us

I have two brown kangaroo hides, one is 58 decimeters, or 6.24 sq. ft., the other 49 decimeters, 5.27 sq. ft. These will serve as

my overlay hides.

The other one is a whisky colored hide, and it is 60 decimeters, or 6.46 sq. ft. This will serve as the braided bellies, and the

handle knots, wrist loop, and heel knot cover ( not sure what it's called, just the solid piece of leather covering the top of the

heel knot )


Next picture is some 2 oz. calf hide I'll be using for my core / bolsters. After I finish this whip I'll probably get 2 oz. tooling

cowhide for my bolsters, but I'm going to use every bit of this that I can , here it is:

Image

Uploaded with ImageShack.us

I'll update the thread when I actually start,

THANKS again to everyone who has helped :TOH:
User avatar
Canuck Digger
Professor of Archaeology
Posts: 747
Joined: Sun Mar 30, 2008 8:24 pm
Location: Montreal, Canada

Re: My First Kangaroo bullwhip -Build Log - Mod Approved - P

Post by Canuck Digger »

You know you may be able to make your entire whip from those two hides...

I would make the core from kangaroo instead of kip; I just like it better because it is softer and more pliable and seems to compress better than kip. A good way to use up that outside layer of roo...

This may be a silly question but, why do you want to make the knots and wrist loop a different color than the rest? Is this a S-A thing?

By the way, both knots are called turk's head knots with the one at the end often referred to as the butt knot and the one at the end of the handle the ring knot. But those are not set-in-stone laws, just frequently-used appellations.

Franco
AZ Pete
Field Surveyor
Field Surveyor
Posts: 81
Joined: Tue Jul 29, 2008 6:39 pm
Location: Chandler, AZ

Re: My First Kangaroo bullwhip -Build Log - Mod Approved - P

Post by AZ Pete »

Just curious...

Where did you purchase your hides? They look very nice.

Pete
User avatar
riku1914
Vendor
Posts: 1246
Joined: Mon Feb 07, 2011 6:38 pm
Location: Texas, probably making whips :)
Contact:

Re: My First Kangaroo bullwhip -Build Log - Mod Approved - P

Post by riku1914 »

Got them at a local tandy leather, they are on sale this month for 11.29 a sq. ft., so if you want some you still got two days.

http://www.tandyleatherfactory.com/en-u ... 6-446.aspx

Ok, I'll make the core out of roo, will give me more bolster leather.

I knew that both knots were called turks heads, but I generally refer to the one you hold as the heel knot, and the transition

knot, well the transition knot.

How close would I be cutting it using the 58 and 49 dm hide?

oh also the knot thing :

http://theaustralianwhipco.com/default.htm

I was going to do it like the pic on the bottom and the right

edit: I just realized why you said the turks head thing, my reference to the heel knot "cover" what I meant was not the knot

itself, what I meant was, if you are holding the heel knot in your hand, with the thong facing upwards, the leather that covers

the end of the whip right next to where the wrist loop will come out, that solid strip, that's what I was talking about :TOH:
User avatar
Canuck Digger
Professor of Archaeology
Posts: 747
Joined: Sun Mar 30, 2008 8:24 pm
Location: Montreal, Canada

Re: My First Kangaroo bullwhip -Build Log - Mod Approved - P

Post by Canuck Digger »

How close you cut a set depends on how much stretch there is in the leather and how competent you are at cutting and gauging the amount and areas of stretch in the hide. In other words, as close as you feel comfortable.

Keep in mind that even the core should be stretched before you cut it into its final shape, so that the leather is as stable as possible, this will help the whip maintain its shape over time.

Always grease all the inside layers as much as you can.

Well if you are going for a S-A whip then you know what to do. But I have to say that I always found that wrist loop to be not only too long but too narrow. But hey, that's just my opinion. The question you really need to ask yourself is do you want to make a Jacka whip, or learn how to make your own? Learn from others who know more than you, yes. But don't copy them, it's denying yourself the possibility of achieving your full potential and who says you wouldn't make it better than them in time?

Franco
User avatar
riku1914
Vendor
Posts: 1246
Joined: Mon Feb 07, 2011 6:38 pm
Location: Texas, probably making whips :)
Contact:

Re: My First Kangaroo bullwhip -Build Log - Mod Approved - P

Post by riku1914 »

Canuck Digger wrote:How close you cut a set depends on how much stretch there is in the leather and how competent you are at cutting and gauging the amount and areas of stretch in the hide. In other words, as close as you feel comfortable.

Keep in mind that even the core should be stretched before you cut it into its final shape, so that the leather is as stable as possible, this will help the whip maintain its shape over time.

Always grease all the inside layers as much as you can.

Well if you are going for a S-A whip then you know what to do. But I have to say that I always found that wrist loop to be not only too long but too narrow. But hey, that's just my opinion. The question you really need to ask yourself is do you want to make a Jacka whip, or learn how to make your own? Learn from others who know more than you, yes. But don't copy them, it's denying yourself the possibility of achieving your full potential and who says you wouldn't make it better than them in time?

Franco
I'm making the outer layer look like a jacka, and I'm making the transition stiff, because I wanted to go along with it, but also

I've been wanting to try it very stiff like that. If I were to go all the way and copy him, I would use two thick bolsters,

and thick cowhide for a plaited belly, like he does.

Plus it's completely different than the last one I made, so I figured I was trying something else.

I completely understand what you're saying, and I suppose that I'm technically not copying him, I just like the look.

What I meant by how close, you mentioned that I might be able to make the entire whip out of those two hides, first of all,

what two hides, and second, I meant how close would it be, as in, would I have 2 sq. ft. left over, or would I have barely .5

left over, I don't want it to go too close, as I am very new to this, and I'm happy I'm aware of this.


As for compensating for stretch, I'm not awesome at this, however the calf I used for my first one had some serious stretch

areas pretty far inside the hide, as far as a foot in from the edge, AFTER being trimmed well, so I figure I got some good practice

with that, and none of my strands got too small from stretch, it was just my terrible hand beveling.


I can't wait to start!!!!


edit: as for making my own whip, all I've really wanted was a regular indy style, and a jacka / indy 4 style, so after this, I think

I'll start experimenting with longer handles, finer plait counts, such as 16-24 ( I did a 24 plait vinyl whip, so I suppose I could try

it with leather eventually ) and different knots. I still need to buy the encyclopedia of rawhide and leather braiding to learn how

to do some special knots. Except for that one video Bernie has up, I am completely self taught on turk's heads knots.

Also I want to buy "how to make whips" to get me started on stock whips. I made a nylon whip resembling a stock whip, but

it's not completely a stock whip.
User avatar
Canuck Digger
Professor of Archaeology
Posts: 747
Joined: Sun Mar 30, 2008 8:24 pm
Location: Montreal, Canada

Re: My First Kangaroo bullwhip -Build Log - Mod Approved - P

Post by Canuck Digger »

I may have expressed myself clumsily in my last post. I didn't mean it as a reproach or a criticism by any stretch of the imagination. More like, beyond mimicking a look you like, which is fine btw, I was just trying to encourage you to develop your own style, and this is best done by both experimenting, but also not taking what others do as the only way to do things, including what I say...

I can't tell you how much you will have left over, I doubt anyone can. There are just too many variables to be able to predict it. But if I had to guess, I would say you will probably end up with a very small piece by the end.

Here is something that might just help you figure it out before it's too late; trim your hide of all the rough edges first and by this I mean take as little as you can while still making smooth curves out of the edges. Then cut a test strip around the hide, from one leg up to the neck and down to the other leg (or ear), and do a test stretch and see what happens (this is all explained in Morgan's book btw). It may very well break, and if it does just note where that area is on the hide and trim it a bit more, while always improving the shape of the hide, then do another test strip.

The problem areas are the neck, under the forearms, and the belly, which sometimes feels like it isn't a few areas but just one very big one, so you'll have to see this for yourself. If you see there is a lot of stretch , then you might consider cutting out a wide strip and making your core out of this. The core will not be under as much stress as a plaited strand, so it doesn't need to be as strong, but the stretch should be taken out of it anyway.

Once you have cut a strand that doesn't break or thin down too much after stretching, you are probably OK to cut out a first belly, as long as you cut it a bit on the wide side. But before you cut out any belly from your hides, have a look at how much leather is left; if it looks like you are not going to be able to cut out one belly and say, half the overlay from one hide, then you probably won't have enough and this is when you can consider cutting out your bellies from the third hide. By third hide I naturally mean the one that is of a different color than the two others, because it doesn't matter what color is on the inside, provided the one on the outside is what you want it to be. Three hides seems like a lot for an eight foot whip, and it is, but you are learning and better to use what you need and to finish your whip, then to try to make it out of very little when you don't yet have the skills to do it. That's my take on it anyway. also keep in mind that without someone there to show you in person, you are going to make more mistakes and it may take you a bit longer, but you will develop your own style and your own technique this way.
Good luck,

Franco

That's about as close as I can tell you how to go about it I'm afraid.
User avatar
riku1914
Vendor
Posts: 1246
Joined: Mon Feb 07, 2011 6:38 pm
Location: Texas, probably making whips :)
Contact:

Re: My First Kangaroo bullwhip -Build Log - Mod Approved - P

Post by riku1914 »

I'll do my best :D

Updates when I get my DW strander :TOH:
User avatar
classicbullwhips
Vendor
Posts: 217
Joined: Thu Jul 27, 2006 12:07 am
Contact:

Re: My First Kangaroo bullwhip -Build Log - Mod Approved - P

Post by classicbullwhips »

I know you said that you are open to suggestions so I am going to give you one that I know you probably will resist but I feel will help in the long run. I would suggest against moving on so quickly to a new style of whip (Jacka/Indy 4 Style) and make another original Indy style whip. The reason I say this is because you need to first develop a baseline of what you have learned from the previous whip/s and make small improvements on that. This will help to improve your skills in whipmaking much faster. I know that you may feel that it is not that big of change, but first start with consistency and then move on to new styles. Many of the things I have learned over the years has been through trial and error and a lot of money spend on hides after making mistakes. I'm not looking to discourage you in moving forward just to help you along the way and improve your skills in whipmaking. I hope you truly consider my advice and decide to hold off in moving on to a new style. You can always let me know if you have any direct questions by shooting me a PM or E-mail, I would be happy to help.

In a way that is my brutally honest advice without being brutal. Just looking to help improve.

Keep Crackin,
James
User avatar
riku1914
Vendor
Posts: 1246
Joined: Mon Feb 07, 2011 6:38 pm
Location: Texas, probably making whips :)
Contact:

Re: My First Kangaroo bullwhip -Build Log - Mod Approved - P

Post by riku1914 »

I think I forgot to mention this, but except for the 8 strand point and 6x7 turks head's ( which I have done before so it's not new )

I'm making this whip exactly as I did the indy, except for the second 4 plait belly I'm doing over the entire handle, instead of at

the end of the handle, and I'm adding a third bolster to thicken it up some, and so I can do another good layer of binding.

Other than those very little things, I am making it the same. Not changing internal at all, except for a couple little things Paul

recommended to me after I told him how I did the internals of my first one.


Thanks for the recommendations, after this whip, I'll probably make a few more indy style ones, and sell them on ebay for little

profit, to fund hides more than anything else, and indy style whips seems to sell good on ebay so that's why I'd use those.
User avatar
Canuck Digger
Professor of Archaeology
Posts: 747
Joined: Sun Mar 30, 2008 8:24 pm
Location: Montreal, Canada

Re: My First Kangaroo bullwhip -Build Log - Mod Approved - P

Post by Canuck Digger »

I was going to suggest something along the lines that James has expressed; even though it is very attractive to go out and try a bunch of different things when you are starting out, it is more important to not scatter your energy too much in a bunch of different directions. Any apprenticeship or education process involves a structure and in this, it would be better if you sat down and really made a bunch of whips along the same style first before you move on to fancy plaiting. Learn how to make a basic bullwhip first, and once you have understood how that works, then you can move on to other things. But to go off in every direction right away may not be that helpful in your learning. Learn structure and discipline and that will transcend in your work.


Franco
User avatar
kwad
Professor of Archaeology
Posts: 1016
Joined: Sun Jan 24, 2010 5:26 pm
Location: Hiding under your bed at night.

Re: My First Kangaroo bullwhip -Build Log - Mod Approved - P

Post by kwad »

Great idea for a thread! :tup:
Can't wait to see how it goes.
User avatar
riku1914
Vendor
Posts: 1246
Joined: Mon Feb 07, 2011 6:38 pm
Location: Texas, probably making whips :)
Contact:

Re: My First Kangaroo bullwhip -Build Log - Mod Approved - P

Post by riku1914 »

So I don't have my strander yet, but I figured I'd start on some of the things that aren't plaited. For instance I made my plaiting

soap, got a few spikes for handle foundations, applied plaiting soap to my bolster hide and rolled it up, and then, prepared my

core :
Image

Uploaded with ImageShack.us
Here is the core just cut out, what you didn't see/hear about before this, I just cut out a solid strip, stretch it VERY well, split

it down to .79mm ( i would have done .8 but most of it was .79, with the occasional jump to .8-.81 ) and then taper split it for

the last ft. The core is about 42 inches long, Paul Nolan recommended that I extend my core further out, so I'm trying it.


Here the core is after plaiting soap is applied, before I did the plaiting soap ( after cutting it into an even triangle ) I streched it

again, just to be sure it went as far as it would, as expected, the handle area didn't stretch at all, but the thinner area did to an

extent, here it is rolled up:

Image

Uploaded with ImageShack.us

edit: please excuse the dates, my camera is odd and resets the date after it runs out of battery's, and since this camera *****

batteries QUICK, I don't always feel like resetting it.

edit 2 : lol, this is funny, the color of the whisky with plaiting soap applied is EXACTLY the same as the brown, looks like getting

two colors was useless after all :lol:
User avatar
riku1914
Vendor
Posts: 1246
Joined: Mon Feb 07, 2011 6:38 pm
Location: Texas, probably making whips :)
Contact:

Re: My First Kangaroo bullwhip -Build Log - Mod Approved - P

Post by riku1914 »

Ok, so here it is attached to the handle, what I did next was I separated it into two pieces ( didn't cut it ) so that the second

piece was about 1.5-2mm smaller than the other the whole say down, I did this inch by inch, getting a piece of wood and creasing

it, each inch. Next I got a rounding strand, and round ed it VERY well all the way down, this not only made it round ( duh :lol: )

compressed it into this "folded" circle shape, if I take it apart it wants to go back into the shape, so this is good:

Image

Uploaded with ImageShack.us

Half of me wants to start cutting on my hide now :twisted: the other ( better ) half wants to wait for some money to get a DW

strander, which is the one I'm going to listen to :lol:
User avatar
Canuck Digger
Professor of Archaeology
Posts: 747
Joined: Sun Mar 30, 2008 8:24 pm
Location: Montreal, Canada

Re: My First Kangaroo bullwhip -Build Log - Mod Approved - P

Post by Canuck Digger »

Looking good.

It's funny, I keep my plaiting soap in EXACTLY THE SAME CONTAINER!!! Great minds...

It is probably easier, faster, and ultimately just as good, to cut the core into two halves, but since it is done, leave it as is, it's not a problem.

Also I'm not sure it's really necessary to split-skive your core at the end; it is so small and there will be so many layers of leather over it that I doubt it would make any difference. On the flip side, if you want to try to do this with the last part of the second bolster it may help somewhat to roll into a round shape with the core strands. But I doubt it is worth the time and energy to do it to the core. You'll quickly find that there are places in making a whip where the extra trouble is worth the effort, while others can pretty much be done as simply as possible. But you'll figure this out on your own too.

But things are looking good. Now go prepare your shellac!
Cheers,


Franco
User avatar
riku1914
Vendor
Posts: 1246
Joined: Mon Feb 07, 2011 6:38 pm
Location: Texas, probably making whips :)
Contact:

Re: My First Kangaroo bullwhip -Build Log - Mod Approved - P

Post by riku1914 »

Canuck Digger wrote:Looking good.

It's funny, I keep my plaiting soap in EXACTLY THE SAME CONTAINER!!! Great minds...

It is probably easier, faster, and ultimately just as good, to cut the core into two halves, but since it is done, leave it as is, it's not a problem.

Also I'm not sure it's really necessary to split-skive your core at the end; it is so small and there will be so many layers of leather over it that I doubt it would make any difference. On the flip side, if you want to try to do this with the last part of the second bolster it may help somewhat to roll into a round shape with the core strands. But I doubt it is worth the time and energy to do it to the core. You'll quickly find that there are places in making a whip where the extra trouble is worth the effort, while others can pretty much be done as simply as possible. But you'll figure this out on your own too.

But things are looking good. Now go prepare your shellac!
Cheers,


Franco
Actually don't have my flakes yet :lol: Had planned on ordering them shortly after I did the DW strander.

The reason I taper split it was just cuz I could really. I was already splitting it, so I figured I'd just turn the wheel a little bit, took

maybe 5 extra seconds, then when I was done I just turned it back as many times as I had.

I do plan on doing it on my actual bolsters, but I agree with what you said, the end of the core is small it doesn't really matter.

edit: about the container :lol: I guess I'm doing SOMETHING right :P
User avatar
Canuck Digger
Professor of Archaeology
Posts: 747
Joined: Sun Mar 30, 2008 8:24 pm
Location: Montreal, Canada

Re: My First Kangaroo bullwhip -Build Log - Mod Approved - P

Post by Canuck Digger »

Oh look, I ride ya but it's only because I believe in teaching things with some measure of rigor; if I didn't care I wouldn't say anything :-) Having said that, and at the risk of repeating myself; mine is far from being the only way of doing things, but I can at least say that I never do things out of laziness and making the best whip I know how is always on my mind. Beyond that, I can only pass on what I know.

And you're doing plenty right.


Franco
User avatar
kwad
Professor of Archaeology
Posts: 1016
Joined: Sun Jan 24, 2010 5:26 pm
Location: Hiding under your bed at night.

Re: My First Kangaroo bullwhip -Build Log - Mod Approved - P

Post by kwad »

Keep posting up them pics Jeremy!

I need all the visual aids I can get :lol:
User avatar
riku1914
Vendor
Posts: 1246
Joined: Mon Feb 07, 2011 6:38 pm
Location: Texas, probably making whips :)
Contact:

Re: My First Kangaroo bullwhip -Build Log - Mod Approved - P

Post by riku1914 »

I understand what you're saying franco, and in the future I probably won't bother taper splitting the core, just on a side note.

Kwad, you can be sure I will, as SOON as I get my DW strander, I'll be working on it.


OH also, I forgot to metion, after I attached the core to the handle with some sinew, it took me all of I about 2 minutes to

fold it, crease it, fold it again, round it, whereas, on my first leather whip, when I cut the core, it took me about 10 minutes to get

the same effect. I personally prefer this one over the last one, at least with the experiences I have had with it.

and edit: I compared the color of the core to some scrap whisky hide, and to one of my brown hides, the brown hides are exactly

the same color as the whisky core, with the plaiting soap applied. It kinda upsets how I went through all this trouble to get lighter

heel knot color, and it will all be for nothing :lol: No huge deal however, it will all work the same, regardless of color :TOH:
User avatar
Canuck Digger
Professor of Archaeology
Posts: 747
Joined: Sun Mar 30, 2008 8:24 pm
Location: Montreal, Canada

Re: My First Kangaroo bullwhip -Build Log - Mod Approved - P

Post by Canuck Digger »

Actually it wasn't an effort in vain because the knots are tied with DRY strands, so no plaiting soap on them; it makes the knot stay tight and in place better than with greased up strands which tend to slip (as greased up strands are want to do) all over the place. Furthermore, with the application of a couple of coats of shellac on your knots, this will act as a sort of glue, further solidifying the knot. I've done both with and without grease and I much prefer the result without. Also, I don't skive the strands used to tie knots at all, I just make sure they are even and VERY WELL STRETCHED, because as you are tying the knot, it will become progressively tighter and tighter, and this will press down on your strand as you pass it under previous strands and this tends to stretch it a bit, so I found that if my strand wasn't very well stretched, it got thinner toward the end. Of course a way around this might be to actually cut your strand with a slight taper, so it gets bigger as you go along, but in most cases this won't be necessary if you just stretch it before.

So you see, despite the color match, getting the other hide wasn't pointless at all.
Cheers,


Franco
Marhala
Dig Leader
Dig Leader
Posts: 523
Joined: Mon Jul 14, 2008 10:07 am
Contact:

Re: My First Kangaroo bullwhip -Build Log - Mod Approved - P

Post by Marhala »

That core has a great taper, Jeremy.

I wonder... Do most people leave that "step" where the core leaves the spike? I always try to keep the diameter leaving the spike the same as in the core...

Just asking.

Aldo.
User avatar
Canuck Digger
Professor of Archaeology
Posts: 747
Joined: Sun Mar 30, 2008 8:24 pm
Location: Montreal, Canada

Re: My First Kangaroo bullwhip -Build Log - Mod Approved - P

Post by Canuck Digger »

I just thought of something and decided it wasn't too late to mention it; how did you prepare the tip of the spike? Did you grind a rebate, or file it smooth? Did you use a wear leather?

Franco
User avatar
riku1914
Vendor
Posts: 1246
Joined: Mon Feb 07, 2011 6:38 pm
Location: Texas, probably making whips :)
Contact:

Re: My First Kangaroo bullwhip -Build Log - Mod Approved - P

Post by riku1914 »

Canuck Digger wrote:I just thought of something and decided it wasn't too late to mention it; how did you prepare the tip of the spike? Did you grind a rebate, or file it smooth? Did you use a wear leather?

Franco
I used a file to round it , normally I would grind it, but the grinder was kind of concealed... in a mess... What is wear leather?
User avatar
Canuck Digger
Professor of Archaeology
Posts: 747
Joined: Sun Mar 30, 2008 8:24 pm
Location: Montreal, Canada

Re: My First Kangaroo bullwhip -Build Log - Mod Approved - P

Post by Canuck Digger »

A wear leather is something that some people use (I am one of them) and it's like a very small core that goes around the last inch of the spike and extends for a few inches past it as a tapering triangle. The idea is to have an extra layer of protection so the point of the spike doesn't cut through the other layers of the whip with use. But I think that it really takes on it's full meaning if you don't bind the transition at all, in other words when the thong can start to bend right away after the handle. If you bind the transition zone over multiple layers, then I think this area would probably be sufficiently supported to not wear down too easily. It also depends on how smooth you filed the point. I wouldn't worry about it too much at this stage, it's just something that popped in my head and got curious.

Carry on.


Franco
User avatar
riku1914
Vendor
Posts: 1246
Joined: Mon Feb 07, 2011 6:38 pm
Location: Texas, probably making whips :)
Contact:

Re: My First Kangaroo bullwhip -Build Log - Mod Approved - P

Post by riku1914 »

Considering I'm going to be binding 5 layers of closed loop, with criss cross on the end, I think it'll be fine :lol: Maybe I'll have

to remember this if I made a "used" morgan style, like you see in the streets of cairo scene, that's really loose.

When you said "filing a rebate" do you mean what you see in this pic, minus the thing that is used for shot loading :

Image


I've done this before, and I'm going to try it again, but since when I did do this I was only using plaited bellies ( and it was either

nylon or vinyl ) it didn't do what I wanted it to.

What I kind of want to do on my next whip is grind it down like shown in the pic, putting a short core around it ( longer than wear

leather, shorter than a regular core ) and then putting my core around that, this way, everything would hopefully be leveled out

with the first 4 plait, starting with the yoke over the handle and the plaiting at the end of the handle.

This way I wouldn't need to put my first bolster on the end of the handle to even things out.
User avatar
Canuck Digger
Professor of Archaeology
Posts: 747
Joined: Sun Mar 30, 2008 8:24 pm
Location: Montreal, Canada

Re: My First Kangaroo bullwhip -Build Log - Mod Approved - P

Post by Canuck Digger »

yes this is what I meant by rebate, however you should know many whipmakers don't grind a rebate, but simply use a wear leather over the point which they have filled smooth (there IS a difference between filling a point smooth of any rough or sharp edges and grinding a rebate...). Some even make their core wider as it leaves the spike to act as a wear leather, only incorporated into the core, but that is a bit trickier to get right and I suggest you stick with the basics before tackling that. Plenty of time for experimenting later.

As I understand it, if you were to smooth out the tip into a bullet shape with no rough edges at all, in theory there would be no point to a wear leather in terms of functionality, especially with multiple bindings. However, what I found interesting about using a wear leather on a point with a rebate (like in the pic) , is that if you keep the wear leather to a maximum of 3" past the spike, what happens is that it then becomes relatively easy to match the dip with the skiving of the end of the first bolster. Whereas if you made it longer than 3", the rate of taper you would have to match in skiving the end of the first bolster would be so long as to be a major pain in the rear. This way, you get the added protection, AND it's easy to match with the bolster.

But again, that's just my way of doing things and in many ways I tend to go a bit overboard, and I'm sure many will tell you that if you just roughly file the point smooth, that's enough and you can do that in only a few minutes, as opposed to the 15-20 minutes it takes me to grind a rebate the way I like it. And they may very well be right. But this is more a matter of style than pure necessity, so take this with a grain of salt. I like going that extra mile if I think it makes a difference, but it doesn't mean I'm right... As long as you understand the reasons for a wear leather (to protect the subsequent layers from being cut by the tip of the spike), then you can adapt the IDEA to your own way of doing things. This way has worked very well for me and provides a very sturdy transition from the handle, but beyond that it's to each their own.

Hope this helps.


Franco
User avatar
riku1914
Vendor
Posts: 1246
Joined: Mon Feb 07, 2011 6:38 pm
Location: Texas, probably making whips :)
Contact:

Re: My First Kangaroo bullwhip -Build Log - Mod Approved - P

Post by riku1914 »

I was thinking back on the days when I made wood ( and laminated ) bows. Something I knew from then made me have a realization

with whip making, and here's what it is:

It's regarding paring my strands. The two main versions are / \ , and / / ( or \ \ ) .

Now here's where the bow thing comes in, I was thinking back on english longbows, which has a rounded surface. Now the people

that invented this style of bow many ages ago didn't do it just to make a funny looking bow, they did it because of the way

they would cut the wood out.

The reason they invented these, ( if I got my stories straight ) was because instead of taking the time to train archers for an

army, they simply made everybody have a bow, and then if they got attacked, they had a much better chance of 500, not

skilled archer defending against an army, than 5 or 10 very skilled archers defending against it.


Now, where the rounded limbs come in:

Image

Can you see why they cut it like that? If they cut the wood out of a log, rounded like that, they could get more, because it gets

smaller towards the inside, and fits together more tightly.


How does this all pertain to whips?

Well, pretend that those pieces of wood are leather strands, if you could get the right angle, you can bevel BOTH undersides,

which would make the smaller part fit around whatever you are plaiting over, then the bigger part, the grain side, would fit

around the circle that the smaller part makes ( the flesh side ).

In other words, you would have every strand fit exactly together, IF you got the right angle, which I believe is somewhere in the

neighborhood of 60 degrees.

I'm still going to try this current whip, by paring like / / , but I can see now why you can supposedly get a smoother surface when

paring the strands / \


Interesting....
User avatar
riku1914
Vendor
Posts: 1246
Joined: Mon Feb 07, 2011 6:38 pm
Location: Texas, probably making whips :)
Contact:

Re: My First Kangaroo bullwhip -Build Log - Mod Approved - P

Post by riku1914 »

I've been looking at a couple jacka indy 4 whips, and while on the pics on his website, it doesn't appear that the thong is heavier

than the handle, it does in some people's pictures, so should I make my whip like this, or just make a straight handle - thong joint?

opinions?
Marhala
Dig Leader
Dig Leader
Posts: 523
Joined: Mon Jul 14, 2008 10:07 am
Contact:

Re: My First Kangaroo bullwhip -Build Log - Mod Approved - P

Post by Marhala »

The thing with the way you skive IMHO, is that strands spiral around the thong, they do not go in straight lines as in bows, as I understand. Besides, the plaiting is double-layered, the strand goes down a number of others, and then over another few.

In any sequence under-one over-one (i.e. four plait), each strand describes a wave pattern. The strand that goes over, this "wave", fits perfectly well into the valley formed (a trapezoid, with its shorter base against the "floor", fitting into a gap the same shape). But the strand that remains under the crest formed, generates a gap. It still works great for the outer part, which will be very smooth.

In a four-seam plait (that is, 8 and over), the width of the strand is smaller relative to the distance it should go under or over. They stack one in front of the other. That is why skiving this way (//) seems better for four-seam work. I think it was Louie who said that it fits like a wooden floor with notches.

Aldo.

PS I promise I'll post some sketches of what I mean.
User avatar
Canuck Digger
Professor of Archaeology
Posts: 747
Joined: Sun Mar 30, 2008 8:24 pm
Location: Montreal, Canada

Re: My First Kangaroo bullwhip -Build Log - Mod Approved - P

Post by Canuck Digger »

Couldn't have said it better myself Aldo!

Franco
User avatar
riku1914
Vendor
Posts: 1246
Joined: Mon Feb 07, 2011 6:38 pm
Location: Texas, probably making whips :)
Contact:

Re: My First Kangaroo bullwhip -Build Log - Mod Approved - P

Post by riku1914 »

Like I said, I'm still going to be experimenting with it, ( // /\ ), keep in mind this is NOT on 4 plait ( my experimenting ) :lol:

I would think that even though they spiral around, the same would apply, but that's what my mind says.


What about the other questions I had, about the thong heavier than the handle, as I said, on Terry's website, the indy 4 whips

don't look like the thong is heavier, but the whips I've seen from people that own them, seem like they do...

Opinions? I'd probably, if anything, just have the third bolster taper split for the first 2 inches, to make the "fade" into the thong,

and just add it to the last two inches of the handle, instead of all of it.
User avatar
tomek9210
Professor of Archaeology
Posts: 1161
Joined: Mon Jun 23, 2008 4:13 pm
Location: Warsaw, Poland
Contact:

Re: My First Kangaroo bullwhip -Build Log - Mod Approved - P

Post by tomek9210 »

riku1914 wrote:
What about the other questions I had, about the thong heavier than the handle, as I said, on Terry's website, the indy 4 whips

don't look like the thong is heavier, but the whips I've seen from people that own them, seem like they do...

Opinions? I'd probably, if anything, just have the third bolster taper split for the first 2 inches, to make the "fade" into the thong,

and just add it to the last two inches of the handle, instead of all of it.
Terry Jacka makes the thong heavier than the handle, and that's why his cs whips are nose-heavy. He uses some fiberglass for handles, and heavy cowhide for bellies and bolsters. Maybe they look like the weight is similiar to Morgan's style bullwhips, but from what I've read here, it's the true. Diameter is the same, the trick is in the guts ;)

Two inches sound fine, cs whips have some bulk in the upper handle.
User avatar
riku1914
Vendor
Posts: 1246
Joined: Mon Feb 07, 2011 6:38 pm
Location: Texas, probably making whips :)
Contact:

Re: My First Kangaroo bullwhip -Build Log - Mod Approved - P

Post by riku1914 »

By "heavier than the handle" I mean thicker, sorry for my wording on that, I can understand how you thought I meant weight wise :oops:
User avatar
riku1914
Vendor
Posts: 1246
Joined: Mon Feb 07, 2011 6:38 pm
Location: Texas, probably making whips :)
Contact:

Re: My First Kangaroo bullwhip -Build Log - Mod Approved - P

Post by riku1914 »

tomek9210 wrote:
riku1914 wrote:
What about the other questions I had, about the thong heavier than the handle, as I said, on Terry's website, the indy 4 whips

don't look like the thong is heavier, but the whips I've seen from people that own them, seem like they do...

Opinions? I'd probably, if anything, just have the third bolster taper split for the first 2 inches, to make the "fade" into the thong,

and just add it to the last two inches of the handle, instead of all of it.
Terry Jacka makes the thong heavier than the handle, and that's why his cs whips are nose-heavy. He uses some fiberglass for handles, and heavy cowhide for bellies and bolsters. Maybe they look like the weight is similiar to Morgan's style bullwhips, but from what I've read here, it's the true. Diameter is the same, the trick is in the guts ;)

Two inches sound fine, cs whips have some bulk in the upper handle.
jacka Indy IV compared to a Morgan:


Image

Image

Image

what's confusing to me is the statement on jacka's site :

The handles on both lengths had the same dimensions.

Specifications asked for: - Handles to be the same size as the standard eight and ten ft. whips (7/8 inch dia.) with 5 inches between the two turks heads which made for a 7 inch long handle foundation. The main turks head to be about 1/3 larger than the standard straight handled eight and ten ft. whips. The weight of the ten ft. whips were averaged over four whips at close to 2 lbs. (906 gm.).
Marhala
Dig Leader
Dig Leader
Posts: 523
Joined: Mon Jul 14, 2008 10:07 am
Contact:

Re: My First Kangaroo bullwhip -Build Log - Mod Approved - P

Post by Marhala »

Here's the image I promised:

http://www.flickr.com/photos/32742927@N07/6021969776/


Hope it is clear, as I made it in a hurry. :-

ATB,

Aldo.
User avatar
riku1914
Vendor
Posts: 1246
Joined: Mon Feb 07, 2011 6:38 pm
Location: Texas, probably making whips :)
Contact:

Re: My First Kangaroo bullwhip -Build Log - Mod Approved - P

Post by riku1914 »

I completely understand where you are coming from, but you gotta remember that what you're plaiting over is round, so if you take

those that are / \, and put them in a circle, you'll get an even circle.

I'm still gonna try // on my next one.
User avatar
Flawless Cowboy
Archaeology Student
Archaeology Student
Posts: 29
Joined: Mon May 02, 2011 5:05 pm

Re: My First Kangaroo bullwhip -Build Log - Mod Approved - P

Post by Flawless Cowboy »

Looking good :TOH:
louiefoxx
Dig Leader
Dig Leader
Posts: 443
Joined: Wed Apr 04, 2007 10:07 am
Location: Seattle, WA
Contact:

Re: My First Kangaroo bullwhip -Build Log - Mod Approved - P

Post by louiefoxx »

A couple things to consider about what way of paring covers the whip better (same side or opposite corners):

1. the same side would be the best way to fill a circle IF the strands ran in a straight line, but they don't. Depending on the width of the strands in relationship to the insides of the whip they could be going almost perpendicular to the length of the whip.

2. Most of the whips life it is never laid out straight...except for the brief moment during a crack when it reaches a full extension...and the few people that hang their whips straight up and down. So for most of us whip owners the bulk of the whips life one side of the plaiting is smooshed together tightly and the other side is being pulled apart (i.e. each strand is trying to move away from the one next to it so that the plaiting can cover a larger area).

3. When a whip is being using it's constantly in motion, every bit of it is being pulled apart or pushed together.

So (in my opinion) while one way or the other may seem great on paper or in your head, each has its own advantages and disadvantages in actual use. If I recall one of the top whip makers (Chris Barr) doesn't pare his strands, they are rectangle. And as Joe Strain told me a long time ago, "no matter how you pare lace, they'll still braid". So for me it comes down to personal preference...however if you are making Morgan Style Indy whips you have to do them opposite corners...that's part of the look! If you are just making a whip then do what you feel.

Also I would recommend trying it both ways...in fact try it five ways:
1. top left bottom right
2. top right bottom left
3. both bottom
4. both top
5. rectangle
(bonus) try paring all 4 corners

Each way will give you a different texture on your whip. If you search paring or pare on my blog (http://www.bullwhips.org) you'll see I've tried paring every which way and you can see the results. The important thing is to try it and see for yourself what works better for you and your eye!

The coolest thing about whip making is that there is no one specific right way to do it (there are a lot of specific wrong ways) and that gives the whip maker a lot of room to add in their own personal style!

Louie
User avatar
classicbullwhips
Vendor
Posts: 217
Joined: Thu Jul 27, 2006 12:07 am
Contact:

Re: My First Kangaroo bullwhip -Build Log - Mod Approved - P

Post by classicbullwhips »

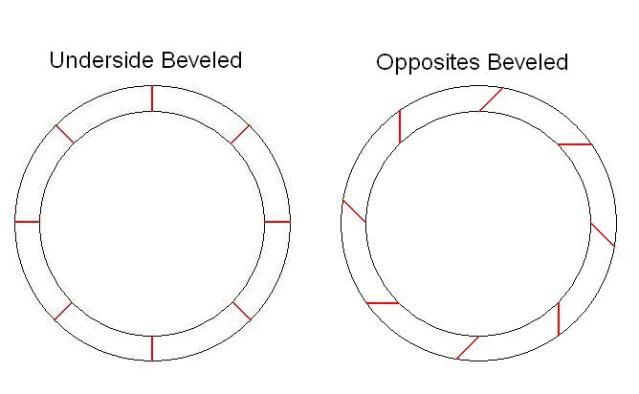
I figured I would post a little drawing that I did to help explain a few things about beveling (please excuse my drawing skills).

Image

Beveling both the opposite sides you still can achieve that roundness that I think you are referring to. One reason that Australian whipmakers beveled opposite sides was to create the least amount of waste as possible when cutting strands. In Ron Edwards book How To Make Whips he talks about how cutting opposite sides allows for placing the strand closer together utilizing more of the hide for possibly more whips (the top bevel of one strand would be the under of the next), these old time whipmakers were so good that the amount of waste could fit onto the face of a coin.

I know I suggested it before but I would highly recommend Ron Edwards book How To Make Whips, it has a lot of good info that I think would help you along your whipmaking journey.

Keep Crackin,
James
User avatar
Canuck Digger
Professor of Archaeology
Posts: 747
Joined: Sun Mar 30, 2008 8:24 pm
Location: Montreal, Canada

Re: My First Kangaroo bullwhip -Build Log - Mod Approved - P

Post by Canuck Digger »

James,
your drawings still presupposes that the strands run down the length of the thong, which they don't; they run at an angle, and as Louie mentioned, sometimes almost perpendicularly, at which point the notion of paring both on the flesh side becomes a bit moot. But, as he also pointed out, to each their own.

While pairing opposite corners can save leather on a thicker hide, such as redhide, where the leather is thick enough to allow such fancy cutting, I somehow doubt this was intended for kangaroo which, thickness asside, does need to be properly stretched first, so cutting in this fashion would not be very economical because you would still need to stretch the strands after cutting and re-skive them.

I do feel that skiving opposite corners can make for a tighter plait if the strands are cut wide, like on a Morgan whip, but that becomes a little less pertinent, though not by much, on a whip cut with thinner strands, like a Jacka.

In this case, I wouldn't say there is a right or wrong way of doing things, but I do think it's important to understand what is going on and why things are done one way as opposed to another...
Cheers,


Franco
User avatar
riku1914
Vendor
Posts: 1246
Joined: Mon Feb 07, 2011 6:38 pm
Location: Texas, probably making whips :)
Contact:

Re: My First Kangaroo bullwhip -Build Log - Mod Approved - P

Post by riku1914 »

The reason we are showing it in a circle like that is because it's simplest way, to draw a 3d spiraling plaiting, you would get a very

similar effect, but i would take a lot more time, I'd probably use google sketch up though if anyone wants to attempt it.

Keep in mind, I'm not arguing or saying any of you are wrong, I'm just stating what makes sense in my own mind , which, I can tell

you myself, isn't always right :lol:

oh update on situation, I'm likely ordering a Dene Williams strander on Thursday or Friday, based on my previous experience with

midwestwhips, it'll be in the mail at the lastest Friday, and get here by tuesday or wednesday, I'll update then.
User avatar
classicbullwhips
Vendor
Posts: 217
Joined: Thu Jul 27, 2006 12:07 am
Contact:

Re: My First Kangaroo bullwhip -Build Log - Mod Approved - P

Post by classicbullwhips »

I agree Franco as it is a very poor representation of what plating actually looks like going down and around a whip, I was trying to show a better visual of what I think riku1914 was talking about within a 2D picture. (the perpendicular cross section to the length of the whip would actually have two sets, one for the strand sets that go over and one for the set that go under) David Morgans book Whips and Whipmaking shows some pictures of what the cross section of the thong looks like throughout the different layers, defiantly a better representation due to it being a picture of a cut whip to show this. As for cutting the bevel with thin leather I thought that Ron Edwards talked about doing this with Kangaroo hides but could possibly be wrong its been a while since I have read it (might have to go back through and read it cover to cover again, I seem to be referencing it a lot these days in posts) Hope that helps to clarify.

Keep Crackin,
James
User avatar
riku1914
Vendor
Posts: 1246
Joined: Mon Feb 07, 2011 6:38 pm
Location: Texas, probably making whips :)
Contact:

Re: My First Kangaroo bullwhip -Build Log - Mod Approved - P

Post by riku1914 »

Based on what I've heard about the balance of terry's indy whip recently, I think I'm going to load the heel with some metal. I

don't have lead, but I do have these huge rolls of 3' by who knows how long sheets of steel, so I'll cut some strips of that.

I'm using an 8" handle spike for the foundation, I was thinking 150-200 grams of steel. That should about right? I'm still going

to make the transition the same, and the 8plait point the same, but what tomek said about the heavy stick really made sense to me.

In case you haven't seen what he said yet , he said something like:

Using a jacka and a morgan would be something using a heavy stick, the morgan, the heavy side would be in your handle, thus

easier to handle and more comfortable, the jacka, would be like having the heavy end on the end.

So I'll cut a few strips of metal, but about how much?
User avatar
Canuck Digger
Professor of Archaeology
Posts: 747
Joined: Sun Mar 30, 2008 8:24 pm
Location: Montreal, Canada

Re: My First Kangaroo bullwhip -Build Log - Mod Approved - P

Post by Canuck Digger »

I would discourage the use of steel sheet. For one thing, steel has way less give than lead and may very well end up cutting the leather around it over time. You can't roll or hammer the butt to the shape you want when the knots are done because once more, steel has not give. Lastly steel will behave like a spring if you try to wind it around the spike and I doubt you'll ever be able to secure it well enough for it to not come loose from the handle foundation.

Look at either 3M (the company), they make insulating lead-based (though not pure lead) tape of varying width, or roofing suppliers, though this may be difficult because lead is a carcinogen and has been banned in a lot of places, but I do believe Louie sells strips of it, just ask him.

Franco
louiefoxx
Dig Leader
Dig Leader
Posts: 443
Joined: Wed Apr 04, 2007 10:07 am
Location: Seattle, WA
Contact:

Re: My First Kangaroo bullwhip -Build Log - Mod Approved - P

Post by louiefoxx »

I do occasionally sell lead strips if I have a bunch around. However you can get a square foot of sheet lead pretty cheap here: http://amzn.to/qIhIk9" onclick="window.open(this.href);return false; and it's probably about what I'd charge you for a strip!

Also I just put up a picture of the cross section of a bullwhip on my blog at: http://bullwhips.org

This bullwhip was pared opposite corners. It was a finished bullwhip from many years ago at got damaged shortly after making it. So i cut out a piece of it to look at the inside! It's a rare peek into the inside of a bullwhip!

Louie
User avatar
riku1914
Vendor
Posts: 1246
Joined: Mon Feb 07, 2011 6:38 pm
Location: Texas, probably making whips :)
Contact:

Re: My First Kangaroo bullwhip -Build Log - Mod Approved - P

Post by riku1914 »

Ok thanks louie, I'll get one of those!

The steel I have is about .5mm thick, still too "springy" for steel?

edit: how about the weight? About how much should I use for your average 8ft whip?

Image
User avatar
tomek9210
Professor of Archaeology
Posts: 1161
Joined: Mon Jun 23, 2008 4:13 pm
Location: Warsaw, Poland
Contact:

Re: My First Kangaroo bullwhip -Build Log - Mod Approved - P

Post by tomek9210 »

If you are going to make orthodox Jacka style, go with fibreglass for handle, but if you are going to do normal Indy bullwhip, but with Jacka's transition and appearance, go with heavy nail, about 8mm thick (0.32" or 5/16").
Lead is way to go when balancing the whip. It's heavier than steel and very plastic, so you can easily build up the turkshead's foundation.
For normal Indy bullwhip, I would use about 100 gr of lead, but if you want to do it slightly nose-heavy, just use less.
User avatar
riku1914
Vendor
Posts: 1246
Joined: Mon Feb 07, 2011 6:38 pm
Location: Texas, probably making whips :)
Contact:

Re: My First Kangaroo bullwhip -Build Log - Mod Approved - P

Post by riku1914 »

tomek9210 wrote:If you are going to make orthodox Jacka style, go with fibreglass for handle, but if you are going to do normal Indy bullwhip, but with Jacka's transition and appearance, go with heavy nail, about 8mm thick (0.32" or 5/16").
Lead is way to go when balancing the whip. It's heavier than steel and very plastic, so you can easily build up the turkshead's foundation.
For normal Indy bullwhip, I would use about 100 gr of lead, but if you want to do it slightly nose-heavy, just use less.
I am using the 3/8" nail . I'm pretty much making this whip the same I would any other whip, just more binding, and an extra

bolsters. Oh and the 8plait point and different knots. Internals are going to be the same.
User avatar
Canuck Digger
Professor of Archaeology
Posts: 747
Joined: Sun Mar 30, 2008 8:24 pm
Location: Montreal, Canada

Re: My First Kangaroo bullwhip -Build Log - Mod Approved - P

Post by Canuck Digger »

louiefoxx wrote:I do occasionally sell lead strips if I have a bunch around. However you can get a square foot of sheet lead pretty cheap here: http://amzn.to/qIhIk9" onclick="window.open(this.href);return false;" onclick="window.open(this.href);return false; and it's probably about what I'd charge you for a strip!

Also I just put up a picture of the cross section of a bullwhip on my blog at: http://bullwhips.org

This bullwhip was pared opposite corners. It was a finished bullwhip from many years ago at got damaged shortly after making it. So i cut out a piece of it to look at the inside! It's a rare peek into the inside of a bullwhip!

Louie
Hey Louie,
I've always worked with lead-based tape but those weren't pure lead, how long of a strip of 1" lead would you put on an 8' Indy (Morgan style)? The stuff I use is not only lighter than pure lead, but very thin as well, so my base of comparison is very different...

Thanks,


Franco
User avatar
kwad
Professor of Archaeology
Posts: 1016
Joined: Sun Jan 24, 2010 5:26 pm
Location: Hiding under your bed at night.

Re: My First Kangaroo bullwhip -Build Log - Mod Approved - P

Post by kwad »

Another place to get lead is http://www.rotometals.com/product-p/leadsheet2pound.htm
No minimum order and they ship pretty quickly.
Post Reply