


Ok, before the obligatory"the search button is your friend" quote, I did search and couldnt find exactly what Im looking for, so Im asking.
How exactly do you hem the pants? And by that I mean, how does one make the front higher than the back? I thought I had read in a thread somewhere you cut the seam and fold the front up higher than the back...but I cant remember or find that thread.
hemming the pants
Moderators: Mike, Cajunkraut, Tennessee Smith
-
Indiana Joyce

- Dig Leader

- Posts: 656
- Joined: Fri Jun 27, 2008 6:46 am
- Location: Cambridge. MA
-
twilekjedi

- Professor of Archaeology

- Posts: 1095
- Joined: Mon Sep 08, 2008 11:36 pm
- Location: If there's a bright center to the universe...
Re: hemming the pants
Alkali Jones has some info and a photo about hemming the pants within this thread:
http://indygear.com/cow/viewtopic.php?f=16&t=36514
http://indygear.com/cow/viewtopic.php?f=16&t=36514
-
Alkali Jones

- Laboratory Technician

- Posts: 168
- Joined: Mon Jul 14, 2008 6:48 pm
- Location: Chicagoland Area
Re: hemming the pants
Hey Indiana Joyce,
Here’s how to do the military hem. I've seen more posts not getting this than almost any other topic. Of course, the military hem is just hemming the back of the pants one inch or so lower than the front. Here goes:
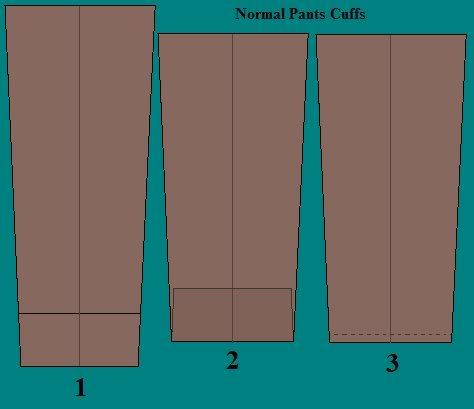
On the normal cuff, you put on the right shoes, mark the spot, tuck them in, iron, serge or false hem, and sew (blind hem stitch), like illustrated. You can't do this with the military hem:
Several problems crop up. Problem one, you can't tuck the hem fabric in, it won't fit. Number two; even if you could tuck the hem in, you can't sew it without puckering the pants leg. It's just too far away.
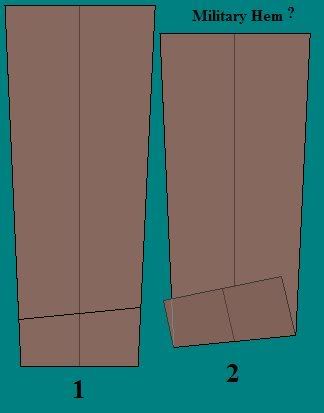
Now if you're a really tall fellow, you must do this, but, you're going to have only about one inch of hem. You're going to slit the front and back of the hem fabric (stay about one eighth to three sixteenths inch back from the edge of the finished hem, it'll stretch a little and look OK). In the front the hem is going to open up a little and in the back it's going to overlap some.
OK, you ask, so how do you do the Indy style military hem?
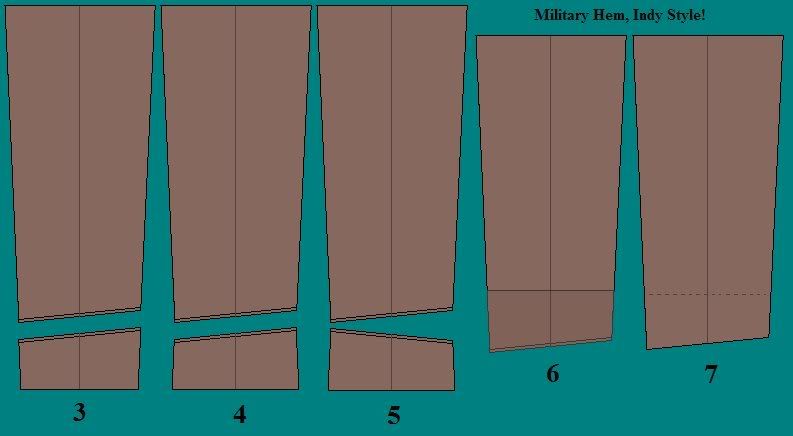
You start by marking the hem like any other (wearing the right shoes). Using pins or tailor's chalk (or any non permanent chalk), mark the military hem from front to back (illustration 1, above). Add seam allowance (about one half or five eighths inch will do), mark and cut off the extra hem fabric (illustration 3).
Next, if you want the four inch high blind hem stitch Indy look, you must rip both side seams and re-pin and sew with the correct taper. It should be slightly smaller than the area of the pants where it will fit (illustration 4). You can check this by laying the hem pieces on the pants and marking the hem pieces so the pants just show on each side.
Decide how you are finishing the top edge of your hem, either serging or a false hem and do this now, as it will be harder later.
Then, reverse the hem piece orientation (illustration 5) turn it inside out, and put good side to good side (illustration 6) and sew. The hem piece will be outside the pants. The side seams should line up pretty close. After you sew, iron things the way they go, and hand stitch the blind hem, or, to be really screen accurate, use a machine blind hem stitch (illustration 7 and below). This might be the time to either iron out some of the original creases if the pants are bought, or put in a little crease if you make your own.

Dan S
Here’s how to do the military hem. I've seen more posts not getting this than almost any other topic. Of course, the military hem is just hemming the back of the pants one inch or so lower than the front. Here goes:
On the normal cuff, you put on the right shoes, mark the spot, tuck them in, iron, serge or false hem, and sew (blind hem stitch), like illustrated. You can't do this with the military hem:
Several problems crop up. Problem one, you can't tuck the hem fabric in, it won't fit. Number two; even if you could tuck the hem in, you can't sew it without puckering the pants leg. It's just too far away.
Now if you're a really tall fellow, you must do this, but, you're going to have only about one inch of hem. You're going to slit the front and back of the hem fabric (stay about one eighth to three sixteenths inch back from the edge of the finished hem, it'll stretch a little and look OK). In the front the hem is going to open up a little and in the back it's going to overlap some.
OK, you ask, so how do you do the Indy style military hem?
You start by marking the hem like any other (wearing the right shoes). Using pins or tailor's chalk (or any non permanent chalk), mark the military hem from front to back (illustration 1, above). Add seam allowance (about one half or five eighths inch will do), mark and cut off the extra hem fabric (illustration 3).
Next, if you want the four inch high blind hem stitch Indy look, you must rip both side seams and re-pin and sew with the correct taper. It should be slightly smaller than the area of the pants where it will fit (illustration 4). You can check this by laying the hem pieces on the pants and marking the hem pieces so the pants just show on each side.
Decide how you are finishing the top edge of your hem, either serging or a false hem and do this now, as it will be harder later.
Then, reverse the hem piece orientation (illustration 5) turn it inside out, and put good side to good side (illustration 6) and sew. The hem piece will be outside the pants. The side seams should line up pretty close. After you sew, iron things the way they go, and hand stitch the blind hem, or, to be really screen accurate, use a machine blind hem stitch (illustration 7 and below). This might be the time to either iron out some of the original creases if the pants are bought, or put in a little crease if you make your own.
Dan S

Re: hemming the pants
Thanks Alkali! No if you could just translate that into Vietnamese, I can print it out and get my tailor to do it. ](./images/smilies/Indy_wall.gif "Brick wall")
-
Indiana Joyce
- Dig Leader
- Posts: 656
- Joined: Fri Jun 27, 2008 6:46 am
- Location: Cambridge. MA
Re: hemming the pants
Ok, ive looked at this a million times, and it still makes no sense. So before I let my mother destroy yet another thing, is there any way you can make a clearer and more thorough how to?
It sounds like you are saying, I cut the bottom of the pants, at an angle, then take the leftover material, turn it inside out(and im assuming the pants are inside out at this point)...
Rotate the leftover material 180 degrees( so that its now back to front? or upside down?) then re attatch to the bottom of the pants. Doing this on a scrap pair of pants, I still cant get the leftover material to line up.
I guess Im saying that I just dont understand this at all, and after hours of searching google and MSN for ROTC hem, Military Hem, Slant Hem, Fishtail Hem, and West Point hem, Your tutorial is the only military hem tutorial on the entire internet.
-
Alkali Jones
- Laboratory Technician
- Posts: 168
- Joined: Mon Jul 14, 2008 6:48 pm
- Location: Chicagoland Area
Re: hemming the pants
Hey Indiana Joyce,
Let's start by assuming you are of average height. Say five-ten-ish. Further, I'll assume you have un-hemmed pants to start with. With the pants on and while wearing the correct shoes, mark where you want your pants to break on your shoes. Tuck the pants up on the inside until they look right. Mark the spot with non-permanent chalk or pins.
Both legs should be the same (If they're not the same, see a reliable chiropractor! ) Now, slip your pants off and lay them out on an ironing board or clean table or whatever. They are still right side out. Since the pant legs are tapered, first you must decide on a hem line that is perpendicular to the side seam. Mark the back temporarily with a pin or chalk. Now, so far, all this is just like hemming any pair of pants, so now we go to the military hem.
Along the back of the pants, measure down one inch from the mark you made in the step above, (the perpendicular line). This generates the sloped hem that is one inch longer in the back. Connect the marks with non-permanent chalk if you want to see where the hem will fall. Now, measure down one half (or five eighths) of an inch and draw another line parallel to the finished hem line you might have just made. This will be your cut line. The added half or five-eighths is the seam allowance. It should look something like Illustration three above.
Remember, measure twice, cut once!
Now, rip the thread that is holding the cut off hem pieces together. Don't literally rip it, use a seam ripper or other tool to cut the thread so you can iron the pieces and reattach with the reverse taper. This is important. When you sew them back together, they should still be good side to good side (outside to outside). If you can copy the taper exactly, that's ok, but making it slightly smaller is ideal. It should look like Illustration four.
Now, take the re-done hem pieces and line them up like Illustration five. The old front now lines up with the back edge of the pants. Turn the cut off hem pieces inside out and slide them on to the outside of the pants. The side seams should line up pretty close (but not necessarily perfectly). The cut edges should be next to each other. Pin the pieces together for sewing. The pants may bunch up a little; you do what is called "ease" the seam in. Stretch things a little as you sew so the seam is wrinkle free and flat. Sew. Use the same seam allowance you added earlier (half or five-eighths inch). Start on the inside side seam and just sew around the hem.
Turn the hem inside and iron the new hem seam to look like the picture above. Finish the top of the hem pieces either with a false hem or serge and finish. I know some of that is "sewing speak" and repeats some of the stuff you didn't get from before. If some of our other sewers could chime in (and you know who you are! ), maybe they could help, too. Hope that helps.
Dan S
Let's start by assuming you are of average height. Say five-ten-ish. Further, I'll assume you have un-hemmed pants to start with. With the pants on and while wearing the correct shoes, mark where you want your pants to break on your shoes. Tuck the pants up on the inside until they look right. Mark the spot with non-permanent chalk or pins.
Both legs should be the same (If they're not the same, see a reliable chiropractor!
Along the back of the pants, measure down one inch from the mark you made in the step above, (the perpendicular line). This generates the sloped hem that is one inch longer in the back. Connect the marks with non-permanent chalk if you want to see where the hem will fall. Now, measure down one half (or five eighths) of an inch and draw another line parallel to the finished hem line you might have just made. This will be your cut line. The added half or five-eighths is the seam allowance. It should look something like Illustration three above.
Remember, measure twice, cut once!
Now, rip the thread that is holding the cut off hem pieces together. Don't literally rip it, use a seam ripper or other tool to cut the thread so you can iron the pieces and reattach with the reverse taper. This is important. When you sew them back together, they should still be good side to good side (outside to outside). If you can copy the taper exactly, that's ok, but making it slightly smaller is ideal. It should look like Illustration four.
Now, take the re-done hem pieces and line them up like Illustration five. The old front now lines up with the back edge of the pants. Turn the cut off hem pieces inside out and slide them on to the outside of the pants. The side seams should line up pretty close (but not necessarily perfectly). The cut edges should be next to each other. Pin the pieces together for sewing. The pants may bunch up a little; you do what is called "ease" the seam in. Stretch things a little as you sew so the seam is wrinkle free and flat. Sew. Use the same seam allowance you added earlier (half or five-eighths inch). Start on the inside side seam and just sew around the hem.
Turn the hem inside and iron the new hem seam to look like the picture above. Finish the top of the hem pieces either with a false hem or serge and finish. I know some of that is "sewing speak" and repeats some of the stuff you didn't get from before. If some of our other sewers could chime in (and you know who you are!
Dan S
-
Indiana Joyce
- Dig Leader
- Posts: 656
- Joined: Fri Jun 27, 2008 6:46 am
- Location: Cambridge. MA
Re: hemming the pants
Does it matter that Im actually six foot five, and these are unfinished pants? Im going to pass this info on and see if she gets it now.
And are you saying that the cut off piece gets sewn to the outside of the pants??
And are you saying that the cut off piece gets sewn to the outside of the pants??
-
rover smith

- Archaeologist

- Posts: 324
- Joined: Wed Nov 26, 2008 6:06 am
- Location: Glasgow
Re: hemming the pants
Hey AJ,
Thanks for the detail on this. I too have been trying to find more info on exactly how you go about doing a "military hem" but with no luck. I think I get it now
Scott
Thanks for the detail on this. I too have been trying to find more info on exactly how you go about doing a "military hem" but with no luck. I think I get it now
Scott
-
Alkali Jones
- Laboratory Technician
- Posts: 168
- Joined: Mon Jul 14, 2008 6:48 pm
- Location: Chicagoland Area
Re: hemming the pants
Hey Indiana Joyce,
Boy howdy does it matter if you're six foot five! When you put the pants on, how much do you have left over to cut off for hemming? If you don't have the three or four inches of cut off fabric left over (that are required for SA hemming), then you must hem differently.
Now if you have, say two inches left, well, just follow the directions above and realize that you'll only have a two inch high hem instead of Indy's three or four inch high hem. But, if you only have one or one and a half inches, then we must change our plans.
To do the military hem for you tall guys (with only a small amount of fabric left over), it's much more like a traditional hem. Get yourself to the point where you have the "cut line" marked from the instructions above. Next, don't cut!! Instead, fold on the line that is half an inch or five-eighths of an inch above it and iron the excess fabric to the inside. About an inch above the finished iron line, iron in a false hem or trim and serge.
Now, I know it won't work like this, so you must cut a small slit down from the false hem or serging (on the inside) in both the front and the back along the crease line. Don't cut all the way to the finished edge, though. Stop about one eighth to three sixteenths of an inch from the fold. The back slit edges will overlap a little, the front slit edges will open up a little. After the ironing and the slit cutting, blind stitch or machine blind stitch the hem, and voila!, you're done.
Oh, and to answer your question IJ, you sew the hem piece on the outside, but then you will turn it to the inside to iron it and finish it. The hem cut off piece will have it's good side (the part that will eventually touch your socks or shoes) against the out side of your pants. This is when you sew it. But you will iron it and turn it into the inside. Follow?
You know, I guess I'll say this too, even at the risk of being confusing. You can use the "cut off and sew back on method" even if you're tall, but it'll be pretty hard to handle the tiny little cut off hem peice without wrecking it. But with care, you can do it. Hope this helps.
Dan S
Boy howdy does it matter if you're six foot five! When you put the pants on, how much do you have left over to cut off for hemming? If you don't have the three or four inches of cut off fabric left over (that are required for SA hemming), then you must hem differently.
Now if you have, say two inches left, well, just follow the directions above and realize that you'll only have a two inch high hem instead of Indy's three or four inch high hem. But, if you only have one or one and a half inches, then we must change our plans.
To do the military hem for you tall guys (with only a small amount of fabric left over), it's much more like a traditional hem. Get yourself to the point where you have the "cut line" marked from the instructions above. Next, don't cut!!
Now, I know it won't work like this, so you must cut a small slit down from the false hem or serging (on the inside) in both the front and the back along the crease line. Don't cut all the way to the finished edge, though. Stop about one eighth to three sixteenths of an inch from the fold. The back slit edges will overlap a little, the front slit edges will open up a little. After the ironing and the slit cutting, blind stitch or machine blind stitch the hem, and voila!, you're done.
Oh, and to answer your question IJ, you sew the hem piece on the outside, but then you will turn it to the inside to iron it and finish it. The hem cut off piece will have it's good side (the part that will eventually touch your socks or shoes) against the out side of your pants. This is when you sew it. But you will iron it and turn it into the inside. Follow?
You know, I guess I'll say this too, even at the risk of being confusing. You can use the "cut off and sew back on method" even if you're tall, but it'll be pretty hard to handle the tiny little cut off hem peice without wrecking it. But with care, you can do it. Hope this helps.
Dan S
Last edited by Alkali Jones on Fri Apr 17, 2009 1:51 pm, edited 1 time in total.
-
Indiana Joyce
- Dig Leader
- Posts: 656
- Joined: Fri Jun 27, 2008 6:46 am
- Location: Cambridge. MA
Re: hemming the pants
Ok, that actually makes alot more sense. I think I get more of it now. Ill keep you informed. I think the pants are unfinished 40 inches, and I think Im a 36 or 37 inch leg.
-
Alkali Jones
- Laboratory Technician
- Posts: 168
- Joined: Mon Jul 14, 2008 6:48 pm
- Location: Chicagoland Area
Re: hemming the pants
Hey Indiana Joyce,
It's been about two weeks, any progress or pictures?
Dan S
It's been about two weeks, any progress or pictures?
Dan S
-
RCSignals
- Legendary Adventurer

- Posts: 3665
- Joined: Thu Sep 18, 2008 11:32 pm
- Location: Twin Galaxies
Re: hemming the pants
I understand what is being described. I've never seen a pair of 'military' trousers hemmed with such a deep hem like this though and I've had some very old (1937) (unissued) 'riding troops' blue trousers. Angled hem definitely, even with a curve to it, but nothing so complicated as is being described.
-
Alkali Jones
- Laboratory Technician
- Posts: 168
- Joined: Mon Jul 14, 2008 6:48 pm
- Location: Chicagoland Area
Re: hemming the pants
Hey RCSignals,
My nephew is around six three or four. He is an M.P. in the army (currently in Iraq). I got a chance to examine his dress green (?) trousers. They have the "tall guys" hem instructions with the slits. Once I saw them, I knew how to do both the "narrow" hem method and the "wide" hem method. I've used the "wide" hem method numerous times hemming Star Wars Capes and Cloaks and what not.
It's very complex to describe; but in practice, it only takes minutes to do (if you're familiar with such things). One thing is certain, if you try to do the Military hem like a conventional hem, it won't work. Do you have pictures of the "riding troops" blue trousers angled hem? I'd love to see what you're talking about.
Dan S
My nephew is around six three or four. He is an M.P. in the army (currently in Iraq). I got a chance to examine his dress green (?) trousers. They have the "tall guys" hem instructions with the slits. Once I saw them, I knew how to do both the "narrow" hem method and the "wide" hem method. I've used the "wide" hem method numerous times hemming Star Wars Capes and Cloaks and what not.
It's very complex to describe; but in practice, it only takes minutes to do (if you're familiar with such things). One thing is certain, if you try to do the Military hem like a conventional hem, it won't work.
Dan S
Last edited by Alkali Jones on Tue Nov 10, 2009 1:14 pm, edited 1 time in total.
-
RCSignals
- Legendary Adventurer
- Posts: 3665
- Joined: Thu Sep 18, 2008 11:32 pm
- Location: Twin Galaxies
Re: hemming the pants
It's only the 3" or 4" deep hem I haven't seen. As I said the angled military hem yes.Alkali Jones wrote:Hey RCSignals,
My nefew is around six three or four. He is an M.P. in the army (currently in Iraq). I got a chance to examine his dress green (?) trousers. They have the "tall guys" hem instructions with the slits. Once I saw them, I knew how to do both the "narrow" hem method and the "wide" hem method. I've used the "wide" hem method numerous times hemming Star Wars Capes and Cloaks and what not.
It's very complex to describe; but in practice, it only takes minutes to do (if you're familiar with such things). One thing is certain, if you try to do the Military hem like a conventional hem, it won't work.
Dan S
Usually on military trousers there is also a heal guard srtrip too.
I sold the blue trousers to someone who had to have them, but I might have some photos. I'll try to find them.
They were a very heavy cloth as well.
-
Indiana Jake

- Dig Leader
- Posts: 576
- Joined: Wed May 07, 2008 3:41 am
- Location: Seated in a Pan Am Sea Plane, flying over a map of Glendale, CA
- Contact:
Re: hemming the pants
Here is a pic of what I had my tailor do to give my pants the military hem.

Jake
Jake
-
Texan Scott
- Legendary Adventurer
- Posts: 5838
- Joined: Sat Jun 21, 2008 8:55 am
- Location: A felt body at rest tends to stay at rest. Sieze the day!
- Contact:
Re: hemming the pants
I've seen a few of those myself.Indiana Joyce wrote:Ok, before the obligatory"the search button is your friend" quote...
Like the color on those pants, Jake.
-
Alkali Jones
- Laboratory Technician
- Posts: 168
- Joined: Mon Jul 14, 2008 6:48 pm
- Location: Chicagoland Area
Re: hemming the pants
Hey Indiana Jake,
That looks really accurate. Well done, good work. You probably have the most accurate Indy pants on the planet (except, of course, for Indy's pants!? ). The color photographs well. If they're too dark, I'd never guess it. I hope Todd's come out as well as yours did. Still waiting for pics in full gear! 'Nough said. 
Dan S
That looks really accurate. Well done, good work. You probably have the most accurate Indy pants on the planet (except, of course, for Indy's pants!?
Dan S
-
rover smith
- Archaeologist
- Posts: 324
- Joined: Wed Nov 26, 2008 6:06 am
- Location: Glasgow
Re: hemming the pants
Gave this a go with some old trousers I have. Didnt turn out all that great, maybe I'm missin something in Alkali's instructions.
When you redo the offcut to match the taper and slide them over the trousers it causes the trousers to bunch up due to the smaller size off the offcut. If you just slip it inside with the pants the right way round this is no problem but when you come to stitch the hem you need to turn them insideout creating the bunching preoblem.
When you redo the offcut to match the taper and slide them over the trousers it causes the trousers to bunch up due to the smaller size off the offcut. If you just slip it inside with the pants the right way round this is no problem but when you come to stitch the hem you need to turn them insideout creating the bunching preoblem.
-
rover smith
- Archaeologist
- Posts: 324
- Joined: Wed Nov 26, 2008 6:06 am
- Location: Glasgow
Re: hemming the pants
Are you drawing my attention to the wrinkling in the bottom picture? Thats not whtas happening. I'm stitching round and when I get tot he end it seems like theres all this extra material that I need to fold over to finish the hem which spoils the line of the trousers. I'm gonna unpick and give it another go tweaking it a little. Big believer in learn by doing.
-
Alkali Jones
- Laboratory Technician
- Posts: 168
- Joined: Mon Jul 14, 2008 6:48 pm
- Location: Chicagoland Area
Re: hemming the pants
Hey rover smith,
The problem you have is solved by "easing-in" the seam. As you have rightly said, the "inner" piece is slightly smaller than the actual pants and so causes them to bunch somewhat when slid on. Since you have cut the "military hem" (it has a slight angle), you have made a "bias cut". This will allow the pants to stretch a little.
Use this to your advantage and as you sew, very gently pull (or stretch) the "off cut" piece. Remember, it only has to look right once it's been turned the right way around, so it may look funny going together, but you don't care as long as when it's turned, it works out. Also, a little stretching may be in order once things are sewn and turned the right way around (before ironing).
All this must be done gently. You can stretch things all out of shape if done "ham-fistedly" (is that a word?). Show some pictures when you're done so others can see how it works. You can even solve this like you were adding sleeves to a shirt or jacket by very slightly gathering the pants before adding the 'off cut". Then remove the gathering when you're done.
Dan S
-
rover smith
- Archaeologist
- Posts: 324
- Joined: Wed Nov 26, 2008 6:06 am
- Location: Glasgow
Re: hemming the pants
Thanks Dan
I think part of the problem is that when I re-stitched the seam on the offcuts I made themm a little too small.
I've unpicked everythign to try again. I'll be sure and post my results once I'm done.
Scott
I think part of the problem is that when I re-stitched the seam on the offcuts I made themm a little too small.
I've unpicked everythign to try again. I'll be sure and post my results once I'm done.
Scott
-
rover smith
- Archaeologist
- Posts: 324
- Joined: Wed Nov 26, 2008 6:06 am
- Location: Glasgow
Re: hemming the pants
So I had a second go at this. Same problem only not as bad.

Im wondering if it could be the material? They're a wool/poly blend.
Im wondering if it could be the material? They're a wool/poly blend.

Re: hemming the pants
rover smith,
Do you have any close ups of the material?
Kyle
Do you have any close ups of the material?
Kyle
-
rover smith
- Archaeologist
- Posts: 324
- Joined: Wed Nov 26, 2008 6:06 am
- Location: Glasgow
Re: hemming the pants
Hey Knibs, heres a link
http://i424.photobucket.com/albums/pp32 ... fabric.jpg
You dont notice it too much when worn. I just wanted to give it a go to see how difficult it would be toi do it myself.
Scott.
http://i424.photobucket.com/albums/pp32 ... fabric.jpg
You dont notice it too much when worn. I just wanted to give it a go to see how difficult it would be toi do it myself.
Scott.
-
Alkali Jones
- Laboratory Technician
- Posts: 168
- Joined: Mon Jul 14, 2008 6:48 pm
- Location: Chicagoland Area
Re: hemming the pants
Hey rover smith,
So the bunching isn't down by the hem edge, it's up by the hem stitching. How are you sewing this? Is it a machine "blind hem"? Or are you hand stitching? It seems it must be a machine doing the stitching. Machine "hemming" is hard. It takes practice. It looks like you're getting better, since you said this "try" is bunching less. Keep at it and you'll get it right. It's still just a matter of "easing" it in. It's that differential "stretching" during construction that has to be "guessed" at. Sewing does require technique. You're getting the hang of it! Hand stitching would be easier, but less acurate.
It could be the taper, too, but it sounds like you fixed that. Just imagine the wrinkling if you hadn't altered the taper at all after you cut the "off-cut" peice off!
Dan S
Last edited by Alkali Jones on Sun Feb 07, 2010 7:44 am, edited 1 time in total.
-
rover smith
- Archaeologist
- Posts: 324
- Joined: Wed Nov 26, 2008 6:06 am
- Location: Glasgow
Re: hemming the pants
Hi Dan,
I'm hand stiching the final step as I dont have the correct foot for my machine to do the blind hem.
I think I've got the cutting and adjusting of the taper correct. Like you said, just a case of doing it a bunch of times until I get the feel for it.
Scott
I'm hand stiching the final step as I dont have the correct foot for my machine to do the blind hem.
I think I've got the cutting and adjusting of the taper correct. Like you said, just a case of doing it a bunch of times until I get the feel for it.
Scott