Welcome to the Fedora Forum FAQs.
Here, you will find answers to some of the more commonly asked questions.
It is always recommended to visit the main Indygear site for more detailed information.
http://www.indygear.com/igfedora.html
Terminology:
Block: The overall shape of the hat body.
Bash: Not to be confused with block, this refers to the shaped details of a hats crown,
such as the top center or teardrop dent and front pinch/crease of the crown.
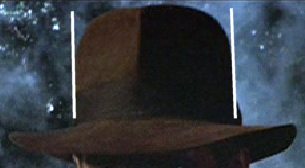
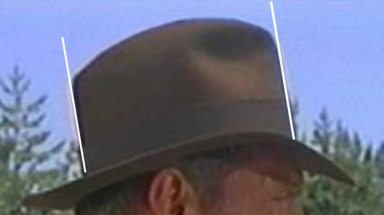
Taper: A sloping of the crown from bottom to top. _ / \_
Taper can happen when a hat gets wet and/or shrinkage occurs. Some hats are designed with taper.
The Raiders hat is not supposed to have any taper.
Dimensional Cut: A non-uniform cut of the brim in relation to the front/back compared to the sides.
Generally, the front/back is slightly wider then sides.
Turn: Refers to the brim warp as seen in the Raiders fedora, especially noted in the Streets of Cairo scene. A basic visual demonstration of how to achieve the turn can be noted as such:
1) Who made the original Indiana Jones hat?
The hat in Raiders was the “Poet” model from Herbert Johnson, created by Mr. Richard Swales.
The specifications are reported to be as follows:
Material: Italian Fur Felt
Lining: White Silk w/gold emblem
Brim: Dimensional cut - front/back: 2 3/4" sides: 2 1/2"
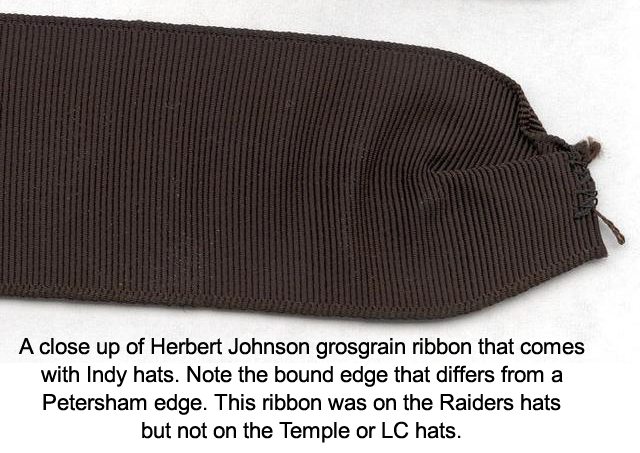
Trim: Dark Brown Petersham Ribbon, 39mm
Color: Sable (medium brown with mild reddish tint)
2) Did HJ make the hat for all of the Indiana Jones movies?
While HJ once again supplied hats for both Temple of Doom and Last Crusade, they were unable to provide the original Brazilian made hats.
The new models were now manufactured by Borsalino.
It is also reported that some Stetson hats appeared in Temple of Doom.
This may account for the variety of different styles seen throughout the movie.
For Last Crusade, HJ reportedly supplied all hats for the movie but still manufactured by Borsalino.
However, in Crystal Skull, the hats were created by Adventurebilt Hat Co.
3) What are the differences between the 4 movie hats?
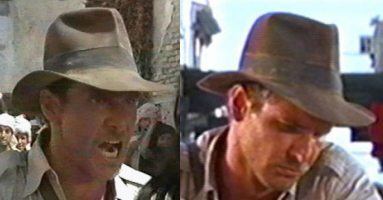
Raiders: Tall crown height. Distinct, tight pinch. Wide brim.
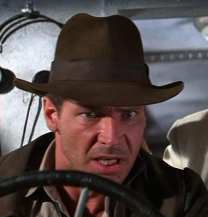
Temple of Doom: Shorter, slightly tapered crown. Relaxed pinch.
A variety of looks depending on the scene due to various suppliers.
Last Crusade: Taller crown then TOD, un-tapered. Pinch not quite as tight as Raiders. Narrower brim but with more swoop.
Crystal Skull: Very Raiders in size and shape, with a Raiders style block, but with a Last Crusade style loose pinch in front.
4) What are the available options for purchasing an Indiana Jones style hat and which is the “Best?”
Today, several excellent and affordable options exist for acquiring an IJ style fedora.
The question of “best” is a matter of personal opinion.
It really depends on how much you are willing to spend, and what type of quality you are looking for.
The following are current vendors offering “Indiana Jones” style fedoras.
Indygear.com does not endorse any of them exclusively.
They are listed here for informational purposes only.
Please note: Prices based on latest information available, are subject to change and do not include shipping.
Herbert Johnson Hats
Poet & McAlpine models
Color: Sable
Approx $225-320 USD
http://www.herbert-johnson.co.uk (England)
http://www.swaineadeneybrigg.net/ (England)
http://www.toddscostumes.com/ (U.S. Source)
http://www.indyfedora.com (German Source)
Adventurebilt Hat Co. (Steve Delk, aka Fedora)
The Fortune and Glory Fedora
Custom Made.
Color: Brown or Gray (Others by request)
$175-$250 USD
http://www.adventurebilthats.com/
Akubra Federation & Federation Deluxe.
Produced by Akubra exclusively for Hatsdirect and based directly on specifications supplied by Indygear.
Ships Open Crown.
Color: Medium dark brown-Regular Federation
Federation Deluxe adds slight red tint and uses Heritage line of felt.
$78 and $125 USD
Australia
http://hatsdirect.com/
Baron California Hats
The "Cliffhanger"
Custom Made
Color: Medium Brown
$298 and $425
Burbank, California
http://www.baronhats.com
Gary White, The Custom Hatter
"The Indy"
Custom Made
Color: Assorted
$395
Buffalo, New York
http://www.vis-pro.com/custom_hatter/
Lee Keppler-Adventure Supply Company
Built to Order by Beaver Brand Hats.
Colors: Medium Brown, Light Gray, Medium Dark Gray
$140
http://www.adventure-supply.com
Miller Hat Company - Indiana Miller
Made by Biltmore. Comes Open crown or bashed.
Color: Coffee, Black & Gray
$115
Houston, Texas
http://www.millerhats.com/
Optimo Hat Company
Custom Made.
Color: Assorted, available upon request.
$400
Chicago, Illinois
http://www.dilectite.au.com/optimohats/
Peter Brothers Hats
PBII Custom and Indy Borsalino aka “The Michaelson.”
Color: 7 Assorted
$185 and $325
Fort Worth, Texas
http://www.petersbros.com
ClubObiWan's JerseyJones is working on the The Model 1936 Fieldmaster
http://www.camptownhats.com
The Penman Hat Co. (John Penman, aka Bendingoak)
The Bulldog tough fedora
handmade/custom using Pure beaver and Pure Rabbit felts
$200.00-$285.00
colors: Black, Charcoal, Dark Moss, Steel Grey, Granite, Dark Brown, Pecan, Natural, Sahara, and Silver Belly.
Ribbon: many color to choose from (contact for a list at info@penmanhats.com)
http://www.penmanhats.com
Akubra Adventurer
Ships Open Crown.
Color: Mid Brown
$125 USD
http://www.akubra-usa.com
http://www.davidmorgan.com
5) How do I shape my hat?
If you purchase an open crown hat, i.e. from Hatsdirect or Miller, it will need to be shaped or “bashed.”
Try here first http://eaglesnest.goblinjournals.com/pagey.html
You may also want to check 3thoubucks site http://www.raidershat.com/
He details bashing the hat off center to fully achieve the Raiders distinct brim swoop.
Its recommended that you familiarize yourself with the shape you are trying to achieve.
MK has put together this group of photos from Raiders to help.
http://www.regular-guy.com/fedora.html
John Penman also offers a very good video tutorial on how to bash a Raiders hat here:
http://www.youtube.com/watch?v=ozJKQVCgeZ4
He also offers a video on bashing it Last Crusade style:
http://www.youtube.com/watch?v=T6hq2sNrU4g
6) I want to replace my ribbon or make the bow look like the one in Raiders.
“What color is the ribbon on the Raiders hat?” was one of the most debated questions regarding the Raiders fedora.
Although it many scenes its looks black, most now believe it to be an extremely dark brown, just short of black.
AdventureBilt, Akubra,and Optimo, probably offer the best color rendition of this ribbon.
Optimo will provide a vintage charcoal brown ribbon if you have them work on your hat.
Akubra WILL NOT sell their ribbon separately.
Adventurebilt Hats now offers Nigerian Brown which may be the darkest to date.
Pyroxene has a supplier that provides a decent quality, medium brown, rayon/cotton blend ribbon.
It needs to be custom dyed a little darker to make it Raiders accurate.
Dalexs’ website shows you how to replace the ribbon and construct what has become known as the “Flying V” bow.
http://www.dalexs.whitvani.net/
7) Are there any special instructions for taking care of my hat?
Most of the above mentioned custom hatters offer cleaning & rejuvenation services.
Special products which include hat brushes, water repelant, stain remover, stiffener,
and hat stretchers are all available at various hat shops.
Noggintops.com has a wide selection of these products.
David Morgan also offers some tips & products here: http://davidmorgan.com/hatcare.html
When “bashing” your open crowned hat, it is ok to use light amounts of steam i.e. from a boiling tea kettle to avoid taper.
Some of the custom hat makers only recommend using the “Cold bashing” method.
This is especially important if the hat has any wool content.
Check with individual vendors for specific instructions
Fedora FAQ's and Links
Moderators: Indiana Jeff, Dalexs
- Dalexs
- Site Admin
- Posts: 9009
- Joined: Mon Jul 08, 2002 2:49 am
- Location: Jus' nath' of Bawstin
- Contact:
Fedora FAQ's and Links
Last edited by Dalexs on Tue May 02, 2006 9:26 pm, edited 11 times in total.
- Dalexs
- Site Admin
- Posts: 9009
- Joined: Mon Jul 08, 2002 2:49 am
- Location: Jus' nath' of Bawstin
- Contact:
What do you look for when looking at an Indiana Jones hat?
Posted Courtesy of Pyroxene
What do you look for when looking at an Indiana Jones hat?
It sounds, at first, to be a simple question. But when you consider the different options and styles from all the different movies,
it is difficult to answer. In this post, I am going to cover some the characteristics I personally look for when looking
at an Indy hat in general. Some things you may know, some you may not.
Also, I’ll touch on things that frustrated me when I would try to shape a hat to look like a particular scene. Keep in mind that
some things are, to me, more important than others. These are things that, when I watch the movie, my eye is always drawn to.
At the same time, I am going to cover some things that I don’t feel are discussed enough.
As far as hats go, I like the profile of the Raiders hats the most and some of the LC hats. Whereas, I don’t find the TOD
hats very interesting. Simply because I don’t think there was much thought that went into the hat for that movie.
BTW, this turned out the be the biggest nitpick I have ever written. So, I will apologize in advance for the length and download
time. With that being said, let’s get started.
The Hat
There are, in my experience, 5 basic parts to the overall appearance of the Indiana Jones hat. Those parts are the
front view, the side view, the pinches or bashes, the ribbon and the brim. I am not going to talk about the liner simply
because I don’t feel, at this time, it plays a major part in the over all look of an Indiana Jones fedora. I will talk briefly
about the sweatband in conjunction with the brim.
The Front View
The front view is the most common view because it’s the one most viewed in the movies and the one you see when
you look in the mirror. It’s this view that is in many of the photographs and stills we model our hats against. When
I think of the best front view, the Raiders hat is the one hat that comes to mind.
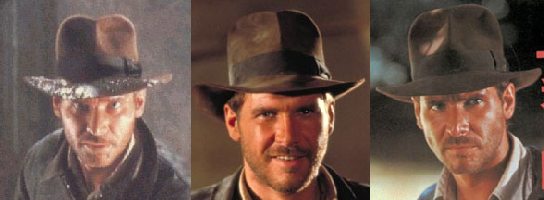
Pictures courtesy of MK
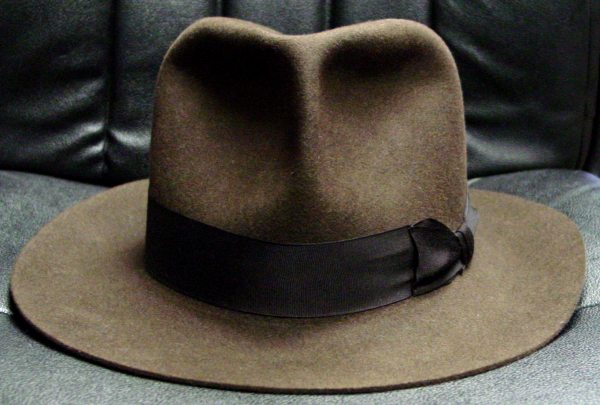
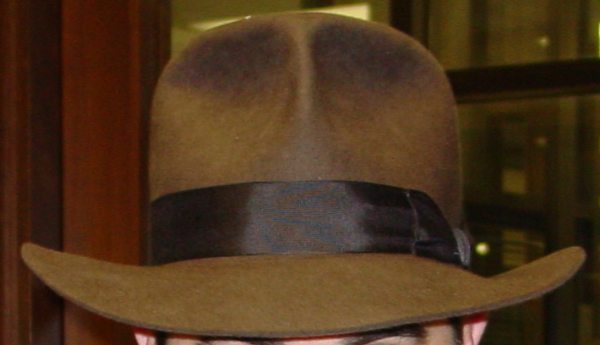
The crown is untapered. Meaning, the edges (in a 2-D view) appear to be parallel. Some people have termed this
a “stovepipe” look.
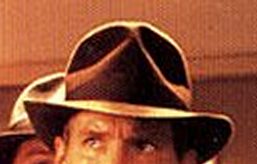
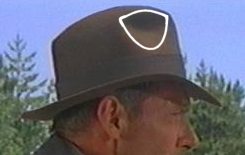
The crown also has two heart-shaped bumps on the top. These are often seen from straight on. However, if the hat,
head or both are tilted back, it could appear to be straight or slightly rounded. Before I understood what was
going on, this was a frustration for me depending on what scene I was shaping my hat to emulate.
Here are some photos of some hats that I feel have had really good front views.
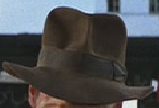
Here are some photos of some hats (all mine) that I feel have had some really bad front views.
Even Indy had his share of bad front views.
The Side View
This view is often overlooked. It’s only after several reblockings does one notice this view. You really need two
mirrors to see this view as the hat is sitting on your head. For the side view, I often pull a little Last Crusade influence
into the mix.
Pictures #1 & #3 courtesy of MK
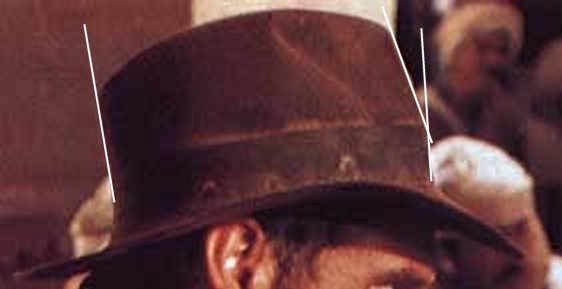
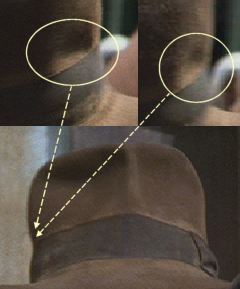
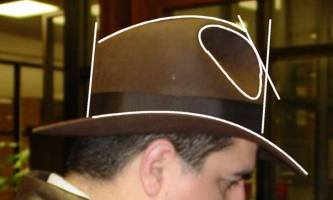
Again, the crown is again untapered. The back of the hat will always be straight as well as some or the entire front.
Sometimes it is even more so. In some scenes, the back of the hat is almost a reverse taper. Meaning, the 2-D line
or edge leans away from the hat rather than towards it. The front of the Raiders’ hat has a backwards slant that starts
just above the ribbon. In almost all cases, the part that is covered by the ribbon is always parallel with the back
of the hat.
Picture courtesy of MK
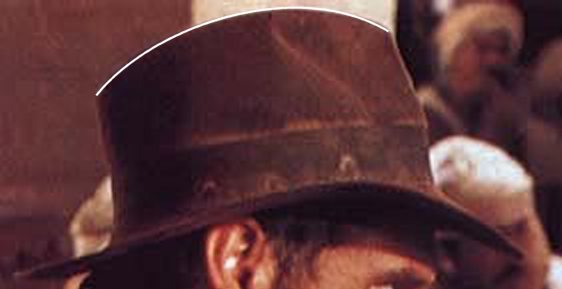
The Last Crusade hat is straight all the way to the top and parallel with the back of the hat.
The top of the hat will have a nice curve across the top.
Picture courtesy of MK
Here are some photos of some hats that I feel have had really good side views.
Here are some photos of some hats that I feel have had some really bad side views.
(Note: The only reason the Pre-Blocked H.J. is listed is because it just didn’t look like any of the hats from
the trilogy.)
There are a few anomalies observed many times with the Raiders hat. The hat can have a very tapered appearance
depending on which angle the hat is viewed.
Additionally, the observance of a reverse taper has been seen in some still photos. Reverse taper is where, on
the front view, the edge of the crown appears to be moving away from the base of the hat rather than remaining
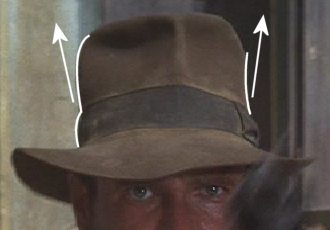
parallel as seen earlier. This creates an additional indentation just above the ribbon of the hat.
Some theories that cause reverse taper are:
• Over tightened ribbon
• Actor’s hair on the inside pushing out on the hat.
• An additional bash on the backside of the
hat that, when viewed from the front, causes this effect.
• Stretching or distorting the hat lengthwise out of its oval form.
• Side bashes pushing the felt further out
• Small little bash or dent towards the back of the hat.
The Bashes or Dents of the Hat
The bashes or dents of the hat are probably some of the most difficult things to create properly in order to make
an Indiana Jones hat look correct. Pushing a bash in one direction may make the hat distort in unpleasant ways
in another. The thickness of the felt is a key and often missed factor of successful hat bashing.
Where does the term bash come from?
Seeing as how most people, including me, in the hat community hadn’t heard of the term bash before, this
question is often asked. The first time most IndyGear fans read the word bash was probably in the following description
on the IndyGear main page.
not as defined.
The tight front crease is primarily created by the side bash. That style calls for the felt to be pulled closely
together in the front of the hat. This also produces the rearward slant that was earlier mentioned.
Picture courtesy of MK
The Last Crusade hat also has a center crease but it’s less defined than Raiders. The felt is pinched near the top.
But, then it flares out, as it gets closer to the ribbon.
From the side, the dents are not as deep and defined as in Raiders. If fact, many of the desert shots in LC appear to
little or no bash to the hat whatsoever.
The LC style will help keep the front and back edge straight and parallel due to the fact that the felt is only pinched
at the top.
The center dent of the hat has been the cause of confusion and concern for a good deal of time. If you make the
bash too deep, on some hats, it will case the sides to taper. If it’s not deep enough, it doesn’t create the correct
looking profile. I have found that if the felt is flexible enough, you can create a very deep center dent without
concern for taper.
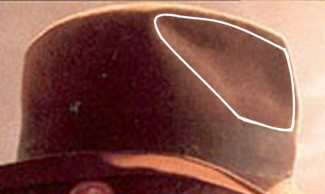
Below are photos of center dents from the three movies. The Raiders is deep and pointed. In Temple of Doom,
the center dent looks like it was almost an afterthought. In LC, the dent looks very shallow and undefined except
for the front.
The Ribbon
According to the IndyGear mainsite, the ribbon was 1½ inches.
Picture courtesy of MK
For the most part, the ribbon that ships on the Federation and Fed. Deluxe are, for me, ideal. I really like the
double bow. It gets really high, like the back of a 1957 Chevy and calls attention to itself. I like tri-fold on the
center of the bow. And, I even like how some of the ribbon from underneath shows through.
I think it gives it character.
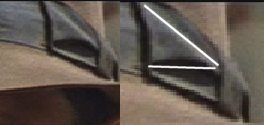
The “Flying V” isn’t that important to me. It is where 2 creases in the material flare out from the center of the bow.
You can read all about that on Dalexs’ website.
It has been observed that the bow of the hat is slightly towards the front of the head in Raiders. This is not observed
in any of the other movies. The cause for this, I feel, if from the hat being turned. 3thoubucks has a website dedicated
to and explaining the Raiders turn and other possible modifications. I am only going to discuss the turn and what
I see from it.
The Brim
I truly believe the brim of the Raiders hat is as flat as flat can get when the hat is setting on a table (or office chair).
It’s only when the hat is placed on the head that the head “deforms” the sweatband. This combined with how the hat
is placed on the head and the dimensional cut will cause the classic Raiders “swooshes” that we see and take on
a completely different appearance.
So, what exactly are we supposed to see?
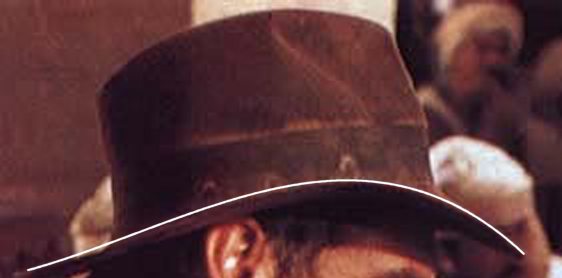
The first thing to look at is what is happening over or above the right ear. There is a very pronounced swoop that starts
almost in the back of the hat. And, peaks over the eye and then starts down and doesn’t stop till it reaches
the brim front.
Picture courtesy of MK
On the left side where the bow is at, the brim does something different. It folds or bends up towards the side of the hat.
It’s different from the right side. There are some shots in the movie where the brim on this side seems rather flat.
I personally believe that it’s due to wear-and-tear or not turning the hat.
So, when the hat is viewed from the front, there are two different shapes going on. One side is straight and flat and
the other side is swooped up.
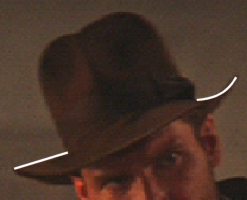
The front of the brim has a few unique things going on. First, is the additional little swoop over the right eye
of the wearer.
The second thing is a small hump in the brim around the forehead.
Finally, the back of the brim is rounded all the way around. The felt actually dips down slightly before it makes
it way back up and ends.
So, these are just some of my observations. If you are like me, you are never satisfied with the look of your hat and
will spend countless hours in front of a mirror tweaking, pushing and adjusting. Hopefully, what I have learned
will help make your time a little more productive.
High Regards,
Pyroxene
What do you look for when looking at an Indiana Jones hat?
It sounds, at first, to be a simple question. But when you consider the different options and styles from all the different movies,
it is difficult to answer. In this post, I am going to cover some the characteristics I personally look for when looking
at an Indy hat in general. Some things you may know, some you may not.
Also, I’ll touch on things that frustrated me when I would try to shape a hat to look like a particular scene. Keep in mind that
some things are, to me, more important than others. These are things that, when I watch the movie, my eye is always drawn to.
At the same time, I am going to cover some things that I don’t feel are discussed enough.
As far as hats go, I like the profile of the Raiders hats the most and some of the LC hats. Whereas, I don’t find the TOD
hats very interesting. Simply because I don’t think there was much thought that went into the hat for that movie.
BTW, this turned out the be the biggest nitpick I have ever written. So, I will apologize in advance for the length and download
time. With that being said, let’s get started.
The Hat
There are, in my experience, 5 basic parts to the overall appearance of the Indiana Jones hat. Those parts are the
front view, the side view, the pinches or bashes, the ribbon and the brim. I am not going to talk about the liner simply
because I don’t feel, at this time, it plays a major part in the over all look of an Indiana Jones fedora. I will talk briefly
about the sweatband in conjunction with the brim.
The Front View
The front view is the most common view because it’s the one most viewed in the movies and the one you see when
you look in the mirror. It’s this view that is in many of the photographs and stills we model our hats against. When
I think of the best front view, the Raiders hat is the one hat that comes to mind.
Pictures courtesy of MK
The crown is untapered. Meaning, the edges (in a 2-D view) appear to be parallel. Some people have termed this
a “stovepipe” look.
The crown also has two heart-shaped bumps on the top. These are often seen from straight on. However, if the hat,
head or both are tilted back, it could appear to be straight or slightly rounded. Before I understood what was
going on, this was a frustration for me depending on what scene I was shaping my hat to emulate.
Here are some photos of some hats that I feel have had really good front views.
Here are some photos of some hats (all mine) that I feel have had some really bad front views.
Even Indy had his share of bad front views.
The Side View
This view is often overlooked. It’s only after several reblockings does one notice this view. You really need two
mirrors to see this view as the hat is sitting on your head. For the side view, I often pull a little Last Crusade influence
into the mix.
Pictures #1 & #3 courtesy of MK
Again, the crown is again untapered. The back of the hat will always be straight as well as some or the entire front.
Sometimes it is even more so. In some scenes, the back of the hat is almost a reverse taper. Meaning, the 2-D line
or edge leans away from the hat rather than towards it. The front of the Raiders’ hat has a backwards slant that starts
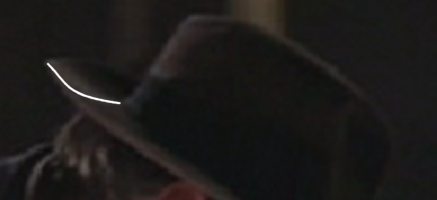
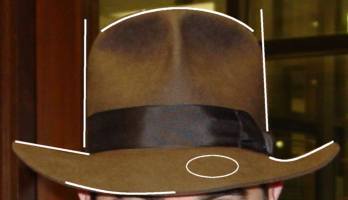
just above the ribbon. In almost all cases, the part that is covered by the ribbon is always parallel with the back
of the hat.
Picture courtesy of MK
The Last Crusade hat is straight all the way to the top and parallel with the back of the hat.
The top of the hat will have a nice curve across the top.
Picture courtesy of MK
Here are some photos of some hats that I feel have had really good side views.
Here are some photos of some hats that I feel have had some really bad side views.
(Note: The only reason the Pre-Blocked H.J. is listed is because it just didn’t look like any of the hats from
the trilogy.)
There are a few anomalies observed many times with the Raiders hat. The hat can have a very tapered appearance
depending on which angle the hat is viewed.
Additionally, the observance of a reverse taper has been seen in some still photos. Reverse taper is where, on
the front view, the edge of the crown appears to be moving away from the base of the hat rather than remaining
parallel as seen earlier. This creates an additional indentation just above the ribbon of the hat.
Some theories that cause reverse taper are:
• Over tightened ribbon
• Actor’s hair on the inside pushing out on the hat.
• An additional bash on the backside of the
hat that, when viewed from the front, causes this effect.
• Stretching or distorting the hat lengthwise out of its oval form.
• Side bashes pushing the felt further out
• Small little bash or dent towards the back of the hat.
The Bashes or Dents of the Hat
The bashes or dents of the hat are probably some of the most difficult things to create properly in order to make
an Indiana Jones hat look correct. Pushing a bash in one direction may make the hat distort in unpleasant ways
in another. The thickness of the felt is a key and often missed factor of successful hat bashing.
Where does the term bash come from?
Seeing as how most people, including me, in the hat community hadn’t heard of the term bash before, this
question is often asked. The first time most IndyGear fans read the word bash was probably in the following description
on the IndyGear main page.
From the front, the Raiders hat had a very tight crease down the center. In the other movies, the center crease was“Last Crusade saw the return of a fairly distinctive hat profile. While not as dramatic as the Raiders hat, the
LC sported a tall (though not quite as tall as the Raiders?) untapered crown, and more of an unbashed look, i.e.
not the tight pronounced pinch and bash of the Raiders fedora. In addition, the brim appears to be slightly
narrower with more of a prominent upward curl - really more of a snap-brim as compared to the Raiders fedora.
The Raiders hat had more of a permanent downward curl to the front of the brim, rather than a true snap-brim.”
not as defined.
The tight front crease is primarily created by the side bash. That style calls for the felt to be pulled closely
together in the front of the hat. This also produces the rearward slant that was earlier mentioned.
Picture courtesy of MK
The Last Crusade hat also has a center crease but it’s less defined than Raiders. The felt is pinched near the top.
But, then it flares out, as it gets closer to the ribbon.
From the side, the dents are not as deep and defined as in Raiders. If fact, many of the desert shots in LC appear to
little or no bash to the hat whatsoever.
The LC style will help keep the front and back edge straight and parallel due to the fact that the felt is only pinched
at the top.
The center dent of the hat has been the cause of confusion and concern for a good deal of time. If you make the
bash too deep, on some hats, it will case the sides to taper. If it’s not deep enough, it doesn’t create the correct
looking profile. I have found that if the felt is flexible enough, you can create a very deep center dent without
concern for taper.
Below are photos of center dents from the three movies. The Raiders is deep and pointed. In Temple of Doom,
the center dent looks like it was almost an afterthought. In LC, the dent looks very shallow and undefined except
for the front.
The Ribbon
According to the IndyGear mainsite, the ribbon was 1½ inches.
Picture courtesy of MK
For the most part, the ribbon that ships on the Federation and Fed. Deluxe are, for me, ideal. I really like the
double bow. It gets really high, like the back of a 1957 Chevy and calls attention to itself. I like tri-fold on the
center of the bow. And, I even like how some of the ribbon from underneath shows through.
I think it gives it character.
The “Flying V” isn’t that important to me. It is where 2 creases in the material flare out from the center of the bow.
You can read all about that on Dalexs’ website.
It has been observed that the bow of the hat is slightly towards the front of the head in Raiders. This is not observed
in any of the other movies. The cause for this, I feel, if from the hat being turned. 3thoubucks has a website dedicated
to and explaining the Raiders turn and other possible modifications. I am only going to discuss the turn and what
I see from it.
The Brim
I truly believe the brim of the Raiders hat is as flat as flat can get when the hat is setting on a table (or office chair).
It’s only when the hat is placed on the head that the head “deforms” the sweatband. This combined with how the hat
is placed on the head and the dimensional cut will cause the classic Raiders “swooshes” that we see and take on
a completely different appearance.
So, what exactly are we supposed to see?
The first thing to look at is what is happening over or above the right ear. There is a very pronounced swoop that starts
almost in the back of the hat. And, peaks over the eye and then starts down and doesn’t stop till it reaches
the brim front.
Picture courtesy of MK
On the left side where the bow is at, the brim does something different. It folds or bends up towards the side of the hat.
It’s different from the right side. There are some shots in the movie where the brim on this side seems rather flat.
I personally believe that it’s due to wear-and-tear or not turning the hat.
So, when the hat is viewed from the front, there are two different shapes going on. One side is straight and flat and
the other side is swooped up.
The front of the brim has a few unique things going on. First, is the additional little swoop over the right eye
of the wearer.
The second thing is a small hump in the brim around the forehead.
Finally, the back of the brim is rounded all the way around. The felt actually dips down slightly before it makes
it way back up and ends.
So, these are just some of my observations. If you are like me, you are never satisfied with the look of your hat and
will spend countless hours in front of a mirror tweaking, pushing and adjusting. Hopefully, what I have learned
will help make your time a little more productive.
High Regards,
Pyroxene
Last edited by Dalexs on Tue Aug 16, 2005 7:58 pm, edited 1 time in total.
- binkmeisterRick
- Stealer of Wallets
- Posts: 16926
- Joined: Thu Mar 11, 2004 3:22 pm
- Location: Chattering with these old bones
Re: Fedora FAQ's and Links
Below is a general conversion chart for figuring out hat sizes. Keep in mind that not all hatters are consistent in how they size their hats, so the chart below is for reference only. Be certain to discuss it with the hatter before choosing a size which works for you. It is ultimately the responsibility of the wearer to do the homework in such matters.
cm = inches US size
49 cm = 19.29 inches 6 1/8
50 cm = 19.68 inches 6 1/4
51 cm = 20.08 inches 6 3/8
52 cm = 20.47 inches 6 1/2
53 cm = 20.87 inches 6 5/8
54 cm = 21.26 inches 6 3/4
55 cm = 21.65 inches 6 7/8
56 cm = 22.05 inches 7
57 cm = 22.44 inches 7 1/8
58 cm = 22.83 inches 7 1/4
59 cm = 23.23 inches 7 3/8
60 cm = 23.62 inches 7 1/2
61 cm = 24.02 inches 7 5/8
62 cm = 24.41 inches 7 3/4