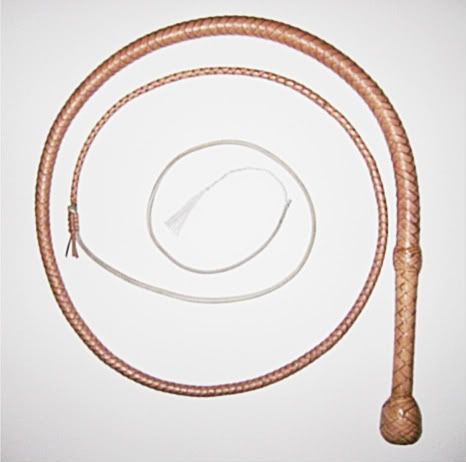
My first kip bullwhip
Posted: Mon Jan 05, 2009 6:10 pm
Here you go folks, a new pic for the new year.
It's my first and probably only kip bullwhip. I made it out of a second-grade hide from Tandy (it was on sale), and I had all the trouble in the world with this hide. Between the hidden and obvious tick marks and abundant scratches, it was hard to not cut through a bad patch of leather, with the resulting broken strands. I broke 4 out of the 8 strands of the overlay, mostly toward the tip of the whip, which is why I was forced to end the whip a little sooner than I would have liked. It should've had another 6" at the tip, but it was either end it here or make a bunch of splices really close to the end, and that was a no-no for me.
It has the standard construction; 8" spike, wear-leather, core, 4 plait belly, bolster, 4 plait belly, bolster, and overlay. The knots are standard too, overall the whip comes in at 6' 11", plus a 34" fall and a 7 1/2" cracker.
I made a few mistakes on this whip, most notably making the core too large with the resulting very heavy first part of the whip being a bit too slow in its taper. But otherwise it cracks very easily and feels very robust.
I did do a few things right though. This was the first whip where I got to try my new recipee for plaiting soap, and as you can see it's a lot paler in color (actually the real whip is even paler than the pic). I didn't so much change the way I make the soap, as I did the type of fat I use to make it. I finally got around to using beef fat (boy rendering that into clean fat was an adventure on its own!), and I love the result! It doesn't darken the leather nearly as much as lard did, but it is a pain to make. The lard I just buy ready-to-use at the grocery store, while the beef fat was purchased from a local butcher's and I had to go through many opperations and stages to turn it into clean fat suitable for a good-quality plaiting soap. Having said that, the trouble is well-worth it and I can't wait to use it on kangaroo!
All-in-all, I don't like kip for plaiting very much and have no desire to return to it anytime soon.
Oh and on this whip I also thinned down the shellac, and I really like the result. It isn't quite as shinny as before with the more concentrated solution, but at least it doesn't crack and flake. I think that my jar of shellac had been getting more and more concentrated due no doubt to the alcohol evaporating with use.
Well enough with the chit-chat, onto the pic:
