


I don't seem to find anything on previous threads but I would like detailed step-by-step instructions about how to replace a ribbon on a hat.
Is it something I can do by myself? How hard is it? I've never done anything similar.
Please hat experts give me a hand.
(HELP NEEDED) How to install a new ribbon
Moderators: Indiana Jeff, Dalexs


I haven´t done it but here is a nice page from Dalexs about replacing a ribbon
http://dalexs.whitvani.net/hat/hatpage.html
http://dalexs.whitvani.net/hat/hatpage.html

-
whipitgood

- Museum Curator

- Posts: 1203
- Joined: Mon Jul 28, 2008 7:16 pm
- Location: Los Angeles "A handsome devil in the city of angels."
I had to put one on the day of my party because Baron Hats screwed-up my ribbon twice. It took me about 2 hours, but I think it came out pretty good. I only see one area that needs adjustment, but I'm being overly critical. Threading the needle seemed like the most time consuming part. Just be patient and it should turn out fine.
-
whipitgood
- Museum Curator
- Posts: 1203
- Joined: Mon Jul 28, 2008 7:16 pm
- Location: Los Angeles "A handsome devil in the city of angels."
I have some Fuller's Earth on it now, so I'm having a hard time seeing some of my tacking. It must be pretty good if I can't notice it  I'm thinking I did a total of 14 or 15 tacks. I would say 8 of those were for the bow, two being hidden for the knot. Aside from the bow only three tacks are visible(front, back and right side). It's holding just fine.
-
BendingOak
- Legendary Adventurer

- Posts: 7011
- Joined: Mon Mar 07, 2005 8:21 pm
-
BendingOak
- Legendary Adventurer
- Posts: 7011
- Joined: Mon Mar 07, 2005 8:21 pm
-
Dalexs

- Site Admin

- Posts: 9054
- Joined: Mon Jul 08, 2002 2:49 am
- Location: Jus' nath' of Bawstin
- Contact:
Erri,Erri wrote:Ahh yes! I forgot about that one! Thanks a lot.
I'm still a bit scared about the "tacking" of the ribbon on the felt though.
The trick is to use the smallest needle you can find and get thread that matches the closest to the ribbon you're using.
Tack around the ribbons edge binding and penetrate the felt from under the ribbon. If you do it right, you'll never know it is there.
Steady hand and patience are your friends.
Good luck.
Dalexs
-
binkmeisterRick

- Stealer of Wallets
- Posts: 16926
- Joined: Thu Mar 11, 2004 3:22 pm
- Location: Chattering with these old bones
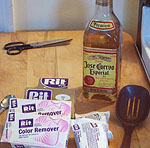
Or you could just use staples.  Seriously, Dalexs is right, you want a small needle for this job. Also keep in mind that you probably won't get it right the first couple of times. Be patient and take your time. And the alcohol is to pour over and sterilize your punctured fingers, as well as to drink to help deaden the pain. ;-)
-
Dutch_jones
- Museum Curator
- Posts: 1438
- Joined: Sun Jan 15, 2006 1:59 pm
- Location: Holland
- Contact:
-
Dutch_jones
- Museum Curator
- Posts: 1438
- Joined: Sun Jan 15, 2006 1:59 pm
- Location: Holland
- Contact:


I've used Dalexs' method several times (and about to do it again tonight on my Christy's) and had great success each time. I try not to put too many tacks at all - 1 on the center piece of the bow, 4 total on the bow (1 on each corner, which also hold the corners of the ribbon in place underneath the bow), and 3 tacks on the hat (1 in the front, 1 on the right side, and 1 in the back - do these low on the ribbon, just above where the ribbon meets the brim). If you do the tacks very small, you'll never know they're there. Good luck!
Kind regards,
Craig
Kind regards,
Craig
Thanks Craig! If you're doing it again would you mind perhaps sharing some pictures? It would be really great.
Thanks again
Is the name and the avatar just coincidence?

Thanks again
Is the name and the avatar just coincidence?
LOL I'll try, I hope Craig will post something too. Anyway I should have the material in a week or so, I started asking already so in a week time I'll have (and I already got) a lot of help from more experienced peopleDutch_jones wrote:Hmm Interested to see how it goes
please don't forget the pics
Anytime, Erri! Glad I can help. As for my Bond avatar, just coincidence that my name's Craig too (well, at least my first name is)Erri wrote:Thanks Craig! If you're doing it again would you mind perhaps sharing some pictures? It would be really great.
Thanks again
Is the name and the avatar just coincidence?
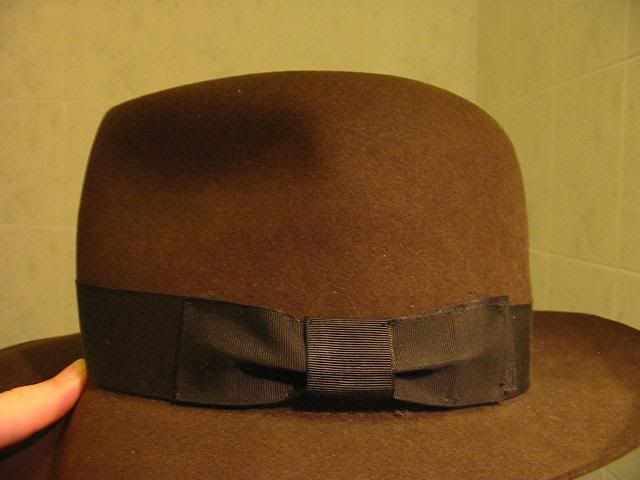
Here's a pic of my completed ribbon change on my HJ (using Dalexs' tutorial) -

When I redo my Christy's tonight, I'll snap some pics as I go and post them up here.
Kind regards,
Craig
Erri,Erri wrote:Thanks Craig! If you're doing it again would you mind perhaps sharing some pictures? It would be really great.
Thanks again
As promised, I took a few pics during my "ribbon replacement party" last night.

The key to a clean ribbon replacement is to gently remove the liner and fold back the sweatband so you can get at the tacks from underneath.

Here's a view of the hat & ribbon after removing the original bow. You can see how big the tacks are and how sloppy it was all applied.

I spent the most time disassemling the original bow, ironing the ribbon flat, then reshaping it (using Dalexs' method) and reapplying it to the hat. Here's the final result -

I hope these pics help!
Kind regards,
Craig
This is some scary s**t Craig 
You've got a cracker of a bow there!
Thanks infinitely for the pictures, they are a really big help. Ribbon replacement party that's a good one

You've got a cracker of a bow there!
Thanks infinitely for the pictures, they are a really big help. Ribbon replacement party
That would be indeed interesting to see Dalexs! Please do!Dalexs wrote: At some point on my next hat project, I'll see if I can document a bit the new ribbon install with my newer camera.
Nowhere near as neat as yours, serrecuir, but this is my (first) result:
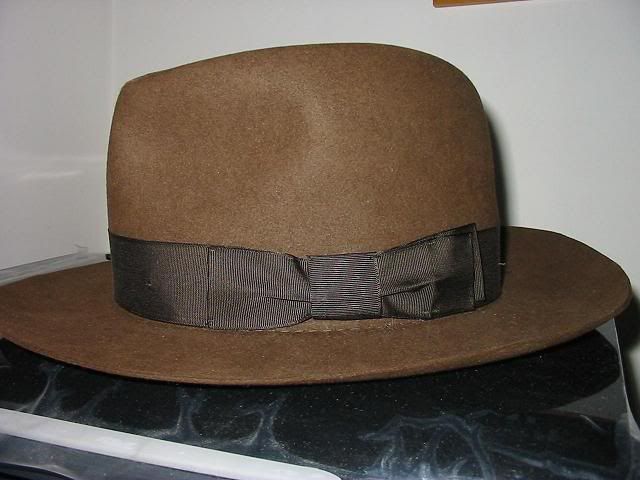
I didn't want to make swiss cheese out of the felt so I was a little tight on stitches. I tried to place the least possible. I know it's not a great result but this is what I got. At most I will try again... when I have another free afternoon
I didn't want to make swiss cheese out of the felt so I was a little tight on stitches. I tried to place the least possible. I know it's not a great result but this is what I got. At most I will try again... when I have another free afternoon
-
Dutch_jones
- Museum Curator
- Posts: 1438
- Joined: Sun Jan 15, 2006 1:59 pm
- Location: Holland
- Contact:
LOL G thanks. Anyway I have a brand new ribbon incoming this week, althought I might leave it to the professionals to be installed... well at least untill dalexs will post that video
Most of the time I was like "What the **** am I doing????!!!!"
Thanks for the simpathetic compliments guys . I don't deny I was exhausted after this job
By the way, it seems that Christy's uses even bigger needles than I do. The regular sawing needle I was using was "loose" into their holes. Just a side note. Partly the reason why the knot is not exactly in place, I was trying to cover those caves left by the previous stitching
and the patienceIndiana G wrote:the force is storng with this one......
Most of the time I was like "What the **** am I doing????!!!!"
I noticed it only too late. I couldn't be bothered cutting the stitches and do them again, I could have but I didn't LOL. But yes I noticed it's not in the exact place. Also I should have ironed the ribbon a bit better.Dutch_jones wrote:the middle part of the bow should be further back and a bit more down towards the brim, but not bad for your first try !!
Thanks for the simpathetic compliments guys
By the way, it seems that Christy's uses even bigger needles than I do. The regular sawing needle I was using was "loose" into their holes. Just a side note. Partly the reason why the knot is not exactly in place, I was trying to cover those caves left by the previous stitching
Erri,
I think that's a great first attempt. I remember the first bow I did, and it looked pretty awful. The great thing is that with every attempt, the bow will get better and better. If you're unhappy with it, cut those stitches loose, and try it again. I'm sure your next attempt will look even better! 
Kind regards,
Craig
I think that's a great first attempt.
Kind regards,
Craig
I know what you mean. The original stitches left holes the size of finishing nails in my hat.Erri wrote:Thanks Craig, my concern is about the original stitches which left visible holes in the felt. My attempt to cover them was partly the cause of the misplaced ribbon.
I brushed the felt slightly to cover them, and it seemed to do the trick. You also may be able to manipulate the material from the underside of the hat to help cover the holes.
Kind regards,
Craig
-
Dutch_jones
- Museum Curator
- Posts: 1438
- Joined: Sun Jan 15, 2006 1:59 pm
- Location: Holland
- Contact: