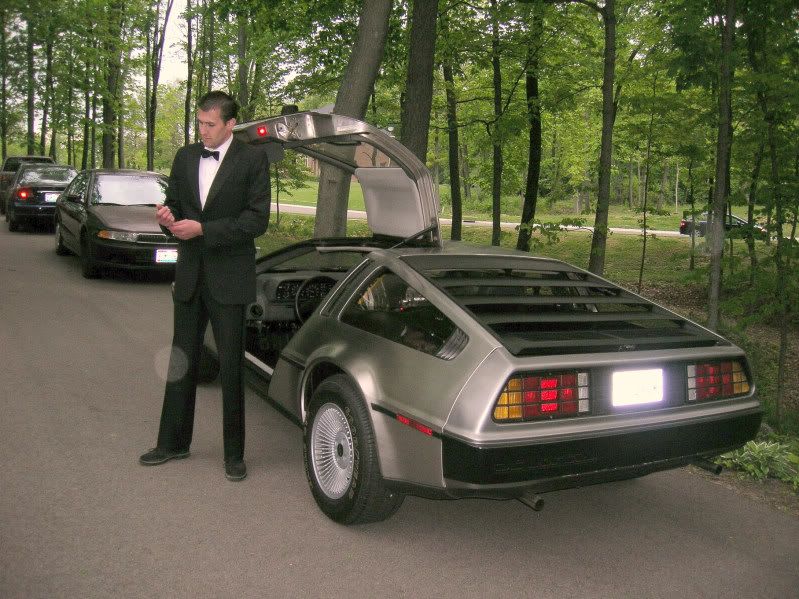
Todd's airsoft Raiders Replica S&W
Moderator: Cajunkraut
Todd's airsoft Raiders Replica S&W
Anyone have one of theses? Looking for some input on them.
- WinstonWolf359
- Archaeologist

- Posts: 222
- Joined: Sun Mar 12, 2006 12:22 am
- Location: Fayetteville, NC
It's funny you should ask, I was just about to post up my review of the gun I got today. Hope this helps!
I finally took the plunge and bought one of Todd’s Costumes modified Tanaka airsoft pistols, and it arrived today, so I thought I’d post a review with some pics, and later on show off some of the modifications I’ve made so far.
Todd offers two different airsoft revolvers, an M-10 .38 Cal revolver, and an M-29 .44 Magnum, both with a 4” barrel. I think the M-10 looks the part of Indy’s pistol right out of the box a lot more than the M-29, but the M-10 is built on S&W’s midsize K-frame, whereas the M-29 (and the HE-2 Indy actually carried) is built on the much larger N-frame, and since I wanted that real “hand cannon” look, I went for the M-29.
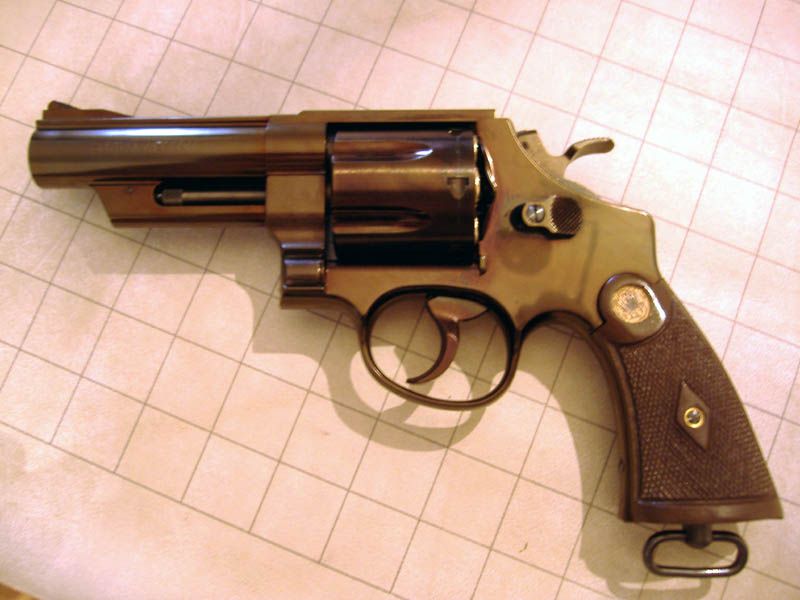
You can get the Tanaka airsoft pistols from several places on the internet, but since Todd goes the extra mile by fitting the lanyard ring and the correct style grips on his airsofts, it’s really a no brainer to go with his. Of course, his great reputation and the fact he’s in the USA also makes getting stuff from him a lot faster, safer and worry free.
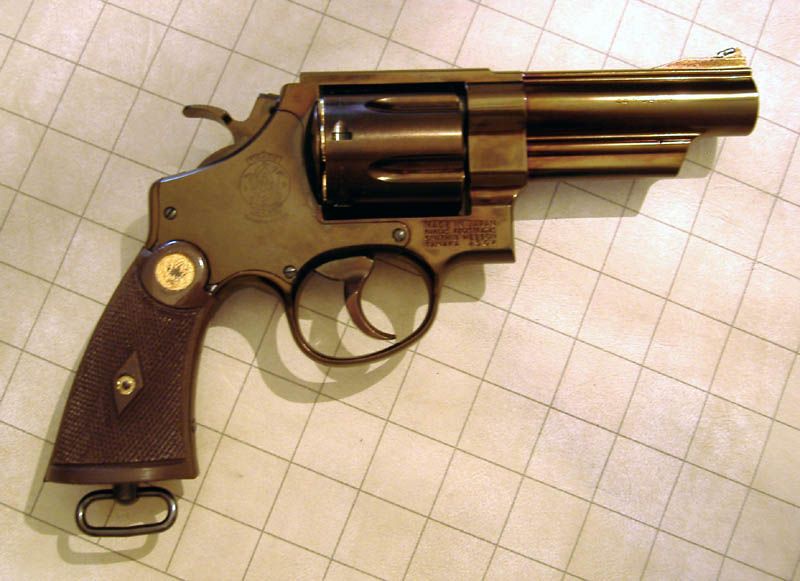
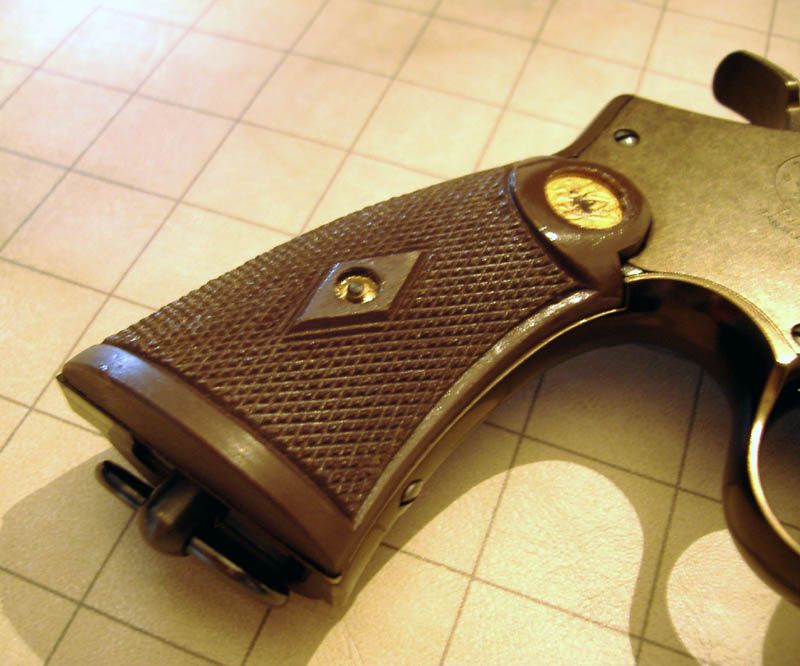
Other than the grips and the lanyard ring Todd doesn’t modify the guns in any way and they ship in the factory box with everything else you’d expect the gun to come with, including Japanese instructions, BB’s and a speed loader. Todd uses a heavy-duty rifle sling loop for the lanyard ring, so it’s solid metal, and very nicely finished. The grips are resin copies of the real grips and are cast in brown resin, with painted medallions. The grips he cast were brand new, so the checkering and all other details are very sharp and strong, and in addition to the flawless factory blued steel finish on the gun the whole package looks like a pristine brand new handgun.
Speaking of the finish, Tanaka has two different finishes available on a number of their guns, including most of their revolvers. This gun has their upgraded “midnight blue” finish, which is a deep, wet-looking glossy finish that mimics very closely the appearance of brand new deep blued gunmetal. It is very impressive. And the finish matches very respectably between the plastic and metal parts, not easily betraying what parts are made of which.
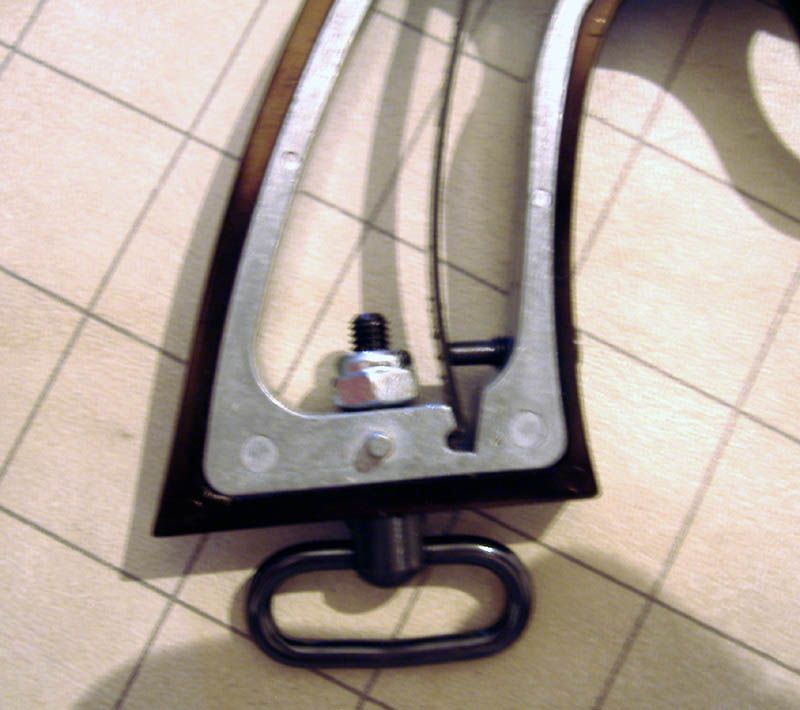
The gun is very hefty, very solid, and really fills out the hand or holster. The gun has a good number of metal parts, including the cylinder, release latch, hammer, trigger, and the ejector rod and arm assembly, Everything else is very solid, heavy duty plastic. The single and double action is smooth, crisp, and tight, and the cylinder release is also clean and smooth. This feels very VERY much just like a real firearm, and especially with this finish it looks very real as well.
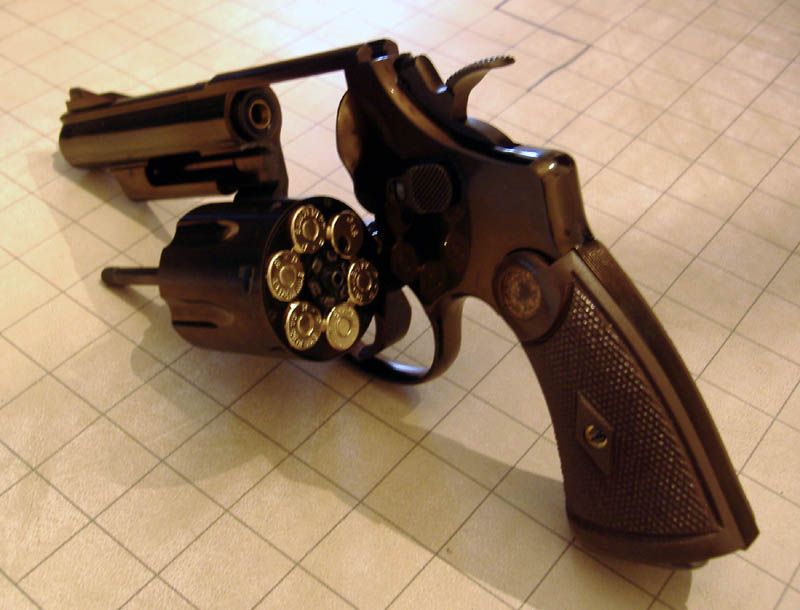
This gun does have a couple drawbacks, however. First, that amazing blued steel finish isn’t supremely durable. If you’d actually like to keep your gun in pristine condition that pretty much means that you’ll need to wrap it up in a soft cotton cloth and never use, touch, or even look too hard at the gun. Also, the fit of the grips is good, but not perfect. I’m not sure, but I’d imagine some of the fit issue could be solved by some additional sanding on the rear face of the grips, but I haven’t tried that yet. I’m actually pretty sure that at some point I’ll just go ahead and buy some real vintage grips, they’re just so expensive right now…
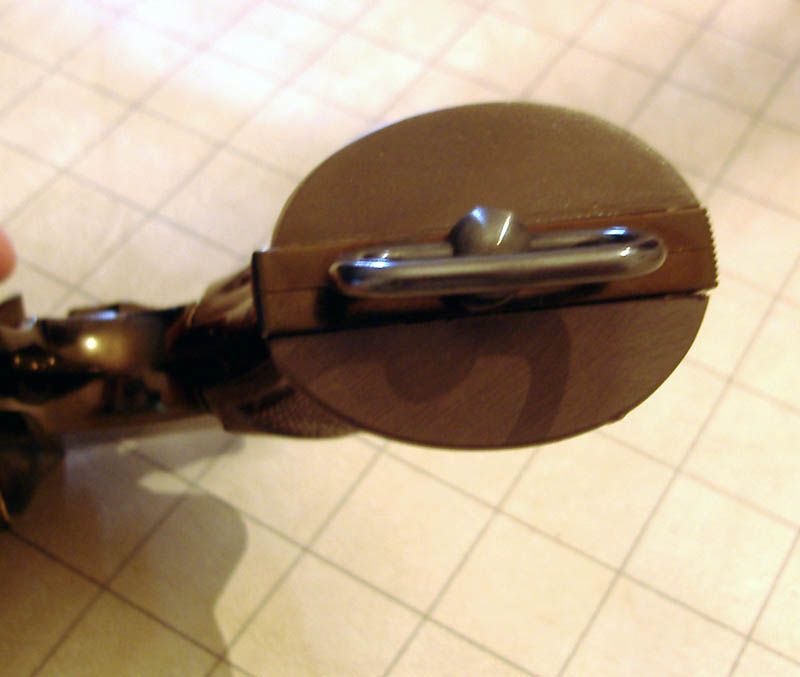
But that’s pretty much it. The only other issues I have with the gun are simply where the M-29 doesn’t match the exact appearance of the old Hand Ejector Indy actually carried, but that isn’t Todd’s fault, and it isn’t a flaw on Tanaka’s part either, other than the fact they REALLY should be making replicas of the HE 2. It’s practically the only Smith and Wesson gun they DON’T make an airsoft version of, and that’s really sad, because there just aren’t any dead-on perfect out-of-the-box replicas of any of Indy’s revolvers, and even the Browning Hi-Power replicas and airsofts are hard to come by. What a shame.
But really, the M-29 straight out of the box from Todd's Costumes is an amazing piece, and would make a great Raiders revolver. I highly recommend spending the little bit more than what most people are charging for a solid chunk of resin and get one of these airsoft pistols from Todd. Even if you don’t modify it it’s still a great replica.
However, if you’re brave, have a couple tools, and don’t mind risking ruining a $200 airsoft, keep an eye out for part two, where I show you some of the accurizing and weathering work I did to my pistol.
I finally took the plunge and bought one of Todd’s Costumes modified Tanaka airsoft pistols, and it arrived today, so I thought I’d post a review with some pics, and later on show off some of the modifications I’ve made so far.
Todd offers two different airsoft revolvers, an M-10 .38 Cal revolver, and an M-29 .44 Magnum, both with a 4” barrel. I think the M-10 looks the part of Indy’s pistol right out of the box a lot more than the M-29, but the M-10 is built on S&W’s midsize K-frame, whereas the M-29 (and the HE-2 Indy actually carried) is built on the much larger N-frame, and since I wanted that real “hand cannon” look, I went for the M-29.

You can get the Tanaka airsoft pistols from several places on the internet, but since Todd goes the extra mile by fitting the lanyard ring and the correct style grips on his airsofts, it’s really a no brainer to go with his. Of course, his great reputation and the fact he’s in the USA also makes getting stuff from him a lot faster, safer and worry free.

Other than the grips and the lanyard ring Todd doesn’t modify the guns in any way and they ship in the factory box with everything else you’d expect the gun to come with, including Japanese instructions, BB’s and a speed loader. Todd uses a heavy-duty rifle sling loop for the lanyard ring, so it’s solid metal, and very nicely finished. The grips are resin copies of the real grips and are cast in brown resin, with painted medallions. The grips he cast were brand new, so the checkering and all other details are very sharp and strong, and in addition to the flawless factory blued steel finish on the gun the whole package looks like a pristine brand new handgun.

Speaking of the finish, Tanaka has two different finishes available on a number of their guns, including most of their revolvers. This gun has their upgraded “midnight blue” finish, which is a deep, wet-looking glossy finish that mimics very closely the appearance of brand new deep blued gunmetal. It is very impressive. And the finish matches very respectably between the plastic and metal parts, not easily betraying what parts are made of which.

The gun is very hefty, very solid, and really fills out the hand or holster. The gun has a good number of metal parts, including the cylinder, release latch, hammer, trigger, and the ejector rod and arm assembly, Everything else is very solid, heavy duty plastic. The single and double action is smooth, crisp, and tight, and the cylinder release is also clean and smooth. This feels very VERY much just like a real firearm, and especially with this finish it looks very real as well.

This gun does have a couple drawbacks, however. First, that amazing blued steel finish isn’t supremely durable. If you’d actually like to keep your gun in pristine condition that pretty much means that you’ll need to wrap it up in a soft cotton cloth and never use, touch, or even look too hard at the gun. Also, the fit of the grips is good, but not perfect. I’m not sure, but I’d imagine some of the fit issue could be solved by some additional sanding on the rear face of the grips, but I haven’t tried that yet. I’m actually pretty sure that at some point I’ll just go ahead and buy some real vintage grips, they’re just so expensive right now…

But that’s pretty much it. The only other issues I have with the gun are simply where the M-29 doesn’t match the exact appearance of the old Hand Ejector Indy actually carried, but that isn’t Todd’s fault, and it isn’t a flaw on Tanaka’s part either, other than the fact they REALLY should be making replicas of the HE 2. It’s practically the only Smith and Wesson gun they DON’T make an airsoft version of, and that’s really sad, because there just aren’t any dead-on perfect out-of-the-box replicas of any of Indy’s revolvers, and even the Browning Hi-Power replicas and airsofts are hard to come by. What a shame.
But really, the M-29 straight out of the box from Todd's Costumes is an amazing piece, and would make a great Raiders revolver. I highly recommend spending the little bit more than what most people are charging for a solid chunk of resin and get one of these airsoft pistols from Todd. Even if you don’t modify it it’s still a great replica.
However, if you’re brave, have a couple tools, and don’t mind risking ruining a $200 airsoft, keep an eye out for part two, where I show you some of the accurizing and weathering work I did to my pistol.
- WinstonWolf359
- Archaeologist

- Posts: 222
- Joined: Sun Mar 12, 2006 12:22 am
- Location: Fayetteville, NC
Okay, here’s part two of my review of my new Tanaka M-29 airsoft pistol from Todd’s. On to the modifications and weathering.
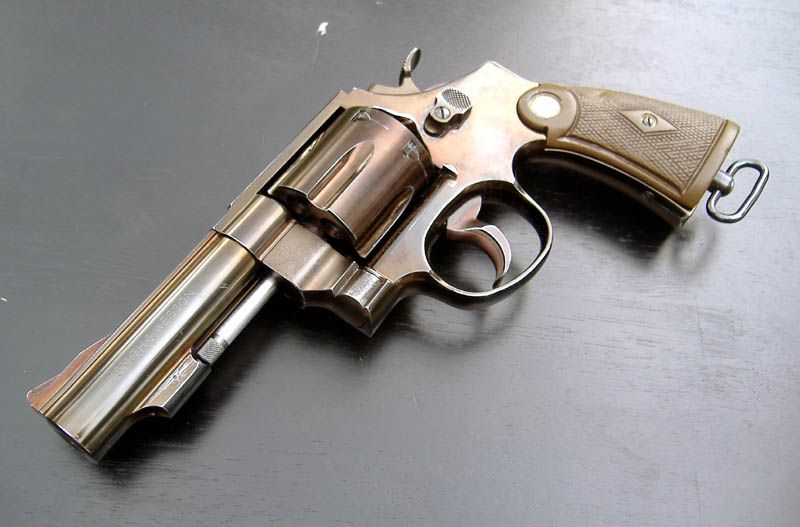
The M-29 has several differences when compared to the Hand Ejector 2 like Indy carried in Raiders. The absolute first thing that jumps out to me is the heavy ejector rod shroud on the M-29. It was almost a deal breaker for me, and I’ll admit that that’s most of the reason why in spite of the size difference I still think the M-10 is a better replica of Indy’s gun. In the end I decided I could either live with it, or if I was particularly daring I could try to modify it.
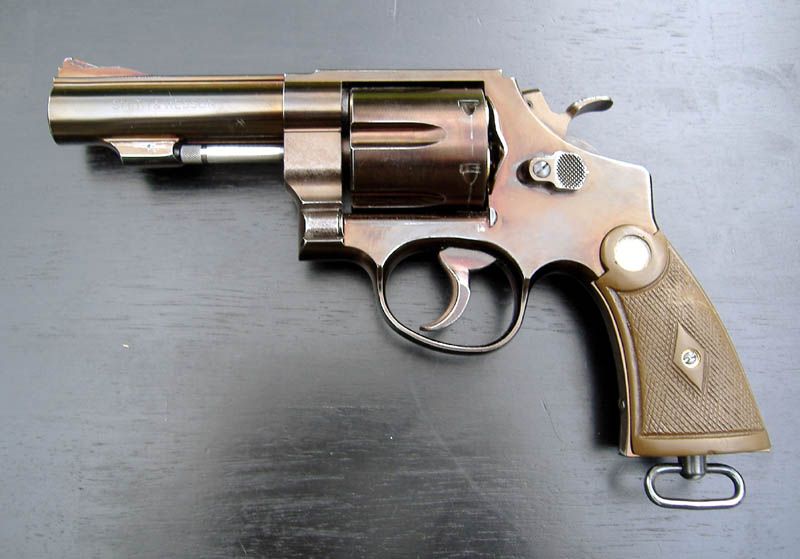
After receiving the gun today and carefully looking the gun over I decided that I really didn’t mind the look of the big shroud at all, since it increased the “bigness” of the front end of the gun, but I also realized from looking it over that it wouldn’t be too hard to modify if I was careful. So using my Dremel’s cut off wheel, sanding drum, and an emery board I made short work of the enlarged shroud, and while still not a 100% match to the HE 2, I’m a lot happier with how it looks.
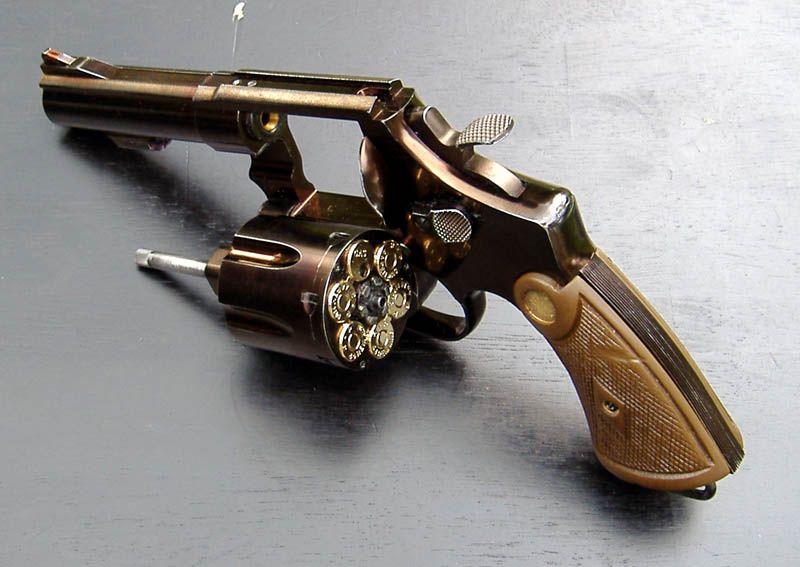
The grips are resin, cast in brown, so it was a simple thing to rub them down with sandpaper going from 220, to 400, to 600, to 0000 steel wool to wear down all that brand new sharp checkering into something that more resembles Indy’s more worn and used handgun grips. I also added a few gouges and gashes in the same places as the real grips on the screen used gun, just to give it that little something extra.
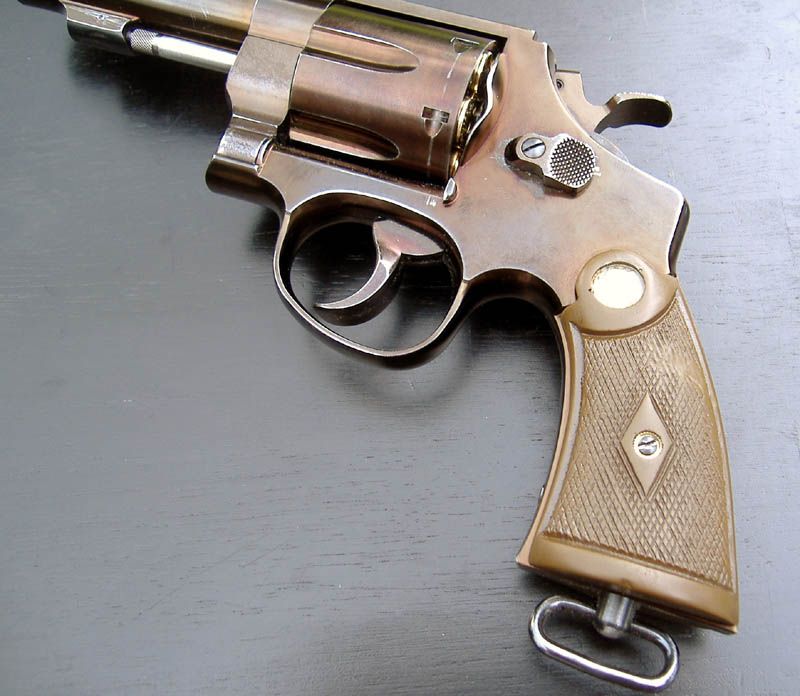
I also repainted the medallions on the grips, again following the look of the actual screen used gun. On the real gun they’re tarnished brass, worn to bright brass in the center. First I brushed on Testor’s Model Master “Jet Exhaust,” which has a nice tarnished metallic brass look. As soon as that dried I lightly dry brushed some Rust-Oleum “Bright Metallic Brass” in the center of each medallion. My next step in going to be to add a black wash to the grips to add a little more contrast to the checkering and give a little more depth and realism to them. Still not perfect, but I’ll eventually replace the resin grips with real vintage ones anyway, but these will do the job very well until then.
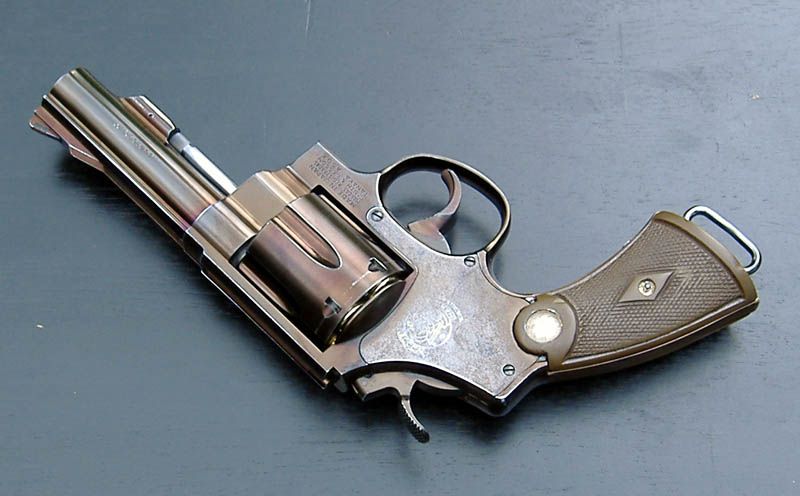
The easiest change is the big target sight at the rear of the gun. One screw and that’s gone.
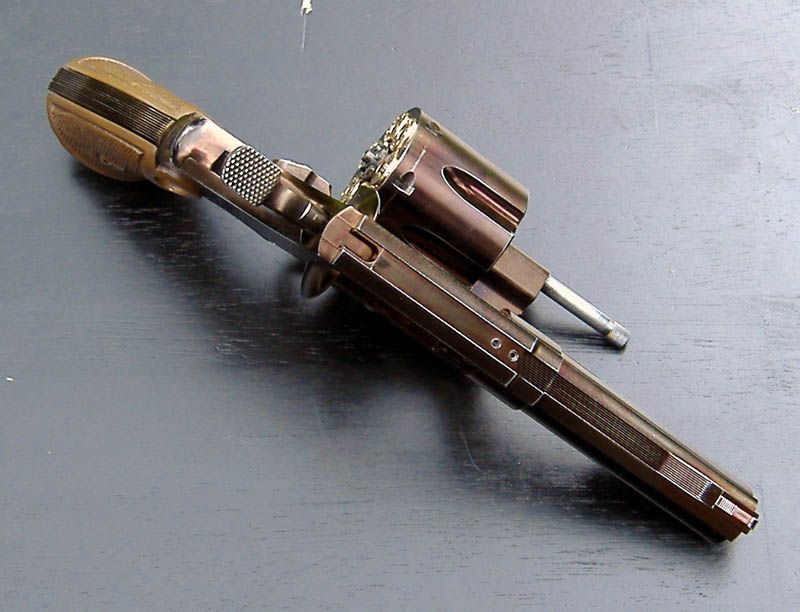
There’s still a few more inaccuracies that are just too hard or impossible to fix, or just too nit-picky. The entire barrel is a lot beefier than the real HE-2, but there’s really no way to fix that. Also, the cylinder is slightly longer on the M-29 than the HE-2 to accommodate the longer .44 Magnum round. Again, no way to fix that. Being really picky I’ll say that the hammer and trigger are both the wider target style, as opposed to the slimmer older versions found on the HE-2. I really don’t care, but they could be ground down narrower and would look more accurate, but would also have to be repainted.
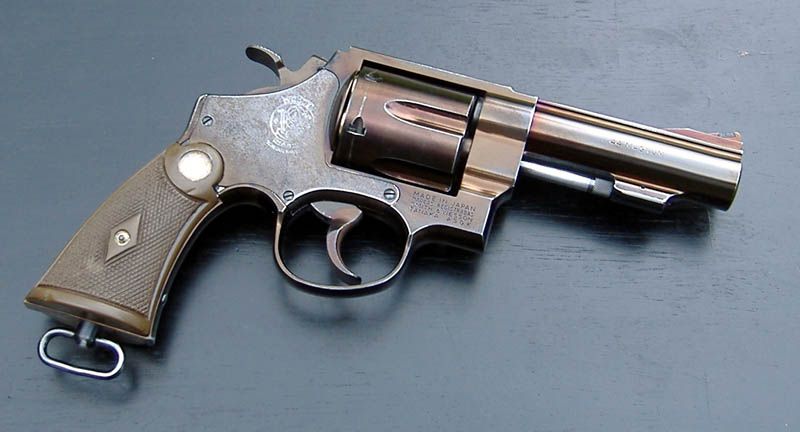
Normally, I would paint a gun replica to get a deeper and more convincing finish and to make it easier to add some subtle weathering, but because of the great looking Midnight Blue finish on this replica, I didn’t want to spoil it by covering it up paint. All I needed to do was lightly rub the whole gun down with 0000 steel wool. It removed a small amount of the bluing from the sharp edges without rubbing large areas of the finish off, so it manages to look subtle and realistic, and not excessively or comically worn.
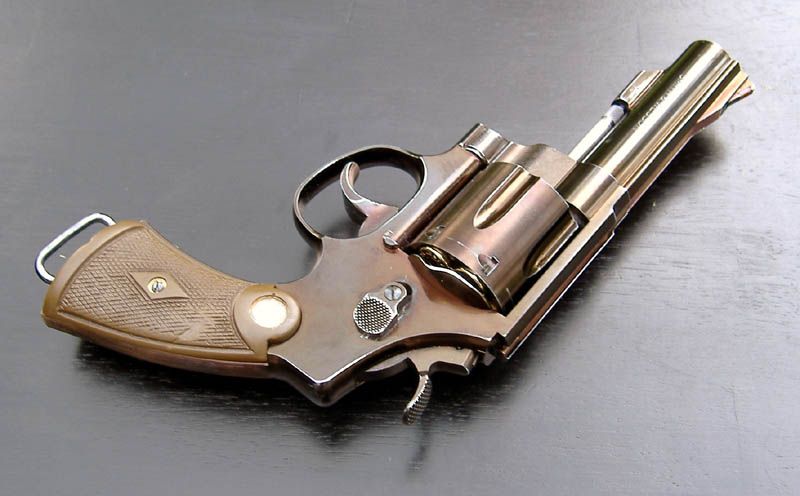
The one place I did a little extra work is on the ejector rod. On the Hand Ejector 2 that rod is a bright, bare steel color, and isn’t blued like the rest of the gun, so with a combination of 400 grit sandpaper and steel wool I wore off all of the black on the rod to add another level of matching between the M-29 and the HE-2.
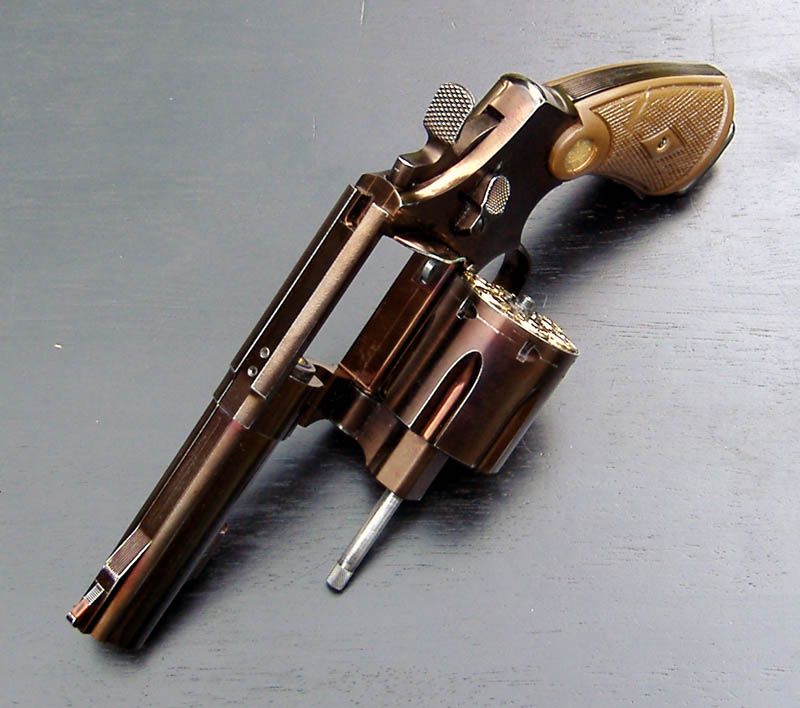
Plus, I’ll mention that because of the way Tanaka achieved this finish I’m really, really lucky.
First, all of the plastic parts on the gun are metal plated in a nickel finish, so any areas where I rubbed off the bluing it shows through a very convincing metal finish underneath. But second, the gun parts themselves are molded in black plastic, so those areas where I completely cut away parts of the gun to remove the ejector shroud still look jet black, which when polished up with some of that 0000 steel wool blend in pretty well.
So after an hour’s worth of work I have a replica of Indiana Jones’ revolver from Raiders that, while not a 100% match, is pretty darn close and really exceeded my expectations in every way. This really and truly is the next best thing to owning a real Hand Ejector 2.

The M-29 has several differences when compared to the Hand Ejector 2 like Indy carried in Raiders. The absolute first thing that jumps out to me is the heavy ejector rod shroud on the M-29. It was almost a deal breaker for me, and I’ll admit that that’s most of the reason why in spite of the size difference I still think the M-10 is a better replica of Indy’s gun. In the end I decided I could either live with it, or if I was particularly daring I could try to modify it.

After receiving the gun today and carefully looking the gun over I decided that I really didn’t mind the look of the big shroud at all, since it increased the “bigness” of the front end of the gun, but I also realized from looking it over that it wouldn’t be too hard to modify if I was careful. So using my Dremel’s cut off wheel, sanding drum, and an emery board I made short work of the enlarged shroud, and while still not a 100% match to the HE 2, I’m a lot happier with how it looks.

The grips are resin, cast in brown, so it was a simple thing to rub them down with sandpaper going from 220, to 400, to 600, to 0000 steel wool to wear down all that brand new sharp checkering into something that more resembles Indy’s more worn and used handgun grips. I also added a few gouges and gashes in the same places as the real grips on the screen used gun, just to give it that little something extra.

I also repainted the medallions on the grips, again following the look of the actual screen used gun. On the real gun they’re tarnished brass, worn to bright brass in the center. First I brushed on Testor’s Model Master “Jet Exhaust,” which has a nice tarnished metallic brass look. As soon as that dried I lightly dry brushed some Rust-Oleum “Bright Metallic Brass” in the center of each medallion. My next step in going to be to add a black wash to the grips to add a little more contrast to the checkering and give a little more depth and realism to them. Still not perfect, but I’ll eventually replace the resin grips with real vintage ones anyway, but these will do the job very well until then.

The easiest change is the big target sight at the rear of the gun. One screw and that’s gone.

There’s still a few more inaccuracies that are just too hard or impossible to fix, or just too nit-picky. The entire barrel is a lot beefier than the real HE-2, but there’s really no way to fix that. Also, the cylinder is slightly longer on the M-29 than the HE-2 to accommodate the longer .44 Magnum round. Again, no way to fix that. Being really picky I’ll say that the hammer and trigger are both the wider target style, as opposed to the slimmer older versions found on the HE-2. I really don’t care, but they could be ground down narrower and would look more accurate, but would also have to be repainted.

Normally, I would paint a gun replica to get a deeper and more convincing finish and to make it easier to add some subtle weathering, but because of the great looking Midnight Blue finish on this replica, I didn’t want to spoil it by covering it up paint. All I needed to do was lightly rub the whole gun down with 0000 steel wool. It removed a small amount of the bluing from the sharp edges without rubbing large areas of the finish off, so it manages to look subtle and realistic, and not excessively or comically worn.

The one place I did a little extra work is on the ejector rod. On the Hand Ejector 2 that rod is a bright, bare steel color, and isn’t blued like the rest of the gun, so with a combination of 400 grit sandpaper and steel wool I wore off all of the black on the rod to add another level of matching between the M-29 and the HE-2.

Plus, I’ll mention that because of the way Tanaka achieved this finish I’m really, really lucky.
First, all of the plastic parts on the gun are metal plated in a nickel finish, so any areas where I rubbed off the bluing it shows through a very convincing metal finish underneath. But second, the gun parts themselves are molded in black plastic, so those areas where I completely cut away parts of the gun to remove the ejector shroud still look jet black, which when polished up with some of that 0000 steel wool blend in pretty well.
So after an hour’s worth of work I have a replica of Indiana Jones’ revolver from Raiders that, while not a 100% match, is pretty darn close and really exceeded my expectations in every way. This really and truly is the next best thing to owning a real Hand Ejector 2.
- WinstonWolf359
- Archaeologist

- Posts: 222
- Joined: Sun Mar 12, 2006 12:22 am
- Location: Fayetteville, NC
I used to have the Tanaka M-10 .38, which I repainted with a multi-step paint job, weathered, and added vintage wood grips to. I recently sold it to another board member since I didn't need two guns.
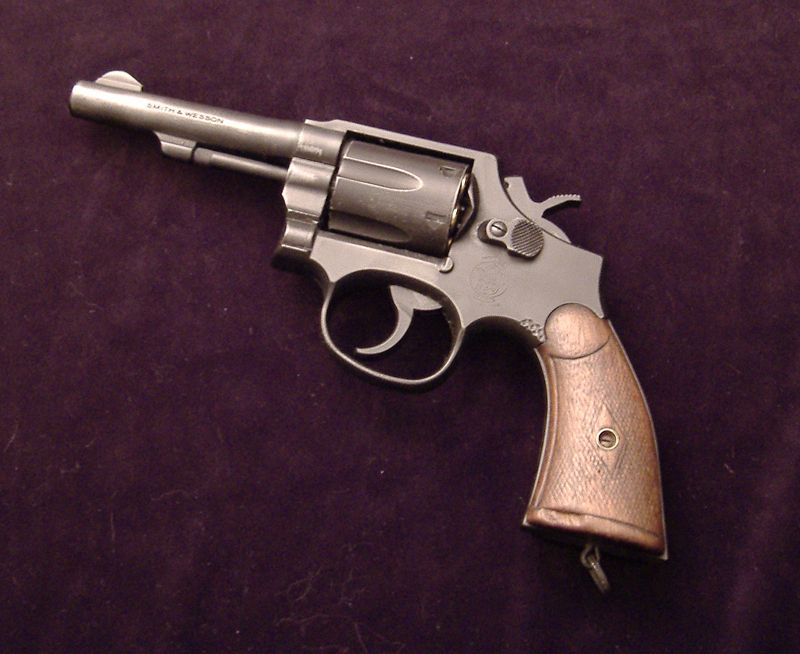
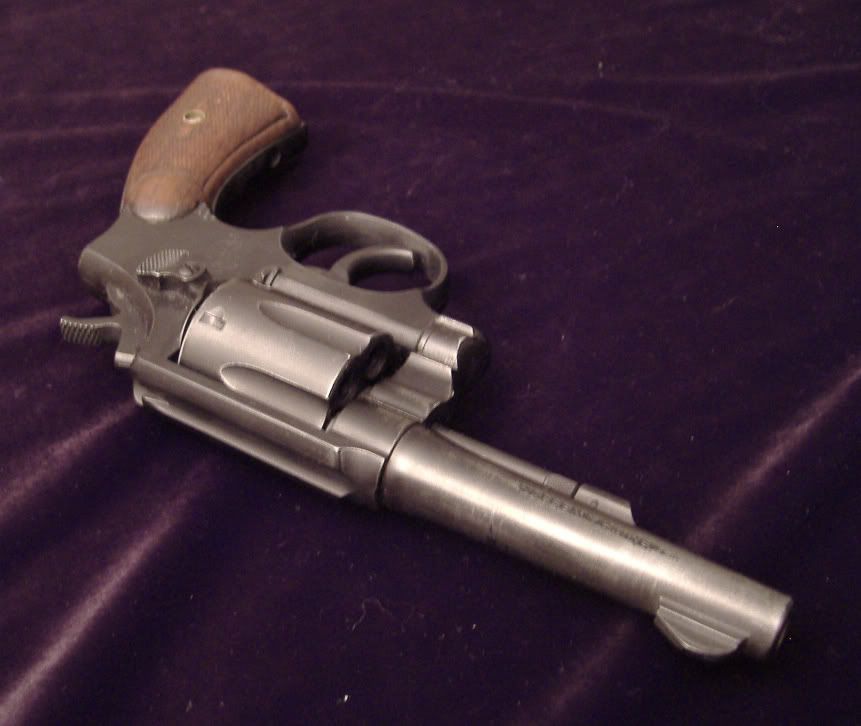
I also had one of the FBI .38 airsofts, which was my first Indy gun. All I have is this rotten picture, though.

All I did to this one is the same multiple coat paint job as the M-10, and I roughed up the plastic grips with sandpaper to give them a little less plastic-y feel.


I also had one of the FBI .38 airsofts, which was my first Indy gun. All I have is this rotten picture, though.

All I did to this one is the same multiple coat paint job as the M-10, and I roughed up the plastic grips with sandpaper to give them a little less plastic-y feel.
- scot2525
- Professor of Archaeology

- Posts: 760
- Joined: Mon May 05, 2008 9:56 pm
- Location: Northeast of Indy
I currently have the same model shown in your last picture. The weathering application I gave it fails in comparison to the Indy guns you have done.
My current gun.

I personally prefer the "suitcase" S&W over the "SOC" S&W and would have been thrilled at the oppurtunity to purchase yours. I can't believe you sold that one, especially with the real wood grips.
Also just want to say that I love the avatar, not a "Trekkie", but I really liked that episode.
My current gun.

I personally prefer the "suitcase" S&W over the "SOC" S&W and would have been thrilled at the oppurtunity to purchase yours. I can't believe you sold that one, especially with the real wood grips.
Also just want to say that I love the avatar, not a "Trekkie", but I really liked that episode.
- WinstonWolf359
- Archaeologist

- Posts: 222
- Joined: Sun Mar 12, 2006 12:22 am
- Location: Fayetteville, NC
I also really liked the M-10 as well, but I couldn't afford to keep both guns.
If you'd like to take another shot at painting and weathering, the process I used on mine is pretty simple.
You'll need three spray cans: Testors Model Master "Gunmetal" and the Testors Metallizer Sealer, and either Krylon BBQ black or Rustoleum High Heat Black.
After removing the grips, paint the whole gun with the gunmetal using light and thin coats. Buff the paint in between coats to get a nice luster with the paint. After two or three coats use the sealer to lock in the finish.
Switch to the BBQ black, and again use light coats, buffing in between. The BBQ black goes on very gray looking, and not perfectly smooth, but a light buff with a soft cloth really makes this paint shine.
Once you've got a good solid layer of black on the whole gun, buff it some more, using a little more elbow grease and you'll end up exposing some of the gunmetal paint underneath. After the soft cloth I also use a little 0000 steel wool as well. It gives the black even more luster and exposes a little the gunmetal a little easier.
At that point, just put the grips back on and you're good to go!
- Zombie Jones
- Archaeologist

- Posts: 343
- Joined: Fri Jun 06, 2008 4:29 am
- Location: So. California
-
Indiana Neri
- Dig Leader

- Posts: 567
- Joined: Sat Feb 01, 2003 3:25 pm
- Location: Rhode Island: The Tiny State That's Actually NOT An Island...and no, I'm not from "Quahog"
Winston: Did Todd's replica have [I'll quote from his website]: 

So how the heck did you get the orange paint off?...VERY permanent orange paint on the tip of the barrel, as required by federal law. AND NO WAY, NO HOW WILL THE ORANGE TIP COME OFF NO MATTER HOW MUCH YOU LIGHTLY SCRAPE WITH YOUR FINGERNAIL. Got it?
- WinstonWolf359
- Archaeologist

- Posts: 222
- Joined: Sun Mar 12, 2006 12:22 am
- Location: Fayetteville, NC
- Zombie Jones
- Archaeologist

- Posts: 343
- Joined: Fri Jun 06, 2008 4:29 am
- Location: So. California
- scot2525
- Professor of Archaeology

- Posts: 760
- Joined: Mon May 05, 2008 9:56 pm
- Location: Northeast of Indy
Zombie Jones wrote:So you're saying this...
...is a bit of an overstatement?Todd's Costumes wrote:...VERY permanent orange paint on the tip of the barrel, as required by federal law. AND NO WAY, NO HOW WILL THE ORANGE TIP COME OFF NO MATTER HOW MUCH YOU LIGHTLY SCRAPE WITH YOUR FINGERNAIL. Got it?
My wife still does not "get" this statement. Several weeks ago when I first found the guns on his website I broke out in laughter after reading his statements. She was curious as to what I thought was "so funny" so I had her read it. Her question to me was "Why would want that gun if you can't make it look like a real one?"
- WinstonWolf359
- Archaeologist

- Posts: 222
- Joined: Sun Mar 12, 2006 12:22 am
- Location: Fayetteville, NC
- DeLoreanDMC81
- Archaeology Student

- Posts: 39
- Joined: Sat Dec 22, 2007 4:24 pm
- Indiana Snipes
- Laboratory Technician

- Posts: 128
- Joined: Thu Oct 13, 2005 9:44 pm
- Contact:
I just got one of these yesterday, it looks awesome. Though I think I'm not filling the tank up correctly because I only seem to be able to get 5-6 shots before having to refill the tank with gas again, which is a little annoying. Anyone know how many shots I should be able to get off if I was filling it up correctly? I read somewhere it should be 50-60!
-
Indiana Neri
- Dig Leader

- Posts: 567
- Joined: Sat Feb 01, 2003 3:25 pm
- Location: Rhode Island: The Tiny State That's Actually NOT An Island...and no, I'm not from "Quahog"
- IndianaJack91
- Dig Leader

- Posts: 482
- Joined: Fri May 23, 2008 10:01 pm
- Location: Glendale, CA
- Contact:
I am a big airsoft guy, you should be able to fire about twenty four rounds with a decent tank inside the gun. i don't know how big your tank inside is but it sounds like you have a leak. if thats the case then you are going to have to buy a whole new tank if any airsoft place even sells itIndiana Snipes wrote:I just got one of these yesterday, it looks awesome. Though I think I'm not filling the tank up correctly because I only seem to be able to get 5-6 shots before having to refill the tank with gas again, which is a little annoying. Anyone know how many shots I should be able to get off if I was filling it up correctly? I read somewhere it should be 50-60!
- Indiana Snipes
- Laboratory Technician

- Posts: 128
- Joined: Thu Oct 13, 2005 9:44 pm
- Contact:
No I think my tank is fine, I don't think I'm filling it up correctly, frankly I can't even tell when I have filled it up, that's the problem. I was able to fill it up to a point and get off about 15 shots. Is there any trick to filling these up? And how do you know when it's full? This is my first gas gun so I'm a little new, plus the instructions for my gun are in Japanese so that doesn't help much!IndianaJack91 wrote:I am a big airsoft guy, you should be able to fire about twenty four rounds with a decent tank inside the gun. i don't know how big your tank inside is but it sounds like you have a leak. if thats the case then you are going to have to buy a whole new tank if any airsoft place even sells itIndiana Snipes wrote:I just got one of these yesterday, it looks awesome. Though I think I'm not filling the tank up correctly because I only seem to be able to get 5-6 shots before having to refill the tank with gas again, which is a little annoying. Anyone know how many shots I should be able to get off if I was filling it up correctly? I read somewhere it should be 50-60!
- IndianaJack91
- Dig Leader

- Posts: 482
- Joined: Fri May 23, 2008 10:01 pm
- Location: Glendale, CA
- Contact:
When filling, the gas can has to be perpendicular to the valve. Push it in for about 5 seconds, then push the can into the valve again for about 3 seconds. when you pull it out it should sound like there is a lot of pressure in the tank. try it and if it still doesn't work, i would be glad to mail you an instruction manual for my revolver(the same basic concept as yours, only exterior differences pretty much).
- IndianaJack91
- Dig Leader

- Posts: 482
- Joined: Fri May 23, 2008 10:01 pm
- Location: Glendale, CA
- Contact:
- Rich Johnson
- Field Surveyor

- Posts: 90
- Joined: Thu Jul 31, 2008 11:45 pm
- Location: Chula Vista, CA
- Contact:
I have one, and have used it in Airsoft. I normall do Nam reinactments in airsoft, but I was Indiana Jones in a themed game with tomb radiers and all. My gun shoots very straight, much better than my WGC M1911A1. I can get abbout 60 shots off one filling of gas. Yes I can only shoot 12 bbs at one reloading, but I didnt have to fill the tank in the whole game. I didnt shoot much, more a roll player for the paid players. Freedom fighters, tomb raiders, trapped archeologists, and local indiginous folk. Fun game.


