Page 1 of 1
Third whip
Posted: Wed Jul 02, 2008 8:32 am
by stealthboy
Hey folks,
I just want to say thanks for all the great advice given in this forum. It's really been a joy getting into whipmaking as a hobby. Thanks especially to Louie.
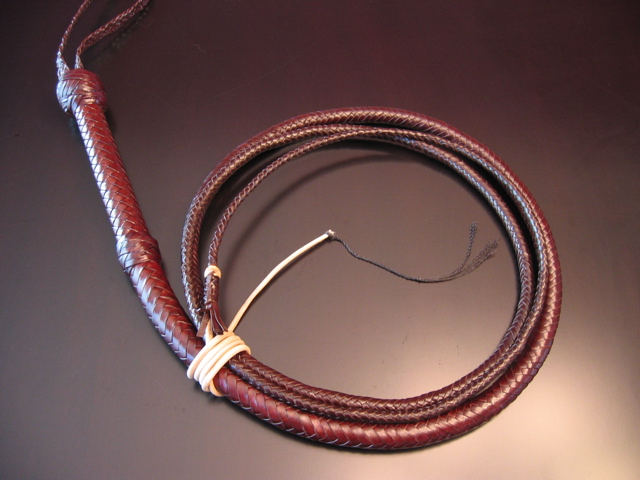
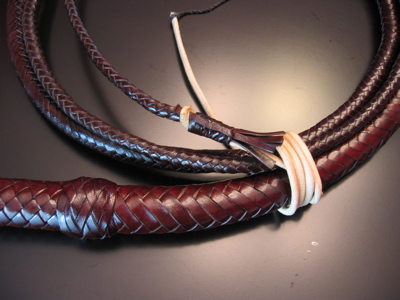
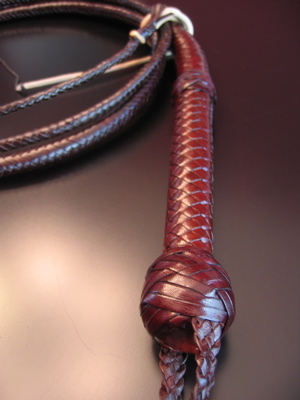
I just finished my third bullwhip! It's a 12-plait, 10-foot kangaroo (brandy-colored). There are definitely some issues with it, but I'm learning. I'm pretty sure I'm not pulling the strands hard enough during plaiting (I'm still scared of breaking strands). I did a three-pass turks head on the handle for the first time, and I think that came out pretty well.
Here are some pics. Please criticize! I need to know what's wrong so I can improve. I'm still in awe of all you folks that make it look so easy! Thanks so much in advance for any critiques.


Posted: Wed Jul 02, 2008 10:29 am
by WhipDude
Wow. I like that color. That thing will age wonderfully. Brandy and Whiskey have always been some of my fav's when it comes to the color aging. Keep up the great work.
Critizism? Without actually having the whip in person (You are allowed to send it to me for free!), is the knot on the handle suppose to be like that? I'm guessing that you were trying to replicate the Indy 4 decorative knot so you just made it rather bulky.
Good photography btw. Whip's aren't easy to photograph. They usually look either plastic or too dull.
Posted: Wed Jul 02, 2008 1:30 pm
by Cracker
That is a great looking whip stealthboy. You did a nice job.
Posted: Wed Jul 02, 2008 5:48 pm
by Canuck Digger
That's a great looking whip mate! Really very nice. My 3rd whip didn't look nearly as good as that! Keep at it! It might be useful to see a straight-on shot of the whip coiled without the fall wrapped around it. It's a bit hard to tell the taper with these shots... But like I said, it seems really nice!
Franco
Posted: Wed Jul 02, 2008 7:18 pm
by LemonLauren
Looks great, especially for a 3rd whip! You've got a knack for this... and for photography too it seems, lol.
Don't be afraid to pull tight... each belly, and the overlay should never have any "squishy" parts - every layer should be 100% firm, seriously rock hard.

) Breaking strands is horribly not fun, but if it happens, try to think of it as good practice. Strands WILL break every once in a while, unfortunately, and honestly I think that a decent chunk of developing whipmaking skills is in learning how to deal with the millions of little problems that can arise when working with a material as natural and inconsistent and as leather.
I look forward to seeing a #4 in the future, maybe?

)
Lauren Wickline
www.midwestwhips.com
Posted: Wed Jul 02, 2008 7:50 pm
by JMObi
That looks like a work of art, and is exactly what I hope to make myself one day. Great job!!
Posted: Wed Jul 02, 2008 8:17 pm
by serrecuir
Stealthboy,
Beautifully done! It looks great to me. How does it crack? That's the important part.
-Craig
Posted: Thu Jul 03, 2008 4:39 am
by Solent MKIII
Nicely done - and a great color, too! Your braiding looks fine to me ( not that I'm
any expert - all I've ever braided have been keychains - making a whip would be the
ultimate braiding job ) Congrats again on a very fine bullwhip! :junior:
Posted: Thu Jul 03, 2008 5:32 am
by Andymac84
The color looks great. Very KotCS-like.
Posted: Thu Jul 03, 2008 6:33 am
by BullWhipBorton
Actually that’s a fine looking bullwhip (and pictures too). It has a good shape and taper, the stands look like they are cut pretty evenly, at least as far as I can tell and your seam work looks pretty good too. There might be a little twisting, I could be wrong as the photo angles are throwing me off a little but try to keep the seams as straight as possible. For this only being the third whip you have made, I'm impressed. I like it and would like to see or hear more about how it handles too.
Like LL said, don’t be afraid to plait as tight as humanly possible. What I was told when I started plaiting, and I am by no means and expert, was to grip the strands firmly and to lean back so that you where pulling smoothly and evenly with your bodyweight, not tugging and jerking them when pulling them into place with just arm strength as that’s what’s going to cause uneven tension, make it more likely to snap strands and cause uneven spiraling in your seam work as you go along.
If you "Shape it right and plait it tight" though your off to a great start. Keep up the good work.
Dan
Posted: Thu Jul 03, 2008 10:01 am
by stealthboy
here might be a little twisting, I could be wrong as the photo angles are throwing me off a little
Yes, there is a bit of a twist unfortunately... While plaiting I tend to tie it to a hook on the wall using a strap of leather, and as I was plaiting it came out of the strap so I had to tie it up again, and I think the alignment was off. At least my handle checkerboard is pretty straight.
How does it crack? That's the important part.
Very well! Much better than my first two. This one is a lot heavier, so it seems to crack without even trying. Just a little wrist action and I can get a good flick crack out of it.
I look forward to seeing a #4 in the future, maybe?
Definitely! I'm going to go with a natural color for number four, and really try hard for the Indy Morgan look.
Thanks for all the critiques, everyone! I appreciate it. I now have quite a list of things to do better next time. I think dropping strands still isn't as smooth as it could be, so maybe instead of dropping both at the same time, I'll stagger them by an inch or so to smooth it out. And definitely I'll pull harder on each strand during plaiting.
Big thanks to my fiancee, too, who is completely supportive of my strange new hobby ;-).
Posted: Thu Jul 03, 2008 11:09 am
by TurnerME
Your work looks great. Keep it up. How soon until you start #4?


