Page 1 of 1
Distressed Todd's Basic Holster
Posted: Fri Apr 25, 2008 1:57 pm
by McFly
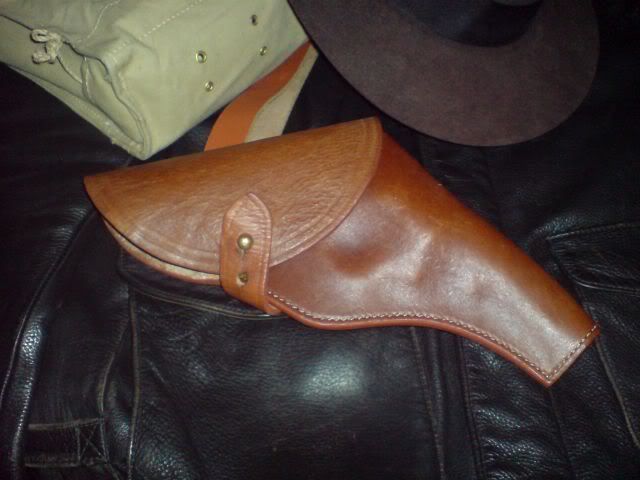
Hey everybody! With Indy IV coming up in less than 30 days (woo!) I thought I should start getting my gear ready. I ordered some brown pecards yesterday to darken up my Aldens, and I've got my Fuller's ready for my Wested and when my new AB shows up, but the one piece of gear that's always bugged me was my holster, which always just looked a little too new. And since it's not something I use every day, and it's ONLY a costume piece, I figured that real distressing wouldn't hurt it.
So I took the Todd's Basic Holster that Hemingway gave me for the COW Gift Exchange a few years ago, and tried all sorts of things on it. First I gave it 2 coats of Pecards (just the regular kind), then after it dried, I tried rubbing alcohol and nail polish remover (I don't have real acetone...) and neither of those really did anything except make it a little less shiny. Then I took some sandpaper, a knife, and some Fuller's, and I went at it. I also used a black pencil to darken the stitches - I'd rather not have ink on there, and I think the black makes it look dirtier, rather than like it was dyed. I also curled the little flap up a little bit, as I've seen done before.
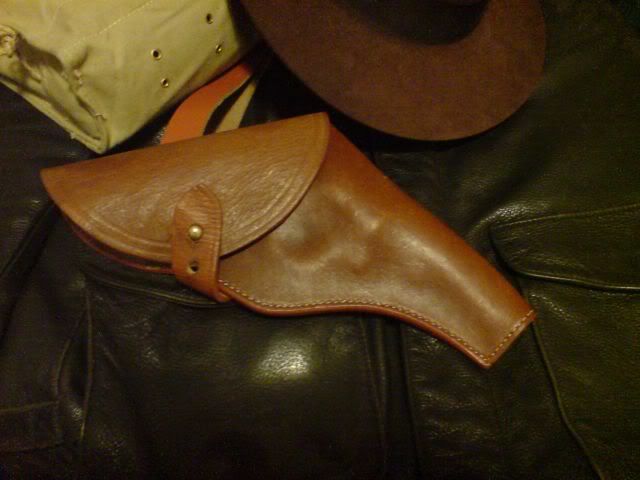
Anyway, here's how it came out! I'm pretty darn pleased with it. Both pics in sunlight through my window, with no flash.

More direct light

Thanks for looking! If you have any tips for things I might do to make it look better, please let me know!

Shane
Posted: Sat Apr 26, 2008 2:52 am
by McFly
It's not as drastic looking in real life... Uh... Is this mic on??

I hope I didn't do THAT bad a job!
Shane
Posted: Sat Apr 26, 2008 12:05 pm
by Wraith1031
I think it looks pretty darn good McFly!

Posted: Mon Sep 29, 2008 5:14 pm
by JimL
I just finished mine recently, and hope to get pictures tonight...
I'll post them here too!
Good job on yours man!

Posted: Mon Sep 29, 2008 6:19 pm
by McFly
Thanks for the comment! Since this thread just came back to life, I thought I'd post a few pics of how it looks now - I have actually done more work to it, putting on some darker spots (as you can see), and roughing it up a little more, as well as trying to blend the scratches I'd previously put on it, to make them look a little more worn in, and not so fresh. Plus, I've had a replica gun in there for a while now, so it's got a much nicer, fuller shape to it than it had before.
The second picture is a much better representation of how it looks in real life:


Looking forward to your pictures, J!m! I don't see a lot of distressed holsters!
Shane
Posted: Tue Sep 30, 2008 8:10 am
by JimL
OK! Here's a couple photos I took last night.
What I did was follow Todd's advice and saturated the holster in water. Then I put my old colt .357 in two bags and jammed it inside, working the leather around the shape of the gun.
That sat in the safe for a week like that, then I pulled the gun out.
Then I took brown and black shoe polish to it while watching Raiders for the elevententh time. I wasn't convinced the holster color was right- it seemed to need a bit more brown...
Then I took scotch-brite to the areas that appeared lighter/rubbed in the film.
For a 'real life' reference, I used an old WW-II flap holster I have. One detail I noticed (among others) was that the hole for the closing pin was all stretched and worn. The new Todd's is very dificult to open, as I'm sure you know, but after opening and closing a few hundred times, the leather stretches and it is much easier....
Anyway, I put a bic pen cap in the opening for a few days, and it worked great to loosten it up, and make it look 'right'.
The final step was curling the end of the strap, shoe-polishing the inside of the strap end as well as the inside of the holster, as it gets matted, dark and polished with use and age. I think it is OK for now, but it still needs a bit more work to be perfect...
Let me know what you think!


Posted: Tue Sep 30, 2008 4:20 pm
by McFly
Looks good! I like how you can see where the chambers were - nice touch!

!
Shane
Posted: Tue Sep 30, 2008 4:32 pm
by JimL
If you use the Tod's method it really takes care of itself.
If you don't have a gun to put in there, it could be more difficult...

Posted: Tue Sep 30, 2008 6:23 pm
by McFly
I have a gun in mine, but it's a much older hostler (doesn't even have a barrel plug or grooves), and I think it's probably more stiff. I did the best I could though! Also, with these 2 more recent photos, I have used Todd's instructions. But since it's thicker, I just aged it with other tactics as well to get the look I wanted, and I'm pretty satisfied with it!
Shane
Posted: Wed Oct 01, 2008 1:28 am
by Zombie Jones
J!m wrote:If you use the Tod's method it really takes care of itself.
I don't know about that...I followed Todd's instructions
twice, and the leather barely budged.

It's a great holster,
far from being a mere costume piece--quality leather, solid construction--but the color could be more screen accurate.
Posted: Wed Oct 01, 2008 7:22 am
by JimL
The color is what prompted me to begin 'changing' the color.
If the shape doesn't change as much as you might like, use the scotch brite on the areas that sit 'proud' (like the cylinder area and edge of top flap) and scuff them down to lighter leather.
At the same time, use black shoe polish to darken the lower areas (like below the barrel and behind the sight bulge[which I also scuffed] on the 'spine').
This is what I did on mine, as you can see as you inspect it.
Blend it all back together, apply fullers to the stitching (dust/dirt always collects in the 'cracks' and is difficult to remove) and you should be set.
Note that there is not any fullers applied to the photos above...
Have fun!
Posted: Wed Oct 01, 2008 6:54 pm
by scot2525
You can definetly see an improvement over the older style holster that Shane and myself own with the newer holsters. The grooves in the flap and underneath the flap are much more deep and noticeable.

This photo is a few weeks old and does not show how I used a lighter to darken the stitching and the end end plug. I had to use the water forming technique twice and was happy with the result. I will say the holster relaxed some after an application of Pecard's. The holster soaked it up as well, there was no excess to wipe off.
Posted: Wed Oct 01, 2008 7:22 pm
by McFly
lol Mine doesn't even HAVE grooves! I carved mine in with a knife and then sanded them away because they looked terrible!

Love the gun impression on yours. Looks good!
Shane
Posted: Wed Oct 01, 2008 8:58 pm
by scot2525
Real quick photo of the holster in its current state. It is not the best picture as I have no sunlight and also have flourescent lighting in my office. I do feel the photo represents the actual color of the holster better and does not give the orange hue seen in the previous photo.

Posted: Mon Oct 06, 2008 8:20 am
by JimL
Looking good!
Lets keep this alive!
Anyone else want to post up their 'distressed' holsters?
Posted: Tue Oct 07, 2008 11:32 pm
by knibs7
Posted: Tue Oct 07, 2008 11:51 pm
by McFly
Thanks! ;-)
Shane
Posted: Tue Oct 28, 2008 12:17 pm
by Tremolo
here is my holster, I followed Todd´s instructions and am really happy with the results.
The first picture is with flash and the other without
Posted: Fri Jan 23, 2009 10:47 pm
by RaiderZee
Just got a new Todd's: it is REALLY nice, can't consider it a costume piece in ANY way. I'm getting ready to distress it, based on the info on this thread. Question: are Todd's instructions posted somewhere? Nothing came with the holster, and I couldn't find them on his website.
RaiderZee
Posted: Fri Jan 23, 2009 11:19 pm
by Imahomer
Please sir... May I have some more?
Posted: Mon Jan 26, 2009 3:19 pm
by RaiderZee
Okay, per an email from Todd's, their website officially has no info on water-forming holsters. Here's another take on this process:
http://www.gunfighter.com/cgi-bin/bbs/c ... ?read=9932
RZ