Page 1 of 1
I made my own hat and hatblock + MORE pictures
Posted: Tue Apr 22, 2008 2:43 pm
by Nicolas Jones
Hello guys,
What do you think of it?
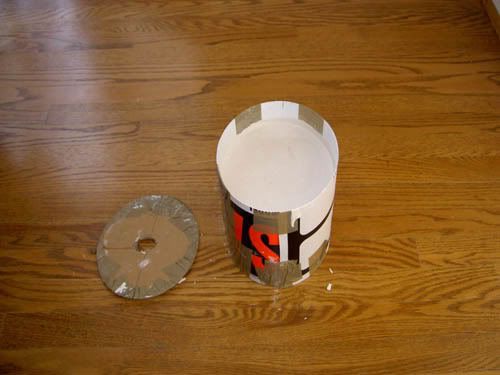
I choose to make a hat block made of plaster rather than wood (easier I think). I made a mold made of a thick plastic sheet and cardboard.

Craving the bottom of the mold


The cover I put on the moist plaster

Then I cast the plaster in it...

After a night the plaster hardened. I put it in a kind of oven for a day, in order to dry it.

I used a cheese grater to change the shape (made my thumbs bleed) and a partern to verify my work.


I painted the block with a resin... and wait it to dry

The for the rest, I followed the tutorial post by Mark Brody (thanks dude!)
viewtopic.php?t=27053&start=0&postdays= ... highlight=
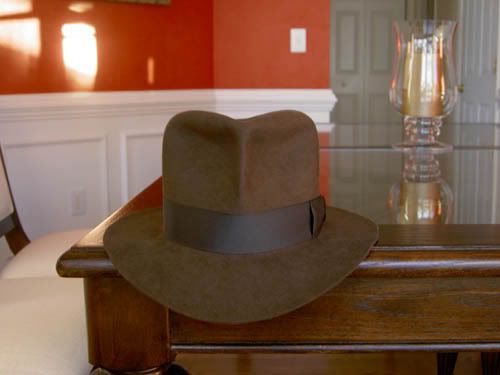
Here are the pictures of my hat, it cost me about 60$ (40€)

Yep, actualy there are two of them now...

I bashed it a little differantly after...
So here it is on the top of my head


Nicolas Jones
Posted: Tue Apr 22, 2008 2:53 pm
by IndianaSolo
DUDE THAT LOOKS AWESOME!!! I would love to hear what the hatters think regarding using plaster and resin for a hat block, but It could work for those who need the block to avoid taper after getting their hat wet.
I Like it, especially where you're wearing it.
Posted: Tue Apr 22, 2008 2:56 pm
by PyramidBlaster
Awesome Job!
You guys are really starting to give me the 'selfmade hat' itch...To go along with my 'homemade bullwhip' and leatherwork itches....
Posted: Tue Apr 22, 2008 3:01 pm
by Thousand Truths
Wow very cool man!
Posted: Tue Apr 22, 2008 3:19 pm
by Nicolas Jones
Thanks guys!
I tell you : This is NOT hard to do, you just have to be patient...


Posted: Tue Apr 22, 2008 3:23 pm
by swcrazyfan
That looks great! BTW, what size is it?
I really want to make my own hat now!

Posted: Tue Apr 22, 2008 3:26 pm
by Nicolas Jones
I am a big head guy, 60 or 7 1/2.
Posted: Tue Apr 22, 2008 3:34 pm
by Fletch
Nice Job Nicolas! What type of epoxy did you use? Spar Varnish is usually used on wood blocks to reduce water absorption and the resulting cracking that comes from that repeated wet and drying process. I think that block would work wonderfully. Another idea would be Dental Stone instead of plaster. It would be even harder, lighter, and has almost no expansion when curing. You couldn't use a cheese grater to shape it but you can sand and dremel on it.

Posted: Tue Apr 22, 2008 3:36 pm
by Mac
Looks great! Good work!
I've made a several blocks using the same method, I didn't think of using a cheese grater though:


- Mac
Posted: Tue Apr 22, 2008 3:38 pm
by Alan
Really nice, guys!
Posted: Tue Apr 22, 2008 3:40 pm
by Nicolas Jones
Great job Mac!
Nice raider look!
I chose something between raider and LC for the look of my own
Would you say that it was easy to do this great hat?
Nicolas
Posted: Tue Apr 22, 2008 4:05 pm
by swcrazyfan
One quick question. Since when you put the sweet band in the fedora, the inside diameter/size gets slightly smaller. Do you compensate for this factor by making the block diameter slightly larger?
Thanks!
Posted: Tue Apr 22, 2008 4:05 pm
by Mac
Nicolas Jones wrote:Would you say that it was easy to do this great hat?
The hard part was making the block - shaping it the way that I wanted. It took me several hours using only sand paper - using a cheese grater never entered my mind!
I was pleased with that hat, but it was far from perfect for me needs. The ribbon was craft store polyester, dyed brown. Polyester is not easy to dye at home and is far too thick and shinny. On that particular block, the second one that I made, the radius where the sides fold into the top is too boxy. I corrected that on the third one!

Other than making the block, sewing in a sweat is quite a bear.
- Mac
Posted: Tue Apr 22, 2008 4:10 pm
by Mac
swcrazyfan wrote:Since when you put the sweet band in the fedora, the inside diameter/size gets slightly smaller. Do you compensate for this factor by making the block diameter slightly larger?
Yes, hat makers use a block one size larger than the head of the wearer in order to make the hat. So if you have a 58cm head size, make your block 59cm in circumference. Your sweatband should fit then.
- Mac
Posted: Tue Apr 22, 2008 4:11 pm
by swcrazyfan
Mac wrote:swcrazyfan wrote:Since when you put the sweet band in the fedora, the inside diameter/size gets slightly smaller. Do you compensate for this factor by making the block diameter slightly larger?
Yes, hat makers use a block one size larger than the head of the wearer in order to make the hat. So if you have a 58cm head size, make your block 59cm in circumference. Your sweatband should fit then.
- Mac
Thats what I thought. I just wanted to make sure. Thanks!
Posted: Tue Apr 22, 2008 4:12 pm
by Mark Brody
Fantastic hat!!! Where'd you get the materials (specifically the ribbon)?
Posted: Tue Apr 22, 2008 4:24 pm
by Nicolas Jones
The material

?
There is a hat maker who works near my place (5min with my car)!
I got the sweatband, lining and capeline (Czech one) there...
The ribbon is one of todd's, in fact my ribbon is made of two saw together.
The stiches are hidden in the bow...
Once again thank you mark, your tutorial was helpful, in fact this tutorial is the reason why I décided to make my own hat.
Posted: Tue Apr 22, 2008 4:39 pm
by Mark Brody
I'm glad I could help! It's always cool to see what people can do themselves.
Posted: Tue Apr 22, 2008 9:19 pm
by Indiana Green
Nic Jones,
What are the specific types of the plaster and resin you used? Also, could you post a few more pictures of the finished block? It looks like a great shape!
Indy Green
Posted: Wed Apr 23, 2008 11:47 am
by Nicolas Jones
This is the point, no material is realy specific.
I used a common plaster (avoid to pour to much water in the plaster powder)
The resin is one of those which can stand contact with water... any waterproof paint would have done the job think.
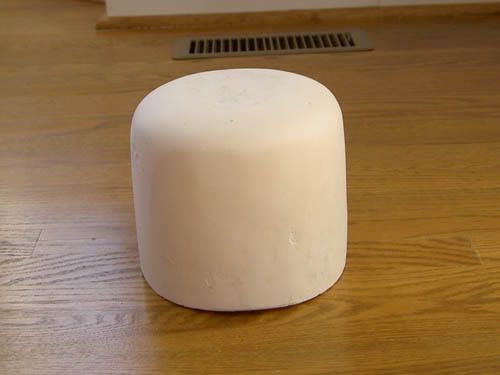
One important point : the block have staight edges and a slightly round top.
Here are some pictures of the block


Nicolas jones
Posted: Wed Apr 23, 2008 12:13 pm
by Fink
Brilliant! Absolute brilliant! Creativity at top peak!

Thank you so much for sharing, this is top value info!

Posted: Wed Apr 23, 2008 1:23 pm
by jedidentist
Fletch wrote: Another idea would be Dental Stone instead of plaster. It would be even harder, lighter, and has almost no expansion when curing. You couldn't use a cheese grater to shape it but you can sand and dremel on it.

It would be much more expensive...not a ton, but definitely more expensive. I honestly wouldn't bother because the expansion will probably compensate for the eventual shrinkage of the hat.
Posted: Wed Apr 23, 2008 8:42 pm
by Bemo
Fantastic Job! Instead of a cheese grater, a trip to your local auto store/hardware store might yield the shavers used when sanding down the bondo used on auto bodies. Stanley tools sell a similiar tool known as the Surform. Replaceable blades would make it much easier I would think. But good for you giving it a try, looks grate (yes, pun intended).
Peace.
Posted: Wed Apr 23, 2008 9:18 pm
by BoilermakerJones
Great hats Nicolas!
Its great to see what someone can do with a little ingenuity.
Matt
Posted: Wed Apr 23, 2008 9:40 pm
by Piker
Who's cat is that?
Posted: Wed Apr 23, 2008 10:51 pm
by Marcus Brody
Ooh, a job well done. I like the hat and block, although I have to ask about the brim width. It looks to be a bit shorter than a usual Indy hat, but it still looks nice.
Posted: Wed Apr 23, 2008 11:11 pm
by BoilermakerJones
I have been noticing hats a lot more lately.
I was watching a show on Napoleon on TV the other day and was fascinated by all the elaborate hats that were being worn. I had never given them much attention before. They had huge brims that were then folded up in various shapes. I probably thought of this since Nicolas is from Paris.
I also saw a few minutes of a Mel Gibson movie Galipoli? - he must have been wearing an Akubra since I saw the same hat on the hatsdirect site.
Matt


