Page 1 of 1

Tood Costumes Standard Indy Jacket - Pics Online Now

Posted: Fri Mar 28, 2008 4:02 pm
by IndyWannaBee
Well the UPS man just left my workplace and dropped off a box! I found out by an instant email coming from UPS and looked up the tracking number! It arrived.

With anticipation I opened up the box and pulled out said jacket! Nice! XL! Pics later since I am at work and people might think I am weird taking pics of myself in another leather jacket!

One surprise though...I was shocked at how light and thin the leather is. Are the custom versions made of the same leather? How does this thinner leather compare to other brands? US Wings? Wested? Movie versions?
Posted: Sat Mar 29, 2008 3:45 am
by IndyWannaBee
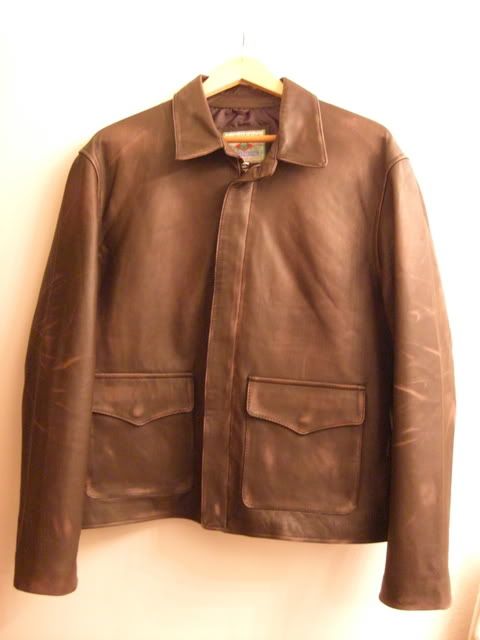
Well I have been working the **** out of my Todd's Costume Standard Indy jacket. I have already gone through 1/2 a bottle of isopropyl alcohol and I must say it is coming along excellent! The coat has definitely grown on me since I have been wearing it and working with it during the last 2 hours of distressing. I am not as shocked as I was when I first pulled it out of the box and was overwhelmed by the light weight and plastic-like smell.

My technique: KOTCS version

First I printed up as many different angles of Indy's coat from the IV movie and supplemented it with a few Raiders / Last Crusade pics for reference.

Next I hung up the jacket and looked at it for about 5 minutes as if it were a blank canvas. I viewed the areas that I thought would get the most wear and tear such as around the pocket flaps, over the left and right shoulders to simulate all the packs and gear Indy may have been carrying, and the right and left lower front panels near where Indy would have drawn his Webley or bullwhip.

I took a paper towel and wrapped it around my finger. I dipped it into the alcohol and started to work the pockets first. I lightened the color over all the edges of the pocket flap and the pocket seams. I also made sure to lighten the area over the buttons so it looks like it has worn down.

I next used the same technique and hit all the raised seams including the the area around the zipper, shoulders, arms, and back. I even lightened around the inside of the collar to give it that worn look.

Next I put the jacket on and bent my arms so that the areas around the inside of the elbow bunched up. I took more paper towels and dipped it into the alcohol. I next rubbed the areas that were bunched out so that it would get lighter in color. Some areas are a bit overdone but I still need to blend in the lightened areas with the rest of the darker areas.

This leads me to a question. What is the best way to distress the flat areas like the front panels and the larger back panel?

Pics will be posted sometime this weekend! It is 1:00am and I am beat and reek of alcohol! :shock:

Posted: Sat Mar 29, 2008 4:36 am
by Mulceber
Also, don't forget the storm flap - what with the constant zipping and unzipping, the edge of it would get a lot of wear from contact with the zipper. Keep in mind though that Indy rarely zips the jacket all the way up so the lower part of the storm flap should receive a lot more wear than the upper. :junior: -M

Posted: Mon Mar 31, 2008 3:35 am
by IndyWannaBee

Posted: Mon Mar 31, 2008 12:53 pm
by Rundquist
Very interesting. Todd really made those things for easy distressing (an Indy fan’s dream). Most jackets need acetone to move the color. My opinion is that your pockets look decent. You’ve got some color removal on your sleeves that are a little too specific for my taste. Try hitting those areas again with alcohol and move the color around so that the marks are less specific. If that doesn’t work, try brown pecards. Cheers