


Introducing - "THE RAIDERS CINCH"
Moderators: Indiana Jeff, Dalexs
-
jlee562

- Professor of Archaeology

- Posts: 1129
- Joined: Thu Mar 26, 2009 8:50 pm
- Location: San Francisco
Re: Introducing - "The Raider's Cinch"
+1 on the previous two posts. This thread is an interesting discussion on how one might reproduce a most exacting Raiders crease. But not so much as an exploration on what Nadoolman, et al, may or may not have done that is backed by evidence.
-
3thoubucks

- Professor of Archaeology
- Posts: 1133
- Joined: Tue Dec 10, 2002 1:26 am
- Location: San Francisco, California, U.S.A.
- Contact:
Re: Introducing - "The Raider's Cinch"
Let's see some hats with "The Raiders Cinch"!
Remember- it's easy, but if you have a problem, I know the trick.
-
3thoubucks
- Professor of Archaeology
- Posts: 1133
- Joined: Tue Dec 10, 2002 1:26 am
- Location: San Francisco, California, U.S.A.
- Contact:
Re: Introducing - "THE RAIDERS CINCH"
These are crummy pics, but whatever. Here's the hat on my head, the dark spots 1/4 inch in front of the ribbon are the stitches holding in the sweatband. The ribbon is the new brim break, and a portion of the sweatband is now the bottom of the brim. 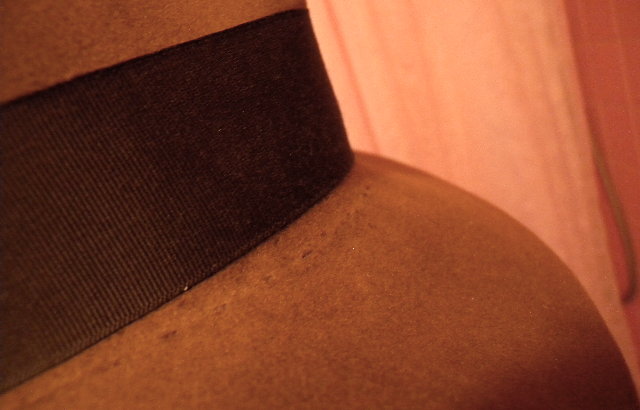
Last edited by 3thoubucks on Fri Jul 09, 2021 1:27 am, edited 1 time in total.
-
3thoubucks
- Professor of Archaeology
- Posts: 1133
- Joined: Tue Dec 10, 2002 1:26 am
- Location: San Francisco, California, U.S.A.
- Contact:
Re: Introducing - "THE RAIDERS CINCH"
Here's the trick to doing "The Raiders Cinch" !!!
If your hat has a ribbon, detach the front of the bow and the ribbon there, and all the tacks on the ribbon, so the rear of the bow is the only attachment point. Cinch the ribbon around the crown with the ribbon slid up 1/4 inch front and back. (it's off center like the turn.) When you get the channel in the front dent, mark the bottom of the ribbon and brim with one chalk line where you want to make the stitch, under the front of the bow. Unwind the ribbon from the crown and pile all the ribbon in the bow area, then make the stitch. Make it 3 or 5 mm tighter than your mark- it will stretch. Now, pull the ribbon loop OVER the top of the crown. Check your results, do it looser or tighter as needed. CHEERS! A 360 stovepipe blocked hat will help.
If your hat has a ribbon, detach the front of the bow and the ribbon there, and all the tacks on the ribbon, so the rear of the bow is the only attachment point. Cinch the ribbon around the crown with the ribbon slid up 1/4 inch front and back. (it's off center like the turn.) When you get the channel in the front dent, mark the bottom of the ribbon and brim with one chalk line where you want to make the stitch, under the front of the bow. Unwind the ribbon from the crown and pile all the ribbon in the bow area, then make the stitch. Make it 3 or 5 mm tighter than your mark- it will stretch. Now, pull the ribbon loop OVER the top of the crown. Check your results, do it looser or tighter as needed. CHEERS!
Last edited by 3thoubucks on Tue Sep 07, 2021 1:49 am, edited 1 time in total.
-
captblitzdawg

- Dig Leader

- Posts: 694
- Joined: Mon Jul 13, 2015 1:19 pm
Re: Introducing - "THE RAIDERS CINCH"
Very cool find! It's amazing the lengths Gearheads go to really understand every part of the costume. I don't think any other costume in movie history has been so scrutinized! And we are the richer for it, and I am glad for it!

Re: Introducing - "THE RAIDERS CINCH"
I think I follow all this, but if you were inspired to make a "How To" video for YouTube, I'd love to have visuals to go along with the instructions. Thanks for sharing this technique!3thoubucks wrote:Here's the trick to doing "The Raiders Cinch" !!!
If your hat has a ribbon, detach the front of the bow and the ribbon there, and all the tacks on the ribbon, so the rear of the bow is the only attachment point. Cinch the ribbon around the crown with the ribbon slid up 1/4 inch front and back. (it's off center like the turn.) When you get the channel in the front dent, mark the bottom of the ribbon and brim with one chalk line where you want to make the stitch, under the front of the bow. Unwind the ribbon from the crown and pile all the ribbon in the bow area, then make the stitch. Make it 4 or 5 mm tighter than your mark- it will stretch. Now, pull the ribbon loop OVER the top of the crown. Check your results, do it looser or tighter as needed. CHEERS!
Re: Introducing - "THE RAIDERS CINCH"
I second that. I would love to see this done as a video tutorial.
-
Canyon

- Legendary Adventurer

- Posts: 6310
- Joined: Thu Sep 18, 2003 3:16 pm
- Location: Swooning over my husband (and Indy!!!)
- Contact:
Re: Introducing - "THE RAIDERS CINCH"
I agree! I would love to see a video of this.mr_alex wrote:I think I follow all this, but if you were inspired to make a "How To" video for YouTube, I'd love to have visuals to go along with the instructions. Thanks for sharing this technique!
-
jlee562
- Professor of Archaeology
- Posts: 1129
- Joined: Thu Mar 26, 2009 8:50 pm
- Location: San Francisco
Re: Introducing - "THE RAIDERS CINCH"
Notably, this is not seen in the original hat. Another reason to doubt the veracity of these claims. Or really, like you debunked your own theory accidentally.3thoubucks wrote:the dark spots 1/4 inch in front of the ribbon are the stitches holding in the sweatband.

-
3thoubucks
- Professor of Archaeology
- Posts: 1133
- Joined: Tue Dec 10, 2002 1:26 am
- Location: San Francisco, California, U.S.A.
- Contact:
Re: Introducing - "THE RAIDERS CINCH"
I have an official wool Indy hat made by Stetson. Even in sunlight there is no trace of stitches. The COO of the Prop Store said he was "surprised how soft the felt actually is". If the color match is perfect, stitches can sink in and disappear? I just used the one spool of brown thread my Mom had left. I'll check some other intact hats I have in the attic, but it's too hot around the Bay to go up there today.
-
jlee562
- Professor of Archaeology
- Posts: 1129
- Joined: Thu Mar 26, 2009 8:50 pm
- Location: San Francisco
Re: Introducing - "THE RAIDERS CINCH"
The manufacturing practices of whomever held the Stetson license in the mid 80's doesn't really tell us much about the manufacturing practices of whomever made the Raiders Hat, be it Cury in Brazil or perhaps Fernandez y Roche in Seville. If we are just describing different hats we own, I can see the sweatband stitches on two pre-war Stetsons (1922 and 1930s), a post war Playboy, and a modern Stratoliner. Like most hats these stitches are typically hidden by the ribbon, but are revealed with a careful nudge. Only on the black Strat would I say any of the threading was color matched.3thoubucks wrote:I have an official wool Indy hat made by Stetson. Even in sunlight there is no trace of stitches. The COO of the Prop Store said he was "surprised how soft the felt actually is". If the color match is perfect, stitches can sink in and disappear? I just used the one spool of brown thread my Mom had left. I'll check some other intact hats I have in the attic, but it's too hot around the Bay to go up there today.
It would be an awfully convenient coincidence for a 'perfectly color matched ' thread to fade in the exact same perfect color match.

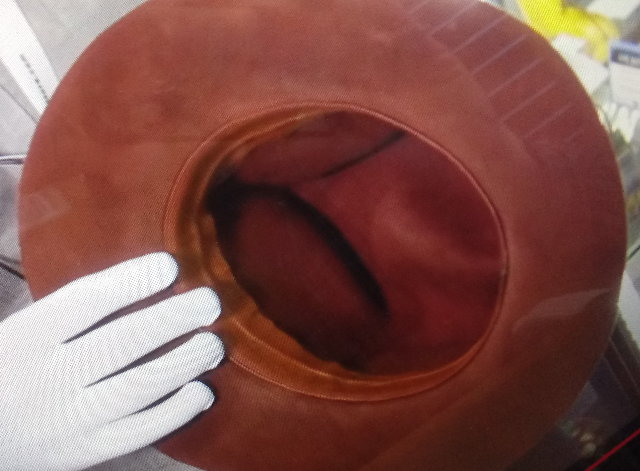
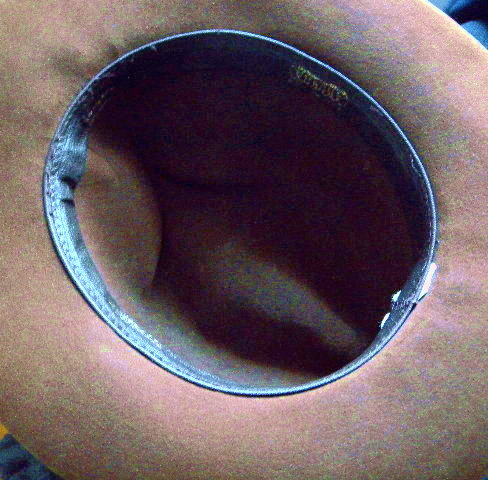
As I pointed out earlier, at the point where we see Harrison's signature, the sweatband is shown seated relatively far inside the crown as you can clearly make out the brim break a few mm below the edge of the sweatband. Ideally, the reed should sit right at the brim break. In all fairness to one of your earlier points, this could potentially suggest the sweatband was removed and/or reinstalled...It could also just be a poorly installed sweatband. But again going back to the signature, it would lie over the wearer's right eye of the hat were on the head. Based on where we can see the sweatband sitting from the inside, above the brim break, those stitches would not be a part of the brim from the outside, whether visible or no.
-
3thoubucks
- Professor of Archaeology
- Posts: 1133
- Joined: Tue Dec 10, 2002 1:26 am
- Location: San Francisco, California, U.S.A.
- Contact:
Re: Introducing - "THE RAIDERS CINCH"
The whole bottom of the brim is splotchy with fullers earth or Tunisian dust. I can see what you're saying very clearly, unless I think of it as an area with dust next to an area with no dust. There's a picture of the signature at the Prop Store auction site if you want another view. You could be right though, the sweatband might be 1/8 inch inside the hat..
Dust. That might be why the stiches aren't visible.
Dust. That might be why the stiches aren't visible.
-
Screencapped

- Vendor
- Posts: 460
- Joined: Wed Jun 25, 2014 9:29 pm
Re: Introducing - "THE RAIDERS CINCH"
This is a very interesting take on this particular feature for sure but I'd have to put myself in Occam's razor camp on this one. The poster is without a doubt one of if not the most dedicated fan of THE HAT and I've enjoyed reading all of the input and valuable discoveries he's contributed to this forum over the years i.e. the turn and folded sweatband stand out immediately. At one point eons ago when I first became obsessed with the Raiders fedora(long before I started making hats) I was under the impression it was somehow magical and attributed all sorts of nonsensical, unproven characteristics to the hat such as it was made on a unique block and not the very common #52 model that it was probably made on or other wild speculations about the most minute nuances. Once I began my hat making training which I learned from Steve Delk which basically consisted of stripping the innards of a hat and either replacing them or just reinstalling and or reblocking, it occured to me that I had been overthinking things way too much. Before I was under the impression that making a hat from scratch must involve some sort of wizardry and never imagined that I'd be doing it for a living some day. Over 1,000 custom hats later I'm no longer under any preconceived notions I was once susceptible to in regards to the process of hatting. Wait a minute, where exactly was I going with this before I started to monologue? Oh yeah! A few years ago I thought maybe I'd solved the distortion in the brim break "mystery" and made a post about it. Let's see how it's aged in the last four years...
https://r.tapatalk.com/shareLink/topic? ... source=app" onclick="window.open(this.href);return false;
Raiders brim break distortion solved...possibly.
Sent from my SM-S102DL using Tapatalk
Oh yeah! A few years ago I thought maybe I'd solved the distortion in the brim break "mystery" and made a post about it. Let's see how it's aged in the last four years...https://r.tapatalk.com/shareLink/topic? ... source=app" onclick="window.open(this.href);return false;
Raiders brim break distortion solved...possibly.
Sent from my SM-S102DL using Tapatalk
-
3thoubucks
- Professor of Archaeology
- Posts: 1133
- Joined: Tue Dec 10, 2002 1:26 am
- Location: San Francisco, California, U.S.A.
- Contact:
Re: Introducing -
This is how I felt too, before I ever posted at Indyfan or Indygear. The hat was indecipherable.Screencapped wrote:I was under the impression it was somehow magical and attributed all sorts of nonsensical, unproven characteristics to the hat such as it was made on a unique block
Your shrinkage theory is good, and if it works it works. I've never had a completely soaked hat and observed what happens when it dries off the block. Cheers!
Re: Introducing - "THE RAIDERS CINCH"
Ok, do y’all really want to know how to get a true Raiders look with out resorting to all this minutiae?
Buy a hat.
Wear the @#$% out of it.
Wear it in the rain, Wear it wet, sweat in it.
After a year or so, get it reblocked by someone that knows a couple of key factors.
There you have it, the perfect Raiders shape.
Buy a hat.
Wear the @#$% out of it.
Wear it in the rain, Wear it wet, sweat in it.
After a year or so, get it reblocked by someone that knows a couple of key factors.
There you have it, the perfect Raiders shape.


Re: Introducing - "THE RAIDERS CINCH"
JPdesign wrote:Ok, do y’all really want to know how to get a true Raiders look with out resorting to all this minutiae?
Buy a hat.
Wear the @#$% out of it.
Wear it in the rain, Wear it wet, sweat in it.
After a year or so, get it reblocked by someone that knows a couple of key factors.
There you have it, the perfect Raiders shape.
-
Ridgerunner58

- Dig Leader
- Posts: 695
- Joined: Tue Jun 02, 2009 4:40 pm
- Location: Between the Edge of Nowhere and the Edge of Somewhere.
Re: Introducing - "THE RAIDERS CINCH"
Pretty much.JPdesign wrote:Ok, do y’all really want to know how to get a true Raiders look with out resorting to all this minutiae?
Buy a hat.
Wear the @#$% out of it.
Wear it in the rain, Wear it wet, sweat in it.
After a year or so, get it reblocked by someone that knows a couple of key factors.
There you have it, the perfect Raiders shape.
That’s how my first Penman got to where it is and how my ABL has been treated. Sweated through in the desert, blasted in a couple of sandstorms, drenched in the rainforest, carried on trips in a motorcycle saddlebag, reblocked twice by John Penman, currently rolled up in a carry on bag in Kauai after a week of humidity and rain. When I get home it’ll get unrolled and sprayed with a little water to get its shape back and will carry on until it needs another reblock. The more it gets used the more compliments it gets.
-
Indy Magnoli

- Staff Member

- Posts: 7029
- Joined: Mon Jul 08, 2002 4:00 am
- Location: Middle Earth, New Zealand
- Contact:
Re: Introducing - "THE RAIDERS CINCH"
I'd be more inclined to this approach if there was a hatter within 6,000 miles of where I live that I could trust. 
-
3thoubucks
- Professor of Archaeology
- Posts: 1133
- Joined: Tue Dec 10, 2002 1:26 am
- Location: San Francisco, California, U.S.A.
- Contact:
Re: Introducing - "THE RAIDERS CINCH"
Sewing is simple. When I was a kid, guys in the Boy Scouts and Military were expected to sew their patches on their uniforms.You can learn basic sewing quickly with youtube videos. Any questions about doing the Cinch, just ask me. 
Couple tips. Soak the thread with spit where you're going to tie a knot so it's less likely to slip.
Practice knots with a length of thread, or string. Tie a simple knot like the first knot when you tie your shoes. Then the second simple knot on top of that can be tied only two ways. One will slip and one will hold. Learn which way holds.
Exacto knife or little needle sharp scissors to remove stitches. Just don't damage ribbon or felt. Use a small thin needle to do minimum damage when you sew.
Pins can hold the robbon in place while you sew.