Distressing photos....Enter at own risk. (Hero project)
Moderator: Dalexs
- fifthchamber
- Professor of Archaeology
- Posts: 1133
- Joined: Sun Nov 07, 2010 12:59 am
- Location: Tachikawa, Tokyo
Distressing photos....Enter at own risk. (Hero project)
Hi all.....
Well....I'd been building up to it for a while now....But I'd always loved the gradation of colours I'd seen from people whose jackets were either old enough to show wear well, or had been run through the sandpaper line some...And yesterday, I decided that I really could use a new project to keep my busy during winter this year...
So, I decided to buy some fine grit sandpaper, and see what happened....The results I've gotten, so far, are rather good I feel, so I wanted to share some of the better photos I'd gotten last night...
This is the result of 3+ hours of slow work, using various paper grits, in small strips of about a centimetre wide and about 5 long, to ensure that I can hit just the spots that I wanted to wear out, and no others...It took a long time, but it seems to have worked decently I think...(Apologies to Michaelson for this...I know this is heresy, but.....It DID pay off..)
I started with lower numbers...160 grit paper to take the top off the leather a touch..Then, using 2000 and 4000 grit, I reinforced the sections that I was working on, to make sure it wasn't just single lines of "damage", but a whole "worn in" area....The 4000 doesn't really do much, except work into the fading already in place, so the 2000 grit was used more to reinforce the stronger faded areas, then I'd lightly go back over the area with the 4000 cloth...
I focused on areas that I'd consider get most use in my other jackets....The lower seams, the pocket flaps and hip area, the straps and buckles, and the shoulders, and then using the 2000 I went back over the elbows, shoulders, and chest area lightly...This seems to have done what I wanted to do, and has given the jacket a rather decent "well worn" look in the areas I wanted....I was worried it was a touch "too much", so I went very slow, and very soft, using the movie as a rough guide to what look I wanted....(Although I don't think the movie was "realistic" in the zones they faded either....It seems a touch more random, more for look than "reality"...No bad thing, but I wanted a good mix between them both)..
Once I felt I was "done" for the night, after about 3 hours, I laid the jacket out, and Pecarded the whole thing again before hanging it up to dry overnight and today in the sun....
I'll see what that leaves me with once the Pecards is absorbed, but I'm happy with the effect as it stands, and also a touch worried about overdoing it....The "hook" is easy to "sink in"....And I wanted to watch that..Enough is enough..
I'd welcome any other ideas and places to work on! I may, I may not do more....But this is all from last night's initial foray.....Let me know what you think? (Except Michaelson, cause...I KNOW what you think mate...And apologies.. And joking...I'd still welcome your help Sir... )
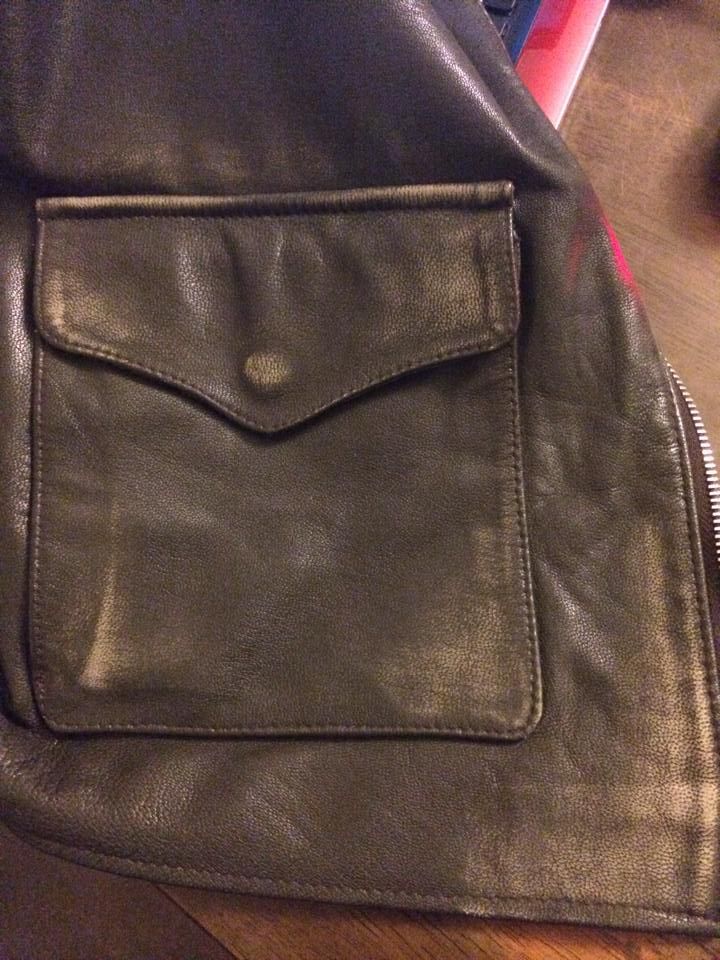
Pocket before I'd worked on it to compare the changes
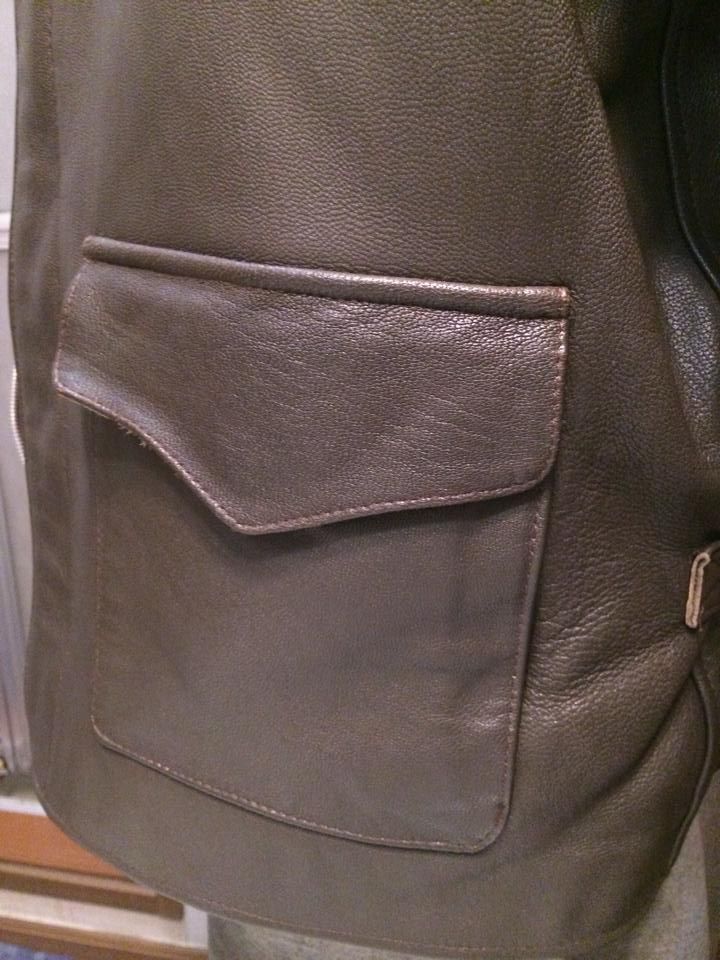
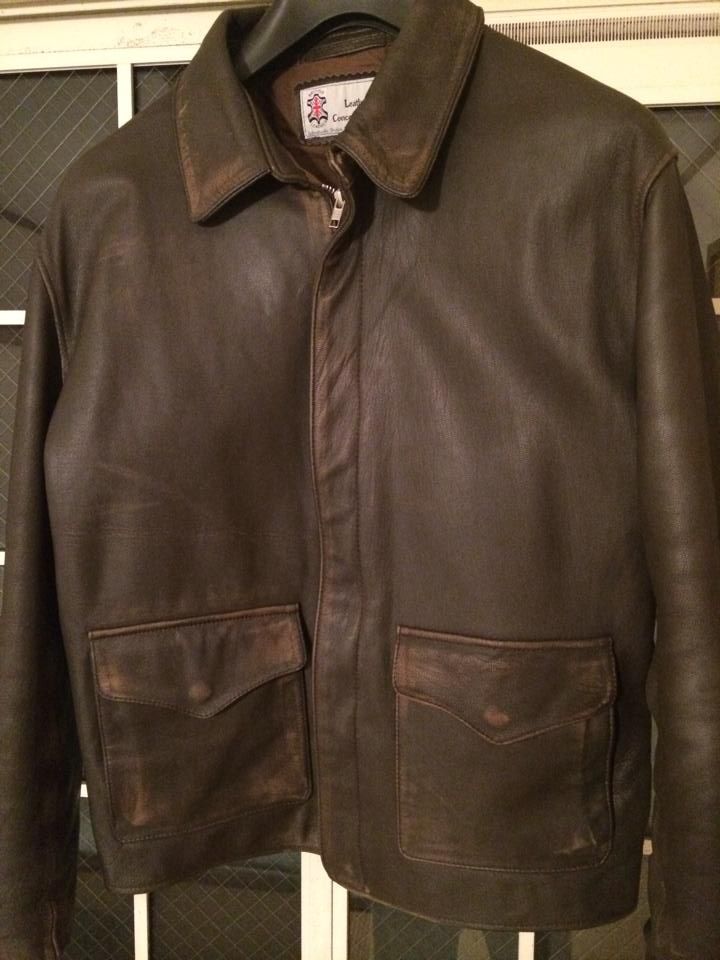
How it ended up..
The collar front
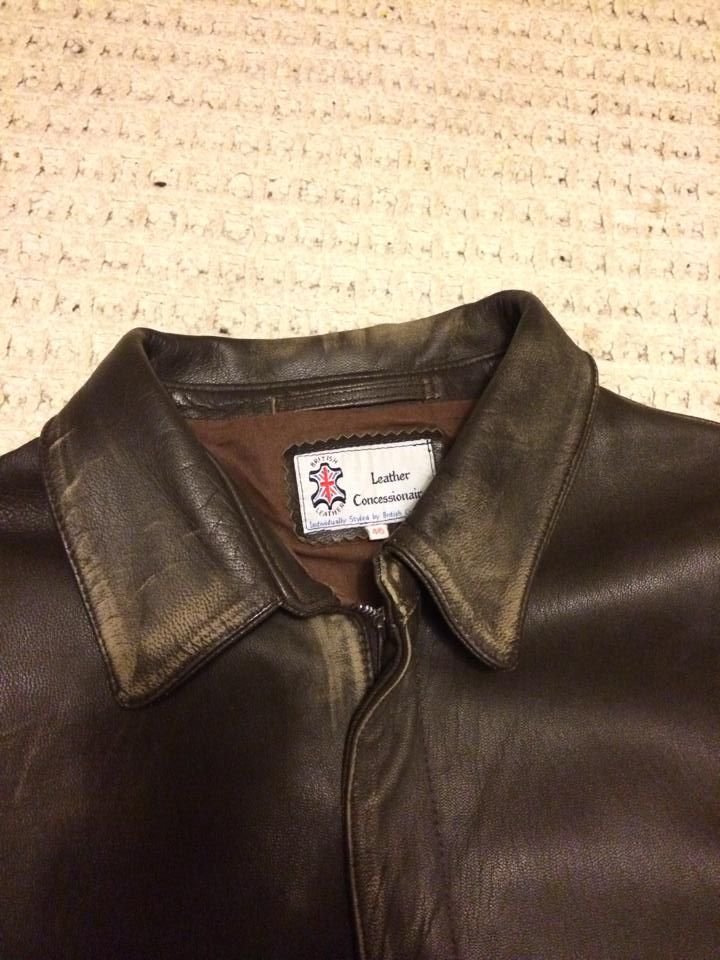
Front of the jacket before Pecards application
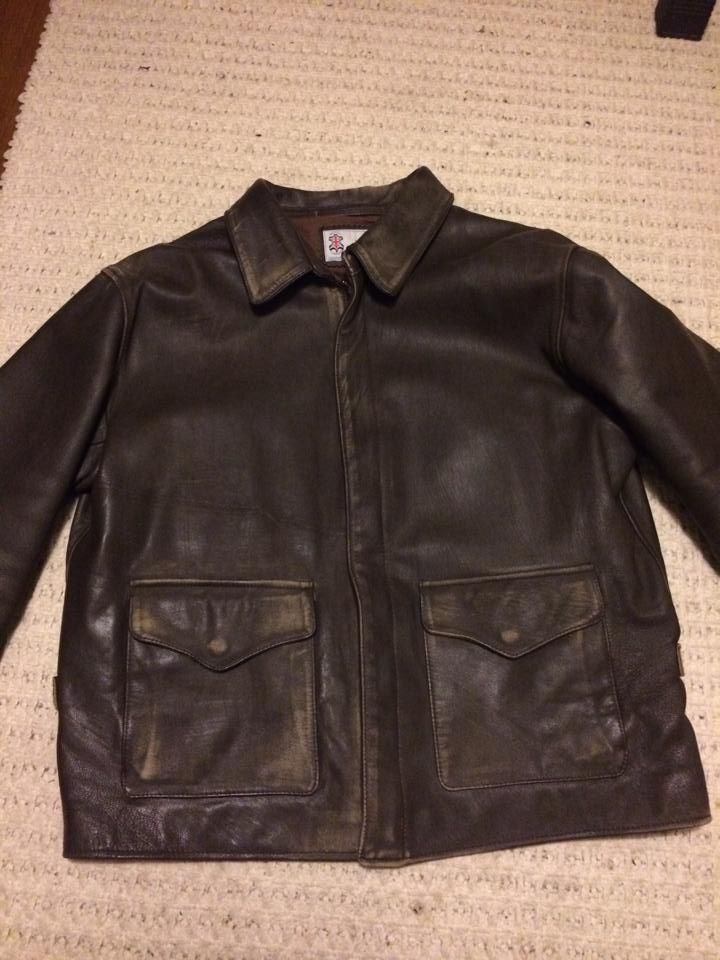
The front after the Pecards..
The back after a decent Pecards bath...
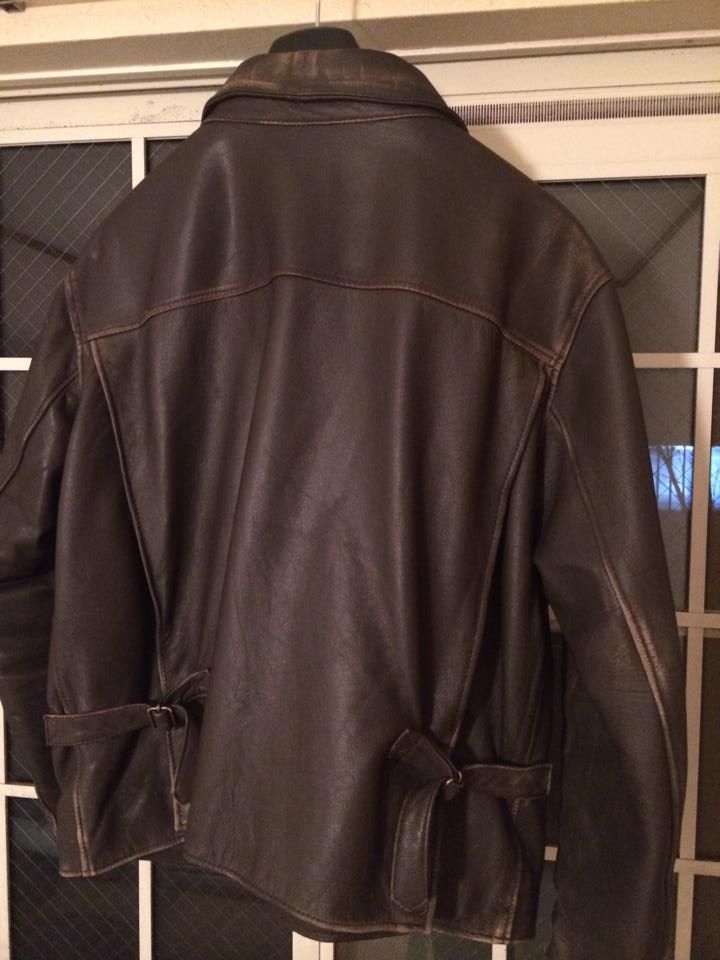
Let me know what you all think....I suspect it's just about right, Holt suggested some more work on the back too, and I might do so....But any ideas are more than welcome!
Warm regards...
- Gorak
- Professor of Archaeology
- Posts: 1053
- Joined: Tue Jul 02, 2002 7:37 pm
- Location: Corpus Christi, Texas
Re: Distressing photos....Enter at own risk. (Hero project)
Really nice looking. What leather is that? I like the collar alot with the distressing you did. I have a Hero in dark brown lamb but havent touched it to see the undercoat color yet.
but really nice job you did there!
- fifthchamber
- Professor of Archaeology
- Posts: 1133
- Joined: Sun Nov 07, 2010 12:59 am
- Location: Tachikawa, Tokyo
Re: Distressing photos....Enter at own risk. (Hero project)
The leather is the "Seal Brown Lamb".... I'd been worried about the under colour too... But the under colour seems to be a lighter brown....And the overall effect is rather pleasing..
- Indiana Jeff
- Site Admin
- Posts: 10214
- Joined: Thu Aug 07, 2008 1:59 am
- Location: TX Panhandle
Re: Distressing photos....Enter at own risk. (Hero project)
I think the effect you got looks very natural, nothing symetrical. Stop here! What you've already done will continue to fade in proportion to the rest of the jacket and become more naturally distressed.
I especially like the work on the left pocket (as pictured). The bottom corner has the effect of something being carried in that pocket continually, a bit of a stretch mark and a particularly light faded spot. Sort of like a Skoal ring in jeans.
Regards,
Indiana Jeff
I especially like the work on the left pocket (as pictured). The bottom corner has the effect of something being carried in that pocket continually, a bit of a stretch mark and a particularly light faded spot. Sort of like a Skoal ring in jeans.
Regards,
Indiana Jeff
- fifthchamber
- Professor of Archaeology
- Posts: 1133
- Joined: Sun Nov 07, 2010 12:59 am
- Location: Tachikawa, Tokyo
Re: Distressing photos....Enter at own risk. (Hero project)
Hi Jeff....Indiana Jeff wrote:I think the effect you got looks very natural, nothing symetrical. Stop here! What you've already done will continue to fade in proportion to the rest of the jacket and become more naturally distressed.
I especially like the work on the left pocket (as pictured). The bottom corner has the effect of something being carried in that pocket continually, a bit of a stretch mark and a particularly light faded spot. Sort of like a Skoal ring in jeans.
Regards,
Indiana Jeff
Thank you...That was more or less what I was going for! I folded the chest over on itself and used the sandpaper there too, to try and get roughly the same kind of effect, but more muted, and it looks like that worked a touch too....
I also think I'm agreeing with you about stopping here....I'm likely to be pulled in deeper than I want (or can afford right now) to go...So...I'll have a rethink while watching the movie, and if something jumps out at me while watching it again? I'll have a think and a look, but if not, I'll leave it now and let my wearing it finish the job for me...
Thanks for your view!
Re: Distressing photos....Enter at own risk. (Hero project)
That looks okay and I'm not a fan of distressed jackets. Funny, I've never thought of the Raiders jacket as being distressed. It looks to be a fairly even, clean jacket in the film that appears to have been washed to be wrinkly. Compared to the obvious and horribly vulgar distressing they did to the LC jacket
- fifthchamber
- Professor of Archaeology
- Posts: 1133
- Joined: Sun Nov 07, 2010 12:59 am
- Location: Tachikawa, Tokyo
Re: Distressing photos....Enter at own risk. (Hero project)
It does seem to depend heavily on which part of the movie you're looking at.....The Cairo jacket is rather heavily worked in, dust accounts for some of it, but there's wear on the pockets there in several scenes....Not Crusade levels, but about the same as mine..
I'd agree, for the rest of the movie, the wear is thinner, not as used...And the effects seen come from the lambskin I think, but even then, there are signs of someone having worked over it in patches...Not heavily, but enough to take the "new" off it....And that was what I wanted to get with this one....Just a slight touch..Not over the top...
It's a hard balance to get, but I think that's about it....
Re: Distressing photos....Enter at own risk. (Hero project)
Nice work on the -stressing!! Hold on .. are my eyes seeing right,but is that jacket´s size 46?
- fifthchamber
- Professor of Archaeology
- Posts: 1133
- Joined: Sun Nov 07, 2010 12:59 am
- Location: Tachikawa, Tokyo
Re: Distressing photos....Enter at own risk. (Hero project)
Yup....46....My size...Why?MARQ wrote:Nice work on the -stressing!! Hold on .. are my eyes seeing right,but is that jacket´s size 46?
Re: Distressing photos....Enter at own risk. (Hero project)
Well,I own a standard Wested size 46 from -04,long story short,it´s too big as I´m suppose to be a 44.That jacket of yours is a Hero,so I´m just curious about the fit.Did you get a standard or custom?
- auntsugar
- Dig Leader
- Posts: 423
- Joined: Wed Jul 10, 2002 8:57 pm
- Location: Back at the workbench....tinkering--always tinkering.
Re: Distressing photos....Enter at own risk. (Hero project)
Great work...and I agree. Stop right there--looks awesome as-is. You've done enough. Let nature do the rest.
The color came out amazing, too.
- fifthchamber
- Professor of Archaeology
- Posts: 1133
- Joined: Sun Nov 07, 2010 12:59 am
- Location: Tachikawa, Tokyo
Re: Distressing photos....Enter at own risk. (Hero project)
It was a custom....I'd ordered a 46 standard LC from Wested, and the size was a touch large for me, so I'd refined that on the second purchase, and got what I wanted on a 46 Raiders....Then order the Wolverine X0, and went 44, which was a touch tight in the chest, so came back to 46 for the Hero, with measurements based off the Raiders order for back and sleeve length......It fits fine..MARQ wrote:Well,I own a standard Wested size 46 from -04,long story short,it´s too big as I´m suppose to be a 44.That jacket of yours is a Hero,so I´m just curious about the fit.Did you get a standard or custom?
Re: Distressing photos....Enter at own risk. (Hero project)
Ok,so how does the jacket measure from the chest,back and sleeves then,being a custom.
- fifthchamber
- Professor of Archaeology
- Posts: 1133
- Joined: Sun Nov 07, 2010 12:59 am
- Location: Tachikawa, Tokyo
Re: Distressing photos....Enter at own risk. (Hero project)
Chest is 58cm, back from the base of the collar stand is 59cm, and the sleeves are 56cm more or less....
- Weston
- Museum Curator
- Posts: 1250
- Joined: Wed Jan 02, 2008 11:14 pm
- Location: The jungles of Oh-ree-gahn, USA
Re: Distressing photos....Enter at own risk. (Hero project)
Nice work! It's been a couple months. Did you go any further or leave it alone?
- Castor Dioscuri
- Expeditionary Hero
- Posts: 2179
- Joined: Wed Jan 10, 2007 10:52 am
Re: Distressing photos....Enter at own risk. (Hero project)
That looks pretty dang close to a distressing job on a Nowak
- fifthchamber
- Professor of Archaeology
- Posts: 1133
- Joined: Sun Nov 07, 2010 12:59 am
- Location: Tachikawa, Tokyo
Re: Distressing photos....Enter at own risk. (Hero project)
Sorry for the late reply!Weston wrote:Nice work! It's been a couple months. Did you go any further or leave it alone?
I'd left it.....Well....No....I'd done a touch more at the same time, but nothing over the top, and nothing majorly different from the photos here, so I'd not updated it....
It's a couple years on now, and the jacket has lightened up some, and worn in a little, but still has no major changes to these photos....I'm still happy with it....It's an easy jacket to wear, and I like the worn effect as well...
Thanks! I had a Nowak (Now traded) at the time (Crystal Skull version) so I could see which areas he'd worn in as well, which did help in giving me a target to aim at....Castor Dioscuri wrote:That looks pretty dang close to a distressing job on a Nowak