Just finished my first leather whip.

From falls & poppers to plaiting & cracking technique, this section is dedicated in memory of Sergei, IndyGear Staff Member and Whip Guru. Always remember to keep "Celebratin' Life!"

Moderator: BullWhipBorton

Post Reply
User avatar
riku1914
Vendor
Posts: 1246
Joined: Mon Feb 07, 2011 6:38 pm
Location: Texas, probably making whips :)
Contact:

Just finished my first leather whip.

Post by riku1914 »

It's about 7'8" , heel knot - fall hitch, I had planned on 8 ', but two strands ran BARELY short, and wanted to have enough to make

my fall hitch rock hard, and it is.

It's a 12 strand overlay, ending in 4 strands ( wanted 6 strand point but again, two strands ran kind of short, and it was a bad place

to splice so I thought it was close enough )

handle is 8" long, but i stopped the diamond just a little too short to make it look more Morgan.

Handle knots are both 5x4 , heel knot being 3 pass, transition being 2 pass.

All strands were pared on the underside, then split to a uniform thickness.

Two 4 plait bellies and two bolsters were also used.

The hide is some tooling calf skins I picked up @ tandy on sale.
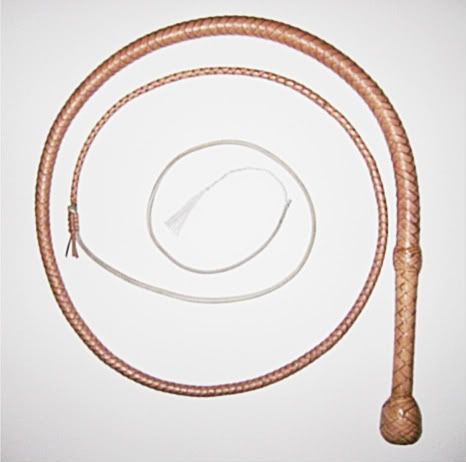
Here it is :

Image

Uploaded with ImageShack.us

Image

Uploaded with ImageShack.us

http://imageshack.us/photo/my-images/830/1040467.jpg/

Uploaded with ImageShack.us

Image

Uploaded with ImageShack.us


Oh also the heel knot is slight larger than I had planned, but my hands are big so it's no huge deal.

All in all I think it turned out good for my first leather whip :TOH:


So is it more TOD or TLC? I know crusade has a tapered handle but it's thicker than TOD ( according to bernardo's site ) but I

can't quite figure which one mine is, you decide :mrgreen:

Also I know the cracker is white, but I have a ton of paracord filler sitting around so I thought why not? it lasts a long time.

edit: just looking at those pics, I think I got the David Morgan heel knot shape pretty well, the top isn't "cut" as much but again,

for my first whip, I think I did well , you guys? :TOH:

also, it looks in the picture that just after the transition ( about 4 inches ) it quickly tapers down thinner, it doesn't actually do

that, just a picture twisting reality as seems to happen often.


Another edit:

well this is my 6th pic of the thread so it's my last,

Just wanted to show the transition area's stiffness, I like it a little more but I know it's more than the morgan's have ( from my

understand ) however I have no idea about one's like strain or del carpio :TOH:

Image

Uploaded with ImageShack.us
Last edited by riku1914 on Wed Jul 13, 2011 5:55 pm, edited 4 times in total.
User avatar
kwad
Professor of Archaeology
Posts: 1016
Joined: Sun Jan 24, 2010 5:26 pm
Location: Hiding under your bed at night.

Re: Just finished my first leather whip.

Post by kwad »

Looks great man! :tup:

Now, GO MAKE MORE!!!! :whip:
:lol:

How much leather did it take to make and what weight did you use?
I'm trying to talk myself into making my first leather whip. I have a Tandy right down the street and need to know how much skin I need.
User avatar
DarenHenryW
Museum Curator
Museum Curator
Posts: 1204
Joined: Mon Jun 22, 2009 1:04 pm
Location: SF Bay Area, CA

Re: Just finished my first leather whip.

Post by DarenHenryW »

Man, I'm impressed, that's for sure. I have never attempted to make a whip, and I don't think I ever will because I know I wouldn't come up with anything even CLOSE to this ! Excellent job! VERY well done. Kudos, my friend!

DHW
User avatar
riku1914
Vendor
Posts: 1246
Joined: Mon Feb 07, 2011 6:38 pm
Location: Texas, probably making whips :)
Contact:

Re: Just finished my first leather whip.

Post by riku1914 »

kwad wrote:Looks great man! :tup:

Now, GO MAKE MORE!!!! :whip:
:lol:

How much leather did it take to make and what weight did you use?
I'm trying to talk myself into making my first leather whip. I have a Tandy right down the street and need to know how much skin I need.
I used 2-3 oz. tooling calf hides, I had two 9 sq. hides, and I use the calf for bolsters as well. I split everything also.

I ended up with about 5 -6 sq. ft. left over ( more on the 5 side ) total, so between the two calf skins, I used about 13 sq. ft.

Again that's including bolsters and waste.

I GREATLY appreciate everybodies nice words. Daren, you could make a whip, I just started with nylon and pleather ( UGH ).

So the only new thing that came with this was cutting and paring strands by hand, which I didn't do a great job at, but again

it's my first one.

Again I really aprpeciate you guys checking out my post, and your kind words make me feel great about what I did.

Only thing I would change that would have been easy to do, I would have done a closed loop bind on the 2nd belly ( last layer

I bound ) a little futher before going into criss cross, maybe just an inch, so it's not much of a big deal, but it's a learning

experience :TOH:

edit: oh also on the yoke of the overlay, which I used as part of my heel knot foundation, with a sharpie on the inside i neatly

wrote : #1, I plan on numbering all of the whips I make this way, so if I ever end up selling any, they could be traced this way,

if the buyer would want to, I don't know, just something I wanted to do.

You whip makers out there, any idea where I can get some shellac? what kind of store or whatever, also could someone

explain what is involved in shellacing a whip, I truly have no idea, and I'd like to shellac it.
User avatar
TREX
Laboratory Technician
Posts: 178
Joined: Fri Sep 24, 2010 7:30 am
Location: North hollywood

Re: Just finished my first leather whip.

Post by TREX »

That is Awesome! Kudos! Very inspiering work & looks great!
I would love to make a whip, but honestly I just don't know if I have the patients- Maybe someday-
Any Way I'm Very impressed, Keep at it man!
-T.Rex
User avatar
Canuck Digger
Professor of Archaeology
Posts: 747
Joined: Sun Mar 30, 2008 8:24 pm
Location: Montreal, Canada

Re: Just finished my first leather whip.

Post by Canuck Digger »

Hi,
I just wanted to show you what my first and only experience making a kip whip looked like. It aged well but because I couldn't pull as hard on the strands as I normally would with kangaroo, it became a bit looser a lot faster. It's a good whip, but it felt like it was older than it really was.

I'm told English kip is a lot better and I'm sure it is-not hard to beat this hide that broke all the time! But after this I decided I just wasn't interested in making any more in kip.

Image
Cheers,

Franco
Marhala
Dig Leader
Dig Leader
Posts: 523
Joined: Mon Jul 14, 2008 10:07 am
Contact:

Re: Just finished my first leather whip.

Post by Marhala »

Hey riku, I think you did a great job with that whip! Making such a complicated construction for a first leather whip is indeed a challenge. The taper is not perfect, but is much better than any other I've seen for a first whip. Did you plan the whip or followed some other whipmaker's plans? If you planned it, I think it is great for a first try.

Some observations (as constructive criticism if I may):

Paring on both flesh sides ( \ / ) is better left for 4 plait. Paring the grain side and then the opposite flesh side ( / / ) is best suited for 4 seam plaiting (8-, 12-, 16-, 20-, 24-, etc.) .

The fall seems a bit light to me for that whip (very thin leather), but I prefer the fall to be made of a cowhide as close in thickness to the braided point of the whip.

Cut the end of the strands at the fall hitch perhaps 1/3 shorter, and that goes for the one which is tuck under the eye of the fall, to prevent them from dragging around when the whip is used.

BTW.... Have you tested it? How does it crack?

ATB,

Aldo.
User avatar
riku1914
Vendor
Posts: 1246
Joined: Mon Feb 07, 2011 6:38 pm
Location: Texas, probably making whips :)
Contact:

Re: Just finished my first leather whip.

Post by riku1914 »

It cracks well, the fall leather I used was from midwest whips, and paul told me it was going to be a little on the lighter side, so he

sent with it a smaller strip of thick stuff to try out ( this stuff is just over 3mm ). For my first couple falls though I used the worse

stuff since I still wasn't perfect at paring the sides. As for what you said about paring, Bernie Wojcicki told me that I should bevel

both undersides, and it seemed to work for me?

Also Canuck digger gave me basic design plans, and I followed them. Here is what it basically was :

Core - 1/4" the whips length PAST the handle, so the core on this particular whip was a total length of 32 ", including what went

around the handle.

First 4 plait belly goes to end of core, with leftover strands going 48" total length, then first bolster covering this. Second 4 plait

belly going to the end of first bolster, and second bolster going 6' total length.

Canuck digger, I saw that kip whip you made on an old thread, you said it was 2nd grade kip, so I'm sure that's why they broke

so much. I had one strand break on my overlay, and one strand break on my first 4 plait belly ( didn't compensate for stretch in

one area enough ). Plus I was also using calf, which isn't technically kip right?

Oh also what you said about the taper, I know it's not perfect, but in the first picture it looks like it jumps thinner all of a sudden

that's just the camera messing around with reality :lol:

Thanks again for everybodies nice words :TOH:
User avatar
tomek9210
Professor of Archaeology
Posts: 1143
Joined: Mon Jun 23, 2008 4:13 pm
Location: Warsaw, Poland
Contact:

Re: Just finished my first leather whip.

Post by tomek9210 »

You should look here: viewtopic.php?f=3&t=40634" onclick="window.open(this.href);return false; .
Congrats :TOH:
rawvoodoo
Field Surveyor
Field Surveyor
Posts: 78
Joined: Sun Jun 27, 2010 5:53 pm
Location: Canton, Ohio

Re: Just finished my first leather whip.

Post by rawvoodoo »

Yes. I use the Paul Stenhouse post all the time to figure out what lengths to make my strands. It took me a while to figure out how to read the charts but once I got it , it became pretty easy.
User avatar
tomek9210
Professor of Archaeology
Posts: 1143
Joined: Mon Jun 23, 2008 4:13 pm
Location: Warsaw, Poland
Contact:

Re: Just finished my first leather whip.

Post by tomek9210 »

It's awesome, because it's universal for all lenghts of whips, it contains all numbers you need to start plaiting.
I'm keeping my fingers crossed for your next one!
User avatar
riku1914
Vendor
Posts: 1246
Joined: Mon Feb 07, 2011 6:38 pm
Location: Texas, probably making whips :)
Contact:

Re: Just finished my first leather whip.

Post by riku1914 »

Oh yeah I read that a while ago. I know how long to cut everything, I just expected them to stretch a little more, ( i cut them

about 11 ft. long if I remember as a just in case thing ) and most stretched to around 13 ft. , but there were those couple that

ended up about 11, this is all not including my strand drops, it's the 8 that I left over at the end, that I had planned to drop 2

for my core past the second bolster.

So what do you guys think on the beveling thing? I know some use the // method, but bernie Wojcicki told me to do it kind of like

this : ^ , beveling both undersides.

Also, what about shellac? Where can I buy and what is involved in shellacing a whip?
Soup
Laboratory Technician
Posts: 176
Joined: Tue Jun 10, 2008 9:57 pm
Location: The Piedmont....North Carolina

Re: Just finished my first leather whip.

Post by Soup »

Very nice looking whip. :TOH: :whip:

I like the color, should age very nicely.

Regards,

Soup
Marhala
Dig Leader
Dig Leader
Posts: 523
Joined: Mon Jul 14, 2008 10:07 am
Contact:

Re: Just finished my first leather whip.

Post by Marhala »

riku1914 wrote:So what do you guys think on the beveling thing? I know some use the // method, but bernie Wojcicki told me to do it kind of like

this : ^ , beveling both undersides.
Well, I won't contradict what Bernie says. I'm just starting on whipmaking and have not much experience as he does. In my personal experience tthough, paring both flesh sides leads to gaps between one strand and the other, and not interlocking correctly when plaiting. But if none of that happened to you, then I think it's fine. ;)

And I still appreciate all your efforts for your first whip. It's not easy, as you have to take into account sooo many things together: stretch in leather, strand width, paring, taper, etc. But you did great. I'm not trying to belittle anything you did by the taper comment. :)

ATB,

Aldo.
User avatar
riku1914
Vendor
Posts: 1246
Joined: Mon Feb 07, 2011 6:38 pm
Location: Texas, probably making whips :)
Contact:

Re: Just finished my first leather whip.

Post by riku1914 »

I completely understand that, I like constructive criticism ( at least on my whips :lol: ) as it will help me to see flaws I may not

have before, and do whatever it takes to fix them.

I am seriously considering getting a dene williams strander before I do my next whip, I really like whip making, so I think getting it

early on will help me. Plus Paul Nolan said it will help me with my free hand cutting since you are basically holding it the same way.

Let's see, i I get that strander, it will be the last expensive tool I need, since I alrready bought a small bench splitter. I think it

would be worth it.
User avatar
Weston
Museum Curator
Museum Curator
Posts: 1250
Joined: Wed Jan 02, 2008 11:14 pm
Location: The jungles of Oh-ree-gahn, USA

Re: Just finished my first leather whip.

Post by Weston »

Excellent work!

Weston
User avatar
riku1914
Vendor
Posts: 1246
Joined: Mon Feb 07, 2011 6:38 pm
Location: Texas, probably making whips :)
Contact:

Re: Just finished my first leather whip.

Post by riku1914 »

I just put on a heavier fall and retied the fall hitch to compensate for it being more than 1mm thicker, it feels top heavy, but that

is likely since I've cracked it probably 500+ times in the last two days and I got used to the thin fall. Also I had to tie my cracker

on differently, I used to use ( going to use the methods HERE

to make it easier to explain ) method 2, but since it was so thick I had to use method 3 a, and it just doesn't look secure, I pulled

very tight, and it slipped some 9 I left about 3 mm on the end in case it slipped any while setting and it slipped all the way to

the end, no extra space. It just doesn't look secure ](*,)
User avatar
riku1914
Vendor
Posts: 1246
Joined: Mon Feb 07, 2011 6:38 pm
Location: Texas, probably making whips :)
Contact:

Re: Just finished my first leather whip.

Post by riku1914 »

I was just wondering:

is this about what I should want my whips to break into? I'm not saying just indy whips ( cuz I plan to do a loose one like a morgan

SOME day ) but is this transition stiffness good? More? Less??

Image

Uploaded with ImageShack.us

edit: I just realized this is the most loose side. The others are a little more stiff, so try to imagine :lol:
User avatar
classicbullwhips
Vendor
Posts: 217
Joined: Thu Jul 27, 2006 12:07 am
Contact:

Re: Just finished my first leather whip.

Post by classicbullwhips »

Hey Riku1914,

From my experience cowhide whips take a bit longer to break in than kangaroo, for your next I would suggest doing a little tighter/more binding at the transition zone and layering it so as you go farther down the thong there is less binding then where the handle and thong meet, this just helps the whip to flow better so it dose not kink where the binding ends. As for the loose morgan comment I guess I don't understand, the morgan whips are not bound any looser, they have just seen lots of use and are very well broken in (I would highly suggest not binding a whip looser at the transition zone as it is the weakest point of a whip) Hope that helps.

Keep Crackin,
James
User avatar
riku1914
Vendor
Posts: 1246
Joined: Mon Feb 07, 2011 6:38 pm
Location: Texas, probably making whips :)
Contact:

Re: Just finished my first leather whip.

Post by riku1914 »

classicbullwhips wrote:Hey Riku1914,

From my experience cowhide whips take a bit longer to break in than kangaroo, for your next I would suggest doing a little tighter/more binding at the transition zone and layering it so as you go farther down the thong there is less binding then where the handle and thong meet, this just helps the whip to flow better so it dose not kink where the binding ends. As for the loose morgan comment I guess I don't understand, the morgan whips are not bound any looser, they have just seen lots of use and are very well broken in (I would highly suggest not binding a whip looser at the transition zone as it is the weakest point of a whip) Hope that helps.

Keep Crackin,
James
What I meant by the morgan comment, the morgan whips are bound with cotton, not artificial sinew, so the transition is much

looser. What I was gonna do was bind it tight, but only for about an inch past the handle, then do some closed loop for about 3

inches on each layer.

Roo actually takes longer to break in, since you can plait it much tighter than any cow.


On this whip I did closed loop, more on each layer, then I did some criss cross down pretty far ( second belly I did criss cross loop

binding about 2 ft. down the whip )

Also keep in mind I had not planned on doing the "loose" transition anytime soon. Maybe just a far future project.
User avatar
classicbullwhips
Vendor
Posts: 217
Joined: Thu Jul 27, 2006 12:07 am
Contact:

Re: Just finished my first leather whip.

Post by classicbullwhips »

What I meant by the morgan comment, the morgan whips are bound with cotton, not artificial sinew, so the transition is much looser.
Thanks for the clarification on what you meant, for a second I thought that you were going to bind it looser to get that effect (I was recommending against that), also I believe that the cotton was waxed to give it more strength in the binding (not just plain cotton)
Roo actually takes longer to break in, since you can plait it much tighter than any cow.
I am aware that Roo can be plaited tighter than Cow, been making whips for almost 10 years, but as I said from my experience it seems like my cowhide whips take longer to break in than roo, other people may have different experiences, this is just mine.

For the binding, just try a few different things and see what works best for you, I exclusively use the criss cross method and layer it in a why that the farther you go down the thong the less binding there is. 2ft does seem a little long for the binding, I would recommend going no farther than a foot down the thong, if you go to far it can cause the whip to not roll out as smooth (something I experienced in my early days of whipmaking and pointed out to me by our very own BullWhipBorton)

Hope that helps to clarify some of the items, and don't hesitate to ask more, its great to see people getting into whipmaking asking questions. Also I remember a quote that I think was in Ron Edwards book on whipmaking, "each whipmaker has different ways of doing things, you just have to find the one that works for you."

Keep Crackin,
James
User avatar
riku1914
Vendor
Posts: 1246
Joined: Mon Feb 07, 2011 6:38 pm
Location: Texas, probably making whips :)
Contact:

Re: Just finished my first leather whip.

Post by riku1914 »

The criss cross that I did 2 ft. down was really far apart, as much as a half inch apart, it didn't really add much of anything in the

stiffness.

Oh also I forgot to mention that on my first biding ( first 4 plait belly ) I did my closed loop then criss cross some, then I just did

criss cross, going further than any of the previous. So I suppose you say I did layer it some, but on my other two binding layers

( first bolster and second 4 plait belly ) I didn't layer.

I'll try going a little further with my closed loop next time.

Thanks again :TOH:
User avatar
Lukes Roommate
Laboratory Technician
Posts: 105
Joined: Mon Nov 09, 2009 12:20 pm

Re: Just finished my first leather whip.

Post by Lukes Roommate »

Wow, fantastic job Riku1914! :clap:

Great work, you should be proud! :whip:

Ryan
User avatar
riku1914
Vendor
Posts: 1246
Joined: Mon Feb 07, 2011 6:38 pm
Location: Texas, probably making whips :)
Contact:

Re: Just finished my first leather whip.

Post by riku1914 »

Thanks a lot :D

My strands weren't perfect but it turned out better than I thought it would :D :D :D
jeanfifi
Laboratory Technician
Posts: 144
Joined: Sat Mar 28, 2009 12:01 pm

Re: Just finished my first leather whip.

Post by jeanfifi »

it is really impressive for a first go
congratulations!!!

as for beveling strands, it's probably better to do the // method, expecially at the start.
Once you'll get more skill in braiding you'll soon discover by yourself that the best your overlay (4 plait or more) fits to your core underneath, the more tight your braiding will be, and the less you'll need to skive, any method you choose (// or / \)

therefore you'll be able to choose between the 2 methods, depending the look you want to give to the whip.

On indy whips it's more a matter of look that leads me to skive on each side. David Morgan did it like that.
But on any other whips, i'm am now much more used to skive on the same side.

plaiting with two much strands regarding to your core leads to overlapping strands.
Plaiting with not enough strands and you'll get gasps in your braid.
You'll have to find the half-way between too much and not enough.....
Australian whipmakers are well-known for plaiting with narrow strands and very obtuse angle without any gasps. just take a look at the Australian bullwhips Mike Murphy makes and you'll get an idea.....take a look also at the Henderson's collection on Midwest whips website.
of course this skill is beyond the beginner, and I am still learning to do it right LOL

I bet it sounds curious to you as you're just starting whipmaking, but with some more experience you'll get what I mean

as for shellac, you'll get some shellac to Mike Murphy's or some US or Canadian suppliers. Once Franco gave us a link but i don't have it anymore. check Mike Murphy's website and you'll find it.
you'll have to find very pure alcohol to dissolve it and it's sometimes hard to find, especially in France. i guess you'll be more lucky in your country.
the final mixture looks just like tea!
3or 4 coats are usually enough to give the whip a good look and of course to protect it.

again, very good job for your first whip, congratulations again.
I can't wait to see the next!!

JP
User avatar
riku1914
Vendor
Posts: 1246
Joined: Mon Feb 07, 2011 6:38 pm
Location: Texas, probably making whips :)
Contact:

Re: Just finished my first leather whip.

Post by riku1914 »

Murphy whips in in Australia right? I had thought about buying some poly thread and shellac from him, but I figured shipping to

the US would be killer.

As for the alcohol, denatured alcohol is what I was told to use for shellac. I use the stuff all the time, you can get it at any paint

store. And ( remember I use it all the time ) I noticed for the first time, on "uses" the first thing is "shellac thinner " :lol:

I use the stuff everyday, ( almost ) and I NEVER noticed it.
User avatar
riku1914
Vendor
Posts: 1246
Joined: Mon Feb 07, 2011 6:38 pm
Location: Texas, probably making whips :)
Contact:

Re: Just finished my first leather whip.

Post by riku1914 »

I put one of the pics on top in url form so I could add this:

Image

Uploaded with ImageShack.us

My 4 strand fall hitch didn't look, or feel secure enough, so I took it apart, backed everything up about 3 inches, then tied this extra

long fall hitch, it's 8 strands, and it's rock hard, I can't bend it :D


Oh also, the tails on it are actually a bit shorter than they look, It's because I took the picture sideways, but it converted it

vertical like you see, everything looks longer than it is, but you get the idea. :TOH:
Post Reply