My in progress S&W build up...

Need help finding an Indy Gun, want to discuss film used guns...

Moderator: Cajunkraut

Post Reply
User avatar
Rook
Dig Leader
Dig Leader
Posts: 660
Joined: Sun Apr 01, 2007 11:11 pm
Location: Northern Minnesota, USA
Contact:

My in progress S&W build up...

Post by Rook »

You may have already figured out that Indy's pistol looks a little... clear. And Pink! :lol:

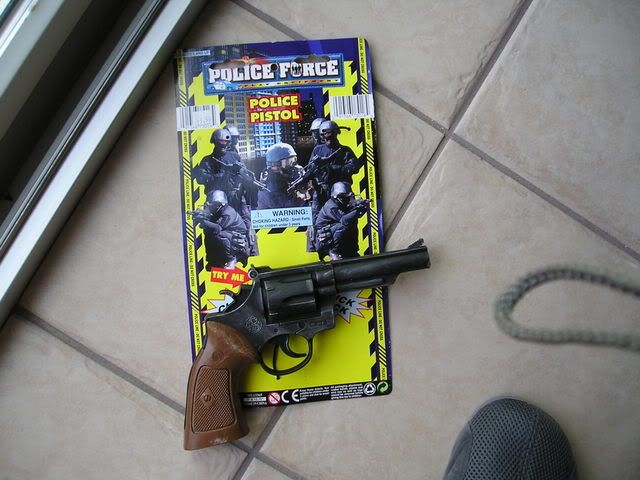
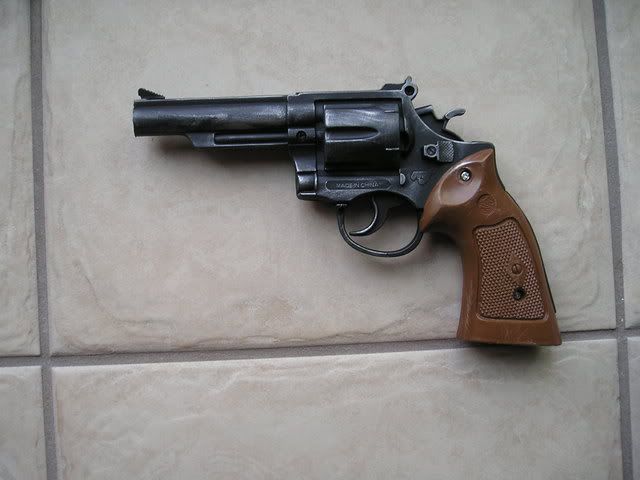
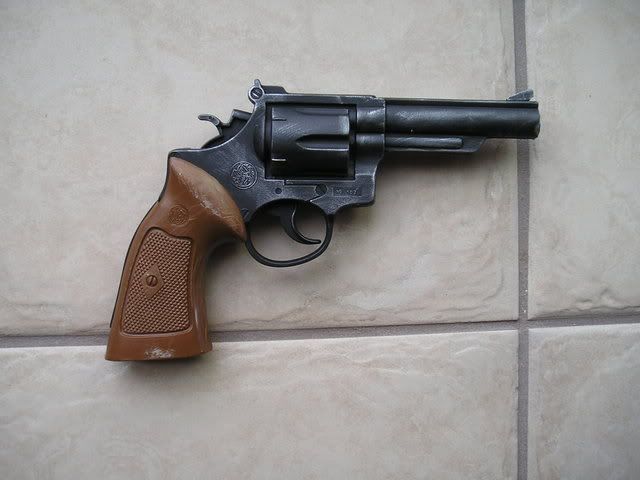
Used a broken squirtgun. Cut the barrel down, cylinder, grips, trigger, etc.

New trigger formed from a piece of AL stock. Cylinder is a "second" from a Trigun anime kit. Grips are walnut cut and sanded to the "right" shape.

Still a lot of Bondo to do yet (filling in the dead interior space), and glue the top sight on the barrel.
I'm also considering adding the hinge and making the cylinder flip open (mainly because it's a PAIN to get it back in place if you remove it).

Image

Image

Image

Russ
User avatar
Chevalier Krak
Dig Leader
Dig Leader
Posts: 503
Joined: Fri Apr 06, 2007 12:24 pm
Location: Out on the edge, looking for a way back in.

Post by Chevalier Krak »

Wow - that is a lot of dedicated modelling time. I echo Webhead's anticipation.
User avatar
IndyTaz
Professor of Archaeology
Posts: 893
Joined: Thu Jun 16, 2005 6:52 am
Location: Tasmania, Australia
Contact:

Post by IndyTaz »

:D Looks great mate. The orange pistol looks like a magnum. Where did you get the cylinder from for the pink pistol????

Regards
Christian
User avatar
Rook
Dig Leader
Dig Leader
Posts: 660
Joined: Sun Apr 01, 2007 11:11 pm
Location: Northern Minnesota, USA
Contact:

Post by Rook »

The squirtgun is close to .44 Magnum sized. Maybe 80-90%% or so of a real one. I have moulds for an Anime gun kit. The cylinder was an "oops" casting, so I figured it was fair game to use. :)

I got the major hollow sections Bondo-ed up and filled in. I sanded down the grips a bit more so they're much more comfortable now and don't bite into your hand as much. I still need to sand the bondo smooth, and recut the channel for the triger. Shouldn't be too much longer before I can paint!

I did decide to make a cylinder arm out of wood and I cut out the original plastic piece from the frame. I still have to drill a pivot hole and do additional mounting, but it should work.

I'll try to get some more in-progress pics up.

Russ
User avatar
IndyTaz
Professor of Archaeology
Posts: 893
Joined: Thu Jun 16, 2005 6:52 am
Location: Tasmania, Australia
Contact:

Post by IndyTaz »

Cool. Looking forward to seeing your build. I have the same gun as the orange one. Only blue. I plan to use that. Any help on how to make the cylinder ect work...would be most appreciated:)

Warm Regards
Christian
User avatar
Mountaineer Lasher
Archaeologist
Archaeologist
Posts: 223
Joined: Sat Feb 10, 2007 10:22 pm
Location: Finally back in the States, having taught North Korea a lesson with his bullwhip.
Contact:

Post by Mountaineer Lasher »

I might just buy a real one in the future. Haha. :P
User avatar
Rook
Dig Leader
Dig Leader
Posts: 660
Joined: Sun Apr 01, 2007 11:11 pm
Location: Northern Minnesota, USA
Contact:

Post by Rook »

I might just buy a real one in the future. Haha.
:P

@Indytaz: You might be better served by just leaving the molded cylinder in place. I know it was a LOT of work to cut the space out. If you really wanted to go for it though you could maybe make a cylinder using a large wood dowel?

Russ
User avatar
Rook
Dig Leader
Dig Leader
Posts: 660
Joined: Sun Apr 01, 2007 11:11 pm
Location: Northern Minnesota, USA
Contact:

Post by Rook »

Finally worked on this a bit last weekend, so... updated pics!

The cylinder arm doesn't work quite like I'd hoped it would. I'm thinking the size of the pistol frame (among other reasons) is to blame.

I filled the main parts of the interior with bondo and sanded it smooth-ish.

The trigger is a piece of flat stock AL that I cut to size. I originally planned on having it moveable, but the way the Bondo filler worked out doesn't leave much room for monkeybusiness. So, fixed position it will be.

I also had to notch a groove in the bottom of the resin cylinder to give the cylinder enough clearance space. It seemed to work okay.

Image

Whoops! Got a little happy with the dremmel and notched the back area
when cutting the trigger section out. Doh.

Image

Image

Russ
User avatar
IndyTaz
Professor of Archaeology
Posts: 893
Joined: Thu Jun 16, 2005 6:52 am
Location: Tasmania, Australia
Contact:

Post by IndyTaz »

:shock: Awesome mate!!!!!!!!!!!! You have done an outstanding job!!!!
Care to share a templetae for the little wooden bit?? Hu would ya??? LOL

Regards
Christian
Ben
Field Surveyor
Field Surveyor
Posts: 86
Joined: Wed May 09, 2007 6:03 am
Location: England, Hove/East Sussex

Post by Ben »

"Care to share a templetae for the little wooden bit"

I'll second that! :D
User avatar
Rook
Dig Leader
Dig Leader
Posts: 660
Joined: Sun Apr 01, 2007 11:11 pm
Location: Northern Minnesota, USA
Contact:

Post by Rook »

LOL. All I did to make that was lay the unmodded squirtgun over a piece of scrap board, and then trace the outline and draw the back side in. But I can do it if you really want it. :)

Haven't gotten any further other than some sanding. It seems I've misplaced my epoxy, so I'm going to have to hunt some more so I can glue on the front sight.

Russ
User avatar
Rook
Dig Leader
Dig Leader
Posts: 660
Joined: Sun Apr 01, 2007 11:11 pm
Location: Northern Minnesota, USA
Contact:

Post by Rook »

Finally got the front sight epoxied in place...

Image

Image

And started painting...

Image

Image

I'm planning at least 1-2 coats of silver, followed by possibly a clearcoat, then 1-2 flat black, some light steel wool based sanding on the muzzle and edges, then possibly either some rub on graphite and then a clear top coat, or maybe just the topcoat without the graphite. Depends on what kind of mood I'm in when I get done painting. :)

Russ
User avatar
K on the run
Vendor
Posts: 671
Joined: Wed Jan 26, 2005 5:31 pm
Location: Denmark
Contact:

Post by K on the run »

Great job, you obviously know your way around the work bench.
Here's links to some useful tools when you get around to checkering the grips. The ones listed below will cut the same pattern as the Raiders gun pictured here (20 lines per inch):
http://www.indygear.com/gear/images/he2_small.jpg


3 handles, one for each cutter.
http://www.brownells.com/aspx/NS/store/ ... 41-010-000

1 fine cutter
http://www.brownells.com/aspx/NS/store/ ... 41-100-001

2 Right hand spacing tools.
http://www.brownells.com/aspx/NS/store/ ... 41-400-020

2 dual cutters
http://www.brownells.com/aspx/NS/store/ ... 3511#13511

Looking forward to see the finished gun,
Kim
User avatar
Rook
Dig Leader
Dig Leader
Posts: 660
Joined: Sun Apr 01, 2007 11:11 pm
Location: Northern Minnesota, USA
Contact:

Post by Rook »

Yikes! After seeing all the tools needed for just doing the handles, I'm leaning towards NOT checkering! :lol:

Thanks for the suggestions though, we'll have to see. . .

Russ
User avatar
Jaredraptor
Dig Leader
Dig Leader
Posts: 559
Joined: Tue Jun 05, 2007 9:37 pm
Location: Tanis, Egypt.........okay, really Alexandria VA

Post by Jaredraptor »

Awsome.
User avatar
IndyFan89
Professor of Archaeology
Posts: 1135
Joined: Fri Mar 02, 2007 10:17 pm
Location: Southern California
Contact:

Post by IndyFan89 »

Awsome it's coming aloung great. This is mine.

Image

Image

Image
User avatar
Rook
Dig Leader
Dig Leader
Posts: 660
Joined: Sun Apr 01, 2007 11:11 pm
Location: Northern Minnesota, USA
Contact:

Post by Rook »

part 4: 6/16/07

Over the last week I got two coats of black on it...

Image

Image

Image

...and today I "finished" the weathering.

Image

Image

Image

Image

Image

It's pretty much complete except for Bullets ( I have some empty .40 cal
brass that fits perfectly, but no lead...) a possible clear coat of paint, I
need to fabricate a lanyard post and ring and last but not least the possible checkering and staining of the wood grips.

Turned out pretty decent I think.

Russ
User avatar
Jaredraptor
Dig Leader
Dig Leader
Posts: 559
Joined: Tue Jun 05, 2007 9:37 pm
Location: Tanis, Egypt.........okay, really Alexandria VA

Post by Jaredraptor »

Wow.....that's real nice. Dunno if you need to do the checkering. I mean, if you wanna take the time to hunt down all those tools you should. But I think it looks fine uncheckered.
User avatar
Indiana Jerry
Scoundrel
Posts: 4684
Joined: Sat Sep 11, 2004 12:59 am
Location: DBSSWWD ~ "This is how we say goodbye to MIMES in Germany!"
Contact:

Post by Indiana Jerry »

Hmm...got a plan for the slugs, or still hunting around?

Seems like if they still make those lead weights for fishing lines, you'd be set right there.

Otherwise, I'd suggest using soder to make some in a little hand-made mold.

(Friendly reminder, realism can be dangerous...)
User avatar
Rook
Dig Leader
Dig Leader
Posts: 660
Joined: Sun Apr 01, 2007 11:11 pm
Location: Northern Minnesota, USA
Contact:

Post by Rook »

I'm not sure which route I wanted to go for the "lead." I have some solid solder that I use for pewter casting projects, but then I'd have to make a mould.

I think bullets from the sporting good store are rather spendy, and you have to buy them in large quantity (50+) so I may just try and cobble something togeather.

Russ
User avatar
Indiana Max
Professor of Archaeology
Posts: 1099
Joined: Tue Nov 07, 2006 11:29 am
Location: Europe/Germany/munich
Contact:

Post by Indiana Max »

Great work until now Rook :wink:
User avatar
Rook
Dig Leader
Dig Leader
Posts: 660
Joined: Sun Apr 01, 2007 11:11 pm
Location: Northern Minnesota, USA
Contact:

Post by Rook »

I suppose I did ruin the unique, classy hot pink color scheme, huh? ;)

Russ
User avatar
Indiana Jerry
Scoundrel
Posts: 4684
Joined: Sat Sep 11, 2004 12:59 am
Location: DBSSWWD ~ "This is how we say goodbye to MIMES in Germany!"
Contact:

Post by Indiana Jerry »

Rook wrote:I'm not sure which route I wanted to go for the "lead." I have some solid solder that I use for pewter casting projects, but then I'd have to make a mould.
I'm thinking this mold wouldn't be TOO hard...just take a drill bit of the appropriate width, drill into a block of wood, pour soder in, push cartridge down into wet soder, pull out (or split wood to remove) when cooled.

Yeah, I'm probably oversimplifying, but the point is the shape need only be close, and then a bit of sanding should round it out if, shouldn't it? Or is soder WAY harder after being heated? Oh, yeah, that might be a problem...maybe you DO need an accurate mold to start with.
Last edited by Indiana Jerry on Tue Jun 19, 2007 2:59 am, edited 1 time in total.
User avatar
191145
Archaeologist
Archaeologist
Posts: 216
Joined: Sun Jul 03, 2005 10:15 am

Post by 191145 »

Holy Cow! That thing looks good! Be very careful with it lest some cop get nervous.
User avatar
Rook
Dig Leader
Dig Leader
Posts: 660
Joined: Sun Apr 01, 2007 11:11 pm
Location: Northern Minnesota, USA
Contact:

Post by Rook »

You know, I think the drillbit in wood bit might actually work. All I'd need to do is flatten the tips with a sander or file, and I'f I'm really feeling anal, I can countersink the bullet tips.

Another question: Did they even have .45 "hollowpoint" bullets in the 1930s?

Russ
User avatar
Jaredraptor
Dig Leader
Dig Leader
Posts: 559
Joined: Tue Jun 05, 2007 9:37 pm
Location: Tanis, Egypt.........okay, really Alexandria VA

Post by Jaredraptor »

Rook wrote:Another question: Did they even have .45 "hollowpoint" bullets in the 1930s?

Russ
Ah, something I can answer: Yes, they would have them for some guns. The first hollowpoint bullets were marketted for rifles in the 1890s. I'm sure by the 1930s they'd have .45 caliber hollowpoints.
User avatar
Indiana Kev
Dig Leader
Dig Leader
Posts: 621
Joined: Fri Sep 23, 2005 8:17 pm
Location: Louisiana
Contact:

Post by Indiana Kev »

Just saw your work Russ and WOW! Nice work!
User avatar
Rook
Dig Leader
Dig Leader
Posts: 660
Joined: Sun Apr 01, 2007 11:11 pm
Location: Northern Minnesota, USA
Contact:

Post by Rook »

Finally got to installing the lanyard ring. It was more difficult that I
imagined it would be and I had to kludge togeather a ring on the inside
to "lock" it into place in the bottom of the grip.

But, overall it seems to have worked for now.

Image

Image

Image

All that remains is the grips. :(

I'm thinking I may add the border detail, and possibly a diamond detail
around the grip bolt and nut, as well as recessing the nut and bolt heads
in the grip.

That last part will be the easiest, while the former will be the hardest as
I'll have to cut the channel by hand with the dremmel. A daunting
prospect at best.

Russ
User avatar
Jaredraptor
Dig Leader
Dig Leader
Posts: 559
Joined: Tue Jun 05, 2007 9:37 pm
Location: Tanis, Egypt.........okay, really Alexandria VA

Post by Jaredraptor »

NICE!!
User avatar
RobbyT43
Dig Leader
Dig Leader
Posts: 400
Joined: Fri Jun 01, 2007 11:04 pm
Location: Well depending on the time, I could be in one spot or several...
Contact:

Post by RobbyT43 »

As Short Round would say...."Holy Smoke!!! Wow!!!" :lol:

Great job! I might try doing this sometime...if I have the patience. About how much has this cost, if I may ask.

Great work!

Robby
User avatar
Rook
Dig Leader
Dig Leader
Posts: 660
Joined: Sun Apr 01, 2007 11:11 pm
Location: Northern Minnesota, USA
Contact:

Post by Rook »

It cost about $35...

for the lanyard ring/post.

Everything else was basically free. I owned the squirtgun (water pistol), the cylinder was reject parts from another project, and the wood grips were scrap maple from another project as well. Some bondo, flat aluminum bar stock (scrap from a project), silver and black paint and LOTS of dremmel time, cutting and grinding parts away so other parts would fit. :)

The only thing it really cost was time. :)

Russ
User avatar
Rook
Dig Leader
Dig Leader
Posts: 660
Joined: Sun Apr 01, 2007 11:11 pm
Location: Northern Minnesota, USA
Contact:

Post by Rook »

A board member here. They do pop up on eBay from time to time but are hideously expensive.

Russ
User avatar
Rook
Dig Leader
Dig Leader
Posts: 660
Joined: Sun Apr 01, 2007 11:11 pm
Location: Northern Minnesota, USA
Contact:

Post by Rook »

Knock yourself out.

Not literally. That's what Nazi's are for. ;)

Russ
carebear
Laboratory Technician
Posts: 153
Joined: Thu Sep 07, 2006 2:09 am
Location: Anchorage, Alaska

Post by carebear »

It won't be exact, but a standard rifle 1" sling swivel should work as an adhoc lanyard ring.

Many come threaded for screwing into wood stocks, which with careful predrilling should make for easy application.

Bonus, they are usually cheap and most gunstores have a random box of such stuff behind the counter.
Post Reply