


As you all know I am more like a jacket guy, but I always fancy a good hat.
So, sorry about my ignorance but, I have this question.
Can anyone describe how the reblocking procedure works step by step?
I know there's a ton of info around here that may answer that, but unfo I don't have the time to read it when I am at work.
Reblocking 101 ?
Moderators: Indiana Jeff, Dalexs
-
Fedoraman

- Archaeologist

- Posts: 225
- Joined: Tue Mar 30, 2004 2:32 pm
- Location: Hanging off the edge of a cliff...
Lot's of different ways to "reblock" a fedora. First question you have to ask yourself is: How much do I like to sew?  Reason being, is to do a complete and total reblock the right way you will need to tear the hat down to just the body. Using a seam ripper or a very sharp knife, tear out every thread on the hat. Take great care with your seam ripper as you can accidently knick the felt and put a hole in it. Get all the loose threads off the body and set aside your ribbon, liner and sweat(if you are going to reuse them.)
Next you can either wet the hat or soak it to the core.
You will need a hat block that you are satisfied with the shape of, a good iron and a brim flange.
Pull the body over the block and make sure it forms completely around the block with no gaps. This is also the time you will find out if you have quality felt or a piece of @#$% as the latter MAY rip as you pull the hat over the block - use great care or you will ruin the hat beyond repair (trust me I have ruined a few cheapo hats this way by accident). I use the brim flange to assist in this step for two reasons:
1. To ensure there is enough brim left as felt tends to shrink once it's wet.
2. To start the brim break.
Once I have enough brim for size - I use an iron to establish the brim-break at the bottom of the crown. After the felt is completely on the block you need to let the felt dry and "set" on the block for about a day or at least overnight to establish the new memory of the shape.
After the felt is completely dry you can remove the hat from the block, if necessary, I run a dull knife between the block and the hat to loosen it enough to pull the hat off.
Now comes the hard part, sewing the sweat, ribbon and as some do the liner back on the hat. I have cussed and fussed more about these steps but it does get easier each time you do it.
There are several methods to sewing on the sweat - el cheapo method like HJ right at the brim break or flipping the sweat and sewing the thin ribbon about 1/4" up from the brim break - there are some real artists around here who get this just perfect, Marc and Steve for example. I re-use the existing sweat if possible or there are several places online to order new raw materials for a new one. I will leave that up to the experts to pass along.
Orient the sweat with regard to front and rear of the body. Starting in the back - start sewing a "guide" thread with long 1" minimum stitches - use a bright colored thread like white as this will be removed later and it makes it easier to see which thread to cut. After you have your guide thread in check to see if you have the sweat positioned correctly - if not start over and get it perfect now as opposed to later. Next, start sewing in your permanent stitched with thread matching the color of the hat. I try to keep my stitches about 1/4" apart the whole way around the hat. Don't be afraid to start over as if it isn't perfect now, it never will be. Flip the sweat up into the hat periodically to ensure your stitches are not too high or low and the "bead" of the sweatband doesn't sit too high or low.
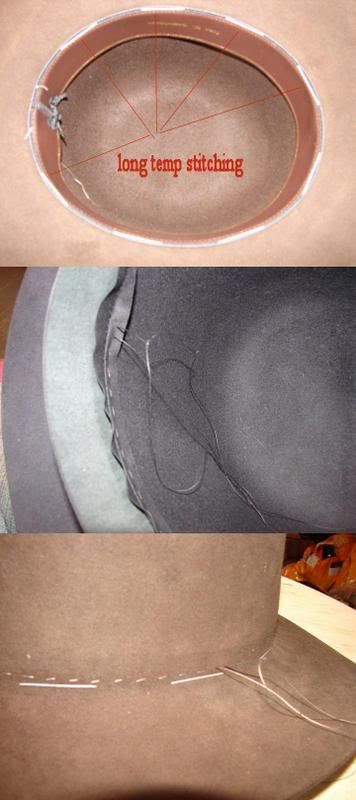
After you have your sweat in and perfect cut the guide thread and remove it.
The next part is the ribbon. There are several great tutorials online that will get you started (here is a great one: http://www.dalexs.whitvani.net/hat/hatpage.html ) - but you will/can put you own twist on it to suit you.
As for sewing in the liner - I usually don't bother attaching it in any way as they all seem to stay put with no effort - but it's up to you. Stay away from the el cheapo hot glue as it can ruin the felt in the long haul.
Lastly - I use the brim flange to shape and curl the brim using spritzing water and smoothing out the brim for the fresh curve.
Now there are other methods which are much simpler involving smaller sized blocks than the original hat size, but it simply won't look as good as a complete overhaul.
What are you looking for?
Next you can either wet the hat or soak it to the core.
You will need a hat block that you are satisfied with the shape of, a good iron and a brim flange.
Pull the body over the block and make sure it forms completely around the block with no gaps. This is also the time you will find out if you have quality felt or a piece of @#$% as the latter MAY rip as you pull the hat over the block - use great care or you will ruin the hat beyond repair (trust me I have ruined a few cheapo hats this way by accident). I use the brim flange to assist in this step for two reasons:
1. To ensure there is enough brim left as felt tends to shrink once it's wet.
2. To start the brim break.
Once I have enough brim for size - I use an iron to establish the brim-break at the bottom of the crown. After the felt is completely on the block you need to let the felt dry and "set" on the block for about a day or at least overnight to establish the new memory of the shape.
After the felt is completely dry you can remove the hat from the block, if necessary, I run a dull knife between the block and the hat to loosen it enough to pull the hat off.
Now comes the hard part, sewing the sweat, ribbon and as some do the liner back on the hat. I have cussed and fussed more about these steps but it does get easier each time you do it.
There are several methods to sewing on the sweat - el cheapo method like HJ right at the brim break or flipping the sweat and sewing the thin ribbon about 1/4" up from the brim break - there are some real artists around here who get this just perfect, Marc and Steve for example. I re-use the existing sweat if possible or there are several places online to order new raw materials for a new one. I will leave that up to the experts to pass along.
Orient the sweat with regard to front and rear of the body. Starting in the back - start sewing a "guide" thread with long 1" minimum stitches - use a bright colored thread like white as this will be removed later and it makes it easier to see which thread to cut. After you have your guide thread in check to see if you have the sweat positioned correctly - if not start over and get it perfect now as opposed to later. Next, start sewing in your permanent stitched with thread matching the color of the hat. I try to keep my stitches about 1/4" apart the whole way around the hat. Don't be afraid to start over as if it isn't perfect now, it never will be. Flip the sweat up into the hat periodically to ensure your stitches are not too high or low and the "bead" of the sweatband doesn't sit too high or low.
After you have your sweat in and perfect cut the guide thread and remove it.
The next part is the ribbon. There are several great tutorials online that will get you started (here is a great one: http://www.dalexs.whitvani.net/hat/hatpage.html ) - but you will/can put you own twist on it to suit you.
As for sewing in the liner - I usually don't bother attaching it in any way as they all seem to stay put with no effort - but it's up to you. Stay away from the el cheapo hot glue as it can ruin the felt in the long haul.
Lastly - I use the brim flange to shape and curl the brim using spritzing water and smoothing out the brim for the fresh curve.
Now there are other methods which are much simpler involving smaller sized blocks than the original hat size, but it simply won't look as good as a complete overhaul.
What are you looking for?
Last edited by Fedoraman on Tue Mar 06, 2007 2:07 pm, edited 2 times in total.
-
binkmeisterRick

- Stealer of Wallets
- Posts: 16926
- Joined: Thu Mar 11, 2004 3:22 pm
- Location: Chattering with these old bones
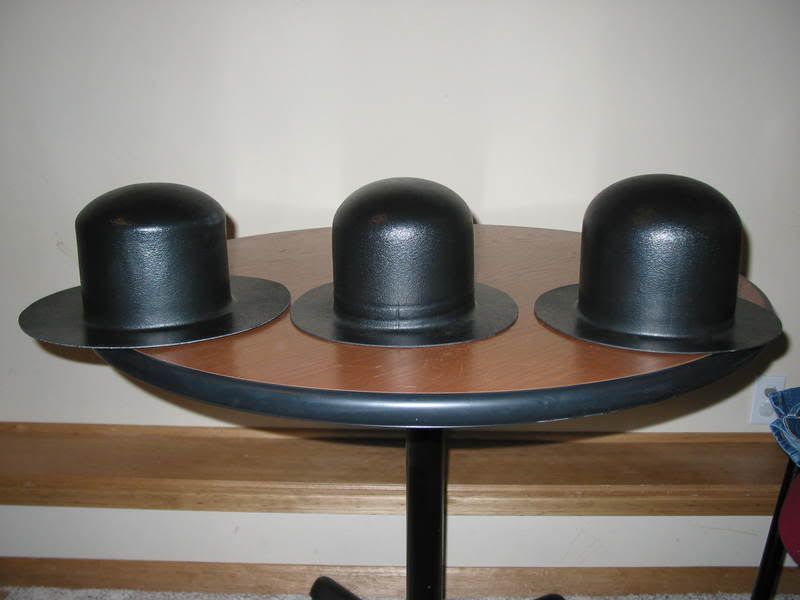
You can either make your own block, which some have done using varied creating methods, you can find old blocks on eBay or in antique stores (though if you're after a Raiders block, it'll be rare to find the right block since there are many block shapes), or you can have one made by a block maker. In another thread long ago, Fedora supplied the name of the guy who made his blocks to his exacting specs. Can't remember the guy's name off the top of my head. Hatmakers (I believe) also make reasonably priced plastic blocks. I think someone around here even worked with them to design a basic Indy style block, though they may only come in S,M,L.
Keep in mind that you might also want a flange to iron the brim after blocking. This essentially is a wood "donut" which allows the crown to rest inside it while you iron the brim into its basic shape.
Keep in mind that you might also want a flange to iron the brim after blocking. This essentially is a wood "donut" which allows the crown to rest inside it while you iron the brim into its basic shape.
-
Fedoraman
- Archaeologist
- Posts: 225
- Joined: Tue Mar 30, 2004 2:32 pm
- Location: Hanging off the edge of a cliff...
www.Hatshapers.com
They make reasonably priced very sturdy abs blocks. They will also work with you to make EXACTLY the shape you want.
They make reasonably priced very sturdy abs blocks. They will also work with you to make EXACTLY the shape you want.
Last edited by Fedoraman on Tue Mar 06, 2007 11:34 am, edited 1 time in total.
-
binkmeisterRick
- Stealer of Wallets
- Posts: 16926
- Joined: Thu Mar 11, 2004 3:22 pm
- Location: Chattering with these old bones
